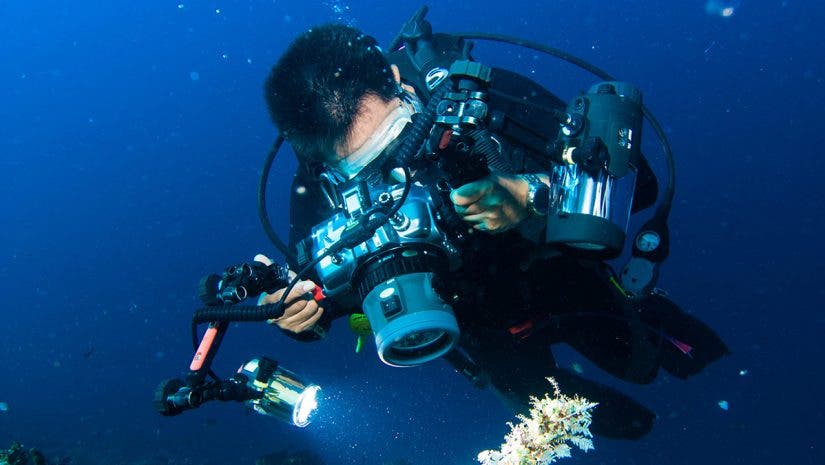

If you’re looking to capture high-impact underwater photography without the backscatter, an ultra-wide lens and closeup photography are your secret weapons.


Top: This is one of my favorite underwater photos of a brown booby investigating his reflection in the super-domeport when using my Canon 15mm fisheye lens. Canon 5D in a Seacam housing. Above: This image was shot in Papua New Guinea of a coral cod resting in a sponge formation. The fact that the 15mm fisheye can get close and show the “big picture” is an advantage of close focus wide angle (CWFA, as we pros call it) underwater photography.
 Many years ago, one of the most fun and challenging formats in underwater photography was using the trusty underwater Nikonos camera with the 15mm wide angle lens. Today, using my DSLR (Canon 5D Mark II, available at Adorama) in a Seacam underwater housing, this is still is one of my favorite set-ups. For beginners, this may be something you may want to wait on until you get a little more experience with a medium wide-angle lens. Where the medium lenses can give you a pleasing scene, it’s the ultra-wide angle lenses that create drama.


Whatever system you use, the idea is to get close, but do know your animal behavior! Top: The moray eel was not agitated at all. He was curious about the dome port. I was only about a foot from his face and still captured the scene. Canon 5D Mark II with 15mm f/2.8 (Although the Canon 15mm f/2.8 has been discointinued, Sigma makes a 15mm f/2.8 lens in Canon Mount. Read on to see which lens I’ve been using lately!) Above: My task was to shoot a vertical image. Not as easy with the strobes….read on! Wobbegong shark showing mobula rays in the distance.
Lenses
What lenses are out there that can capture the ultra-wide scene? The first question to ask when looking at brands and width is “how close does it focus”? That is because in underwater photography the mantra is “Get close – then get closer”. The less water you have in between your lens and your subject, the better your chance of avoiding backscatter. The clarity of the subject is also heightened especially if the visibility is not at its best. It is very important to get as much contrast and detail as possible to maximize the impact to the viewer, especially if it is a dynamic subject!


Both of the above images were shot with the Canon 15mm fisheye. Your composition/position will determine just how much barrel distortion shows up. The closer to the edge of the frame the straight lines are, the more bend you will get.
My favorite lens is a fisheye. For CFWA, it is the lens of choice for both DSLRs and compact cameras since they are unmatched when it comes to focusing very close. The Nikon 10.5mm f/2.8G ED-IF AF DX Fisheye Nikkor lens, available from Adorama, is designed for cropped sensors; The Tokina 10-17mm lens is available from Adorama in Nikon and Canon mounts. I have used the Canon 15mm f/2.8 fisheye lens (discontinued, alas) for years. The most crucial part of lens selection is what works well with your camera body and the proper dome port!

Sometimes it’s just fun to experiment with the curves that show up using a fisheye lens. Canon 5D Mark II, Seacam housing, Canon 15mm f/2.8 fisheye lens and dual strobes.
The lens behind a dome port does not focus on your chosen subject as it does with your terrestrial ones. It is a virtual image about 9 to 12 inches in front of the port. What the heck is a virtual image?
Wikipedia says it is an optical image is formed from the apparent divergence of light rays from a point, as opposed to an image formed from their actual divergence. Translation: In underwater photography, the camera sees the image much closer than it really is. You can test this out by manually focusing your wide-angle lens about 5 feet in distance on a topside subject, then taking it in the water and photographing a subject at the same distance. The result will be that your underwater subject will be blurry.


Wrecks make the perfect subject for close focus wide angle. You can capture the entire scene and only be a few feet from the bow. Then you can head to the interesting areas, such as this wheelhouse, and get vibrant colors of encrusting sponges and fish life. I made sure my strobes were at the 3 and 9 o’clock position with diffusers on them to help spread the light more evenly.
Another thing to consider is that just because a lens may fit behind that dome port you recently purchased, it doesn’t mean that it will give you a sharp image or eliminate vignetting. It is imperative that you follow the housing/dome port manufacturer’s recommendation for the port and/or any spacers.
Exposure
Set your mode to manual! Why? It will be impossible to get the right exposure for the background, especially the water column, and your subject. The shutter speed controls the background while your strobes will light your subject. I tend to use my spot meter and measure off the blue water, then check the histogram on the back of my camera for correct exposure. If the background is too bright, use a faster shutter speed and vice versa.
Depth of field will play an important part in CFWA. Use an aperture of f/8 or smaller. Typically, with bright ambient light on my full frame sensor SLR, the best results are achieved at f/11-16. You may be a bit restricted with a fixed lens compact system and wide-angle adapters since some are set with f/8 as the smallest aperture. I usually set my aperture and leave it on a dive then make my adjustments to the background via shutter speed. I can light my subject using techniques in the next section.


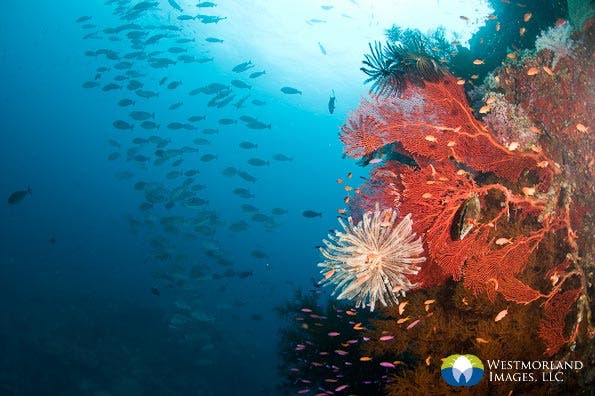
Both of these images were shot by metering off the mid-toned blue water first. Once that was determined, it was a matter of adjusting strobe power and positions to light the subjects. One area with the shark and sponge was lit directly, where the seafans had to have the diffusers on the strobes and set at full power due to their light-absorbing qualities.
Foreground-Subject Lighting
Strobe power and position is the all-determining factor in successful CFWA. For many years, the thought was to have strobes placed on very long arms quite a distance from the port. This was great for large animals, but did not properly light a very close or smaller subject. Dual strobes are important but you can also get away with using just one. My strobe arms are set up using two on each side but not so long that I can’t pull them in tight to the housing. Many times, strobes on longer strobe arms will over-light the sides of the image, leaving the subject in the shade. Of course, if they are too close to the dome you might see some backscatter.
Pull those strobes back and behind the dome or housing to avoid flare. Using diffusers will also help spread the light with a softer wash over a larger area. However, if you are as close to the subject as the lens allows—in some cases only inches—then you will most likely have to reposition your strobes to provide more light directly on the subject. This can be tricky and you will have to experiment a bit. Shooting horizontals is the typical format people use in this case. Placing the two strobes on either side of the port (at 3 & 9 o’clock) and slightly pulled back while pointing straight ahead is a good starting point. You may want to point the strobes slightly inwards when the subject is less than one foot from the front of the dome.


Both shots using the 15mm fisheye and only about a foot from the subject. Because the turtle (top photo) was at the surface of the water, only a tiny amount of strobe power had to be used to light up the details of the face and underbelly. (ISO 200, 100 at f/11 with strobes at ¼ power) The barracuda (above) is a very reflective subject, so I also had to dial down the strobes to ¼ power.
Don’t forget to try vertical formats!! This requires a little more practice with strobe placement. A common problem that occurs if the strobes are left at the same position (now in the 12 & 6 o’clock) is the bottom strobe will put too much light on the subject and look a little unnatural. Ambient light comes from above, not below. It is also common to impede your ability to get low enough to the subject since the strobe is in the way. Move the strobe to either the 12 & 9 or 12 & 3 o’clock positions.

Shoot both formats—vertical and horizontal!
Strobe power is another crucial decision. I use my Ikelite DS 161 strobes, available from Adorama, which have power settings that are easily accessible. I may use full power on a light hungry soft coral or seafan, then dial down the strobe to 1/2 power or less for a smaller subject that is only inches from the front of the dome port. The brand of your strobe can also determine just how much power you want to use. I have found the only true way to know for sure is to get out there, find a static subject such as a sponge, nudibranch or other inanimate creature and practice using all the setting choices you have.


Placing your strobe can be a challenge to get the light to look normal—that is, from overhead. Also watch for shadows created by other objects blocking the light direction from the strobe. The above sequence shows the effect of moving strobes to provide more natural-looking light. ISO 320, 1/60th second at f/8.
Practice on static subjects! Exposure: ISO 320, 1/60th second at f/8. I dialed down the strobes to ½ power because the background was light.
Earlier, you heard me say that over the years, I’ve used the Canon 15mm f/2.8 fisheye lens. Well, I put her to rest a couple of months ago-not that she wasn’t a good performer! My new toy is the Canon 8-15mm f/4.0L USM Wide Fisheye Zooom Lens, available at Adorama. What I have discovered is that in combination with my very small glass dome port and its ability to focus frighteningly close, the images are very dramatic. I’m still in the experimental stage and lighting is an ongoing learning curve. But the fact that I can get into tight spaces with such a wide view is amazing. I have been using the lens from the 13-15mm range because I really don’t care for the vignette that is produced at the wider zoom settings. The best part? My subject is tack sharp. Don’t worry if this was a lot to digest; I’m sure to revisit this subject in a few months.

What in the world does this have to do with underwater photography? It’s the only image I had in my files that shows what the new Canon 8-15mm fisheye lens does when it is shot at its full fisheye capability—8mm!


Shot with my new Canon 8-15mm zoom fisheye lens. It is amazing how close this lens will focus and with the tiny dome ports designed by the housing manufacturers, I can get just inches from the subject. In these shots, I am about 2 to 3 inches from the nose of the frogfish. ISO 200, 1/60th second at f/10.


This beautiful little epaulette shark is only a couple of feet long. I could photograph the entire scene and get within inches of the shark. ISO 320, 1/200 second at f/8.

This is where the fisheye lens excels. I was able to tuck into a lava tube and instruct my model to swim to the opening. Canon 5D Mark II with a Canon 8-15mm fisheye zoom lens in the Seacam housing with the tiny fisheye dome port. Even your compact system will be able to capture interesting images because it’s small. It’s a great advantage. ISO 200, 125th second at f/10.
For now, here are a few quick tips to summarize what I’ve been talking about:
- Check your options for fisheye lenses and look at the available wide angle adapters for compact cameras.
- Get close—then closer! I can’t emphasize that enough.
- Look for an interesting background.
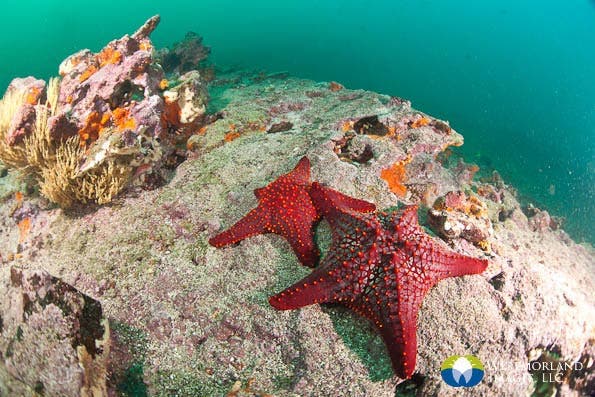
- Start with a prominent subject, such as a large starfish or shapely sponge. Then you can move to more complicated foreground subjects.
- Think about what would be a more pleasing format for the subject and scene (vertical or horizontal) but don’t limit it. Shoot both ways.
- Don’t center your subject in the frame. Always remember the “rule-of-thirds”.
- Experiment with strobe power and the use of diffusers.
- Experiment with strobe positions.
- And once you get that down – think about adding your dive buddy in the background.
- If you are using a camera such as a Canon G9 or G10 or newer model with a dome port, make sure your camera is in macro mode. If not, it’s back to that old “virtual” image issue and your subject will be out of focus.

Don’t let close focus wide angle frighten you away. I’m in love with the technique. This image was from my recent assignment for Sport Diver Magazine on the cenotes of the Yucatan in Mexico. If it weren’t for the ability to get tight, not disturb the talcum powder-like silt and have a sharp focus, this image would not have been done. ISO 320, 1/60th second at f/13.