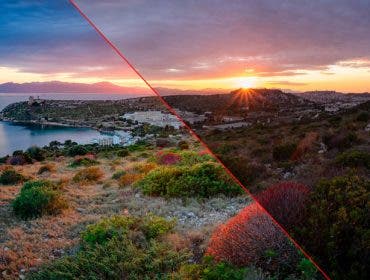
In the days of film photography, vignetting was a popular method of creating separation between the actual image and the white border surrounding a print. Photographers in the dark room would deliberately burn-in the edges to create a more defined border to keep the viewer’s eye within the frame and give their photographs a sense of completion.
But what exactly causes this effect and why does it happen on its own in digital photography? We’ll address the different types of vignetting in your images and get you started on how to correct or adjust them in this guide.

What Is Vignetting?
A vignette is a darker border on the edges of your photographs. Vignettes generally occur in the parts of the image closest to the corners. Many photographers like vignetting and deliberately add it in Adobe Photoshop or Lightroom. But there are a few reasons it happens on its own in digital photography.
What Causes Vignetting?
Here are the most common culprits that cause vignettes.
Mechanical
Mechanical vignetting occurs when something physically blocks the path of light rays before they can enter the camera lens and hit the image sensor. Lens hoods, stacked filters in front of the camera lens, and extension tubes all block light at the edges of the frame. This results in a vignetting effect.
Natural
Natural vignetting occurs because of the law of illumination falloff. Essentially, the vignette effect is caused by the angle of light entering the lens aperture and hitting the sensor. If the light enters perpendicular to the sensor, then vignetting isn’t a problem. But if the light enters the camera lens at a more pronounced angle, then the light falloff causes a vignette. Natural vignetting is generally more gradual and less visually obtrusive than other varieties of vignette.
Lens
Lens vignetting is caused by the physical size of your camera lens. The longer the lens barrel (practical physical length rather than focal length) or the more internal lens elements the light must pass through, the stronger the effect. Lens vignetting is more common with telephoto lenses.
Deliberate Effect
Many photographers enjoy a vignette on their images. Vignettes help define the border of the frame, draw the viewer’s eye to the subject or center of the image, and provide a pleasing visual quality. Some photographers create deliberate vignetting with filters or in post processing.

How to Remove Vignetting
If you’re not a fan of vignetting or you want to have more control over the size, shape, and intensity of vignettes on your images, there are a few quick solutions to consider. While you could certainly crop the edges of your photo to remove a vignette, you’ll also lose visual real estate, so it’s not the best method of correction.
Remove Vignetting in Lightroom
Lightroom is perhaps the easiest post-processing software for dealing with vignettes. If your lens caused the vignette, you can solve it by clicking Enable Profile Corrections in the Lens Corrections panel in the Develop module.
As long as Lightroom recognizes your lens, it will have a pre-programmed calibration profile for your specific lens. If you want to take the vignette reduction further, you can use the Vignetting slider at the bottom of that panel.
Sometimes, lens profiles are missing from Lightroom. If your lens is brand new to the market, you may need to update Lightroom to download new lens profiles. If your lens is uncommon or vintage, then you’ll have to use an alternate correction method.
The easiest alternate way to remove a vignette is by using the Effects panel. Under the Post-Crop Vignetting settings, drag the Amount slider to the right to brighten the corners and edges of the frame. You may need to play with other sliders like Midpoint, Roundness, Feather, and Highlights to get the exact look you prefer.

How to Add Vignetting
If you like a vignette in your images, adding one in Lightroom is relatively easy. In the Effects panel, slide the Post-Crop Vignetting Amount slider to the left. Finally, you should see the corners and edges of your frame start to darken. Keep in mind that a little goes a long way, but just play around with the other sliders in that section until you’re happy with the results!


