Those of us who don’t lug view cameras around get perspective distortion in our subjects whenever we point the camera up or down (even slightly) or diagonally towards a flat surface.

A typical example is the vertical lines of a building leaning in toward the top. Most such images, whether architectural or nature subjects, to look better with the distortion removed, which is why view cameras have been used for serious photography. The front element holding the lens could be tilted and shifted up, down or sideways to correct perspective and alter the plane of focus. There are tilt-shift lenses for Canon and Nikon SLRs, but they are less versatile than our everyday zooms because they are fixed focal-length and manual focus. Those of us who can’t justify the cost or weight of another lens for specialized use can repair perspective problems in Photoshop.
When I shot this building, I was relatively close to a large subject. I could have reduced the distortion by shooting from farther away (with a longer lens), but that wasn’t possible. (I’m using Adobe Photoshop CS3, but the distortion features I will use have been in Photoshop for a long time. Some other image editors may also support distortion. Of course, menus will be different in different programs and versions, and I’m speaking Windows here. If you use a Mac, substitute Cmd for Ctrl.)
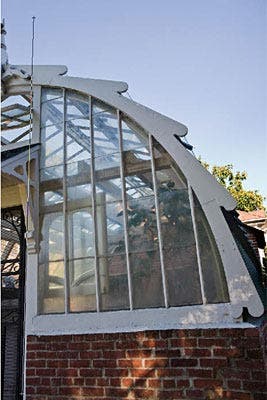
An optional first step is to rotate the image to get a major vertical line square to the frame. I chose the left edge of the door trim. The image can be rotated very accurately using the reading from the Ruler tool, which is nested under the Eyedropper tool in the Toolbar. (Tools with others nested have a small triangle in the lower right corner of their button.) Touch the mouse to the Eyedropper for a second and the other tools pop up. I clicked on the Ruler tool and drew a line along the edge of the door frame from top to bottom as shown at right. Then I went to Image > Rotate Canvas > Arbitrary. The angle shown will be the angle that will bring the line I drew to vertical. (If I had used a near-horizontal line instead, the program will guess that I want to rotate to make it horizontal. This is how you level a crooked horizon.) The rotated canvas is shown below.
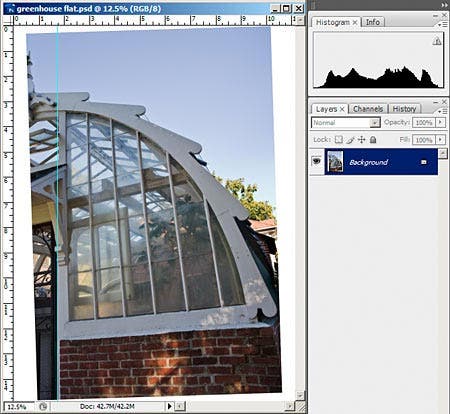
You can toggle Rulers along the left and top edge of the image window with Ctrl-R. I moved the cursor into the vertical ruler and clicked and pulled into the image to pull out a vertical guide line to check the accuracy of the rotation. To get rid of the guide I can either push it back into the ruler while I still have “hold” of it, or, if I have let go of it to make a guide line, as I did in the image above, I need to choose the Move tool and move the cursor over the guide line until it changes to an icon that appears to grab the guide. I can then click and push it back into the ruler (if the Rulers are toggled on) or just drag it out of the image window.
Although this squaring-up step isn’t strictly necessary, after some part of the image is squared you can more easily deal with the remaining perspective distortion. But you can’t distort the Background layer. You first have to turn it into a regular layer by double-clicking it, or you can make a duplicate layer by pulling the Background layer to the icon at the bottom of the Layers palette that looks like a piece of paper. I chose to do this so I could have the “before” and “after” preserved in my master file. If I later decide I don’t need the “before,” I can always delete that layer.
With the duplicate layer as the active one I went to Edit > Transform > Distort. This places corners on the layer that I can move, but I need room to pull them out. To get this room I first needed to make the image window smaller with Ctrl-(minus), because it was maximized to fill the Photoshop workspace. Then I grabbed a corner of the image window and pulled on it to enlarge it, as shown below. This enlarges only the window, not the image, giving me gray space around the image instead of having it flush with the window edges. I can now see and pull the corners of the distort box. (If needed, I can move the entire window in my Photoshop workspace by grabbing its top bar.) I want the image as large as will fit on the screen in order to work more accurately.
Then I pulled the two top corners horizontally until the window dividers were vertical. I had to go back and forth several times since pulling one edge out distorted the lines near other edge. To keep from moving the corners up or down I held down the Shift key. Then I pushed the lower left corner up to straighten the horizontal lines near the bottom.

(Instead of Transform > Distort I could have used Edit > Free Transform, but I have more precise control over one edge at a time with Distort. I can’t use Transform > Perspective here because I need to distort the two edges different amounts. If the image had been symmetrically distorted I could have used Perspective. It lets you pull one corner and the opposite one moves a corresponding amount.)After juggling the two corners of the image to my satisfaction, I hit Enter to finalize the changes. The seemingly detached brick area at the bottom is the original background showing under the Background Copy layer.
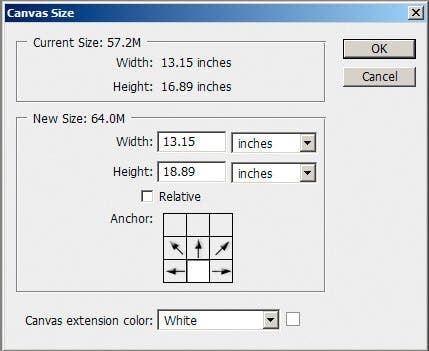
I toggled the visibility of the Background copy layer off and on to compare before and after. Then I turned off the Background visibility to get an accurate view of my new layer, as part of the original Background sky showed behind my distorted layer and was the same color and tonality as its sky. I don’t want a piece of the original Background getting visually confused with my new layer. The distortion has made the building look too short so I need to stretch the image upward. I could have stretched it while doing the Distort transformations, but I can do it more accurately in a separate step, using the Scale function. But this will pull some parts of the image out of the visible canvas area. To see them I needed to enlarge the canvas. I went to Image > Canvas Size and guessed at an amount. If it is too much I can crop back, and if too little I can add more. Here I added two inches to the height and width. Then I went to Edit > Transform > Scale and grabbed the top center and pulled it up. How much to move it is a judgment call.
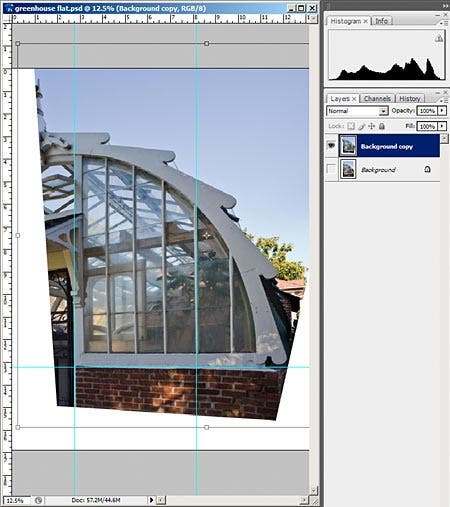
I pulled the top of the sky beyond the visible “canvas” window, but it is still there until I crop. If I want it back, I need to do another Image > Canvas size and enlarge it more in the vertical dimension. I can click in the bottom of the nine boxes to enlarge it only at the top edge. You can see that I have added another two inches to the height box, compared to the Current Size (the “before.”)
The next step would be to crop back to a rectangle. If the original image was too tightly framed, the trick of enlarging the canvas allows you to gain some breathing room by cropping to a larger image that includes some of the white area, as shown below, and then cloning in some information to fill the white.

Perspective correction is very simple. You can’t do it on the Background layer, so either double-click it and turn it into a regular layer or make a copy layer above it. An optional first step is to rotate the canvas to get some major feature as close as you can to proper alignment before you do any distortion. Make the image window small enough so you have room on the screen to pull out its edges to leave some gray space around the image. Then do Edit > Transform > Distort and make your corrections. Turn on the Rulers (Ctrl-R) and pull out guides as needed to help get things straight. Then enlarge the canvas to see what you pulled out of the image window and decide where to crop and if any cloning is needed. That’s all there is to it. If you’re lucky, everyone will think you have a view camera!
Diane Miller is a widely-exhibited freelance photographer who lives north of San Francisco, in the Wine Country, and specializes in fine-art nature photography. Her work, which can be found on her web site, www.DianeDMiller.com, has been published and exhibited throughout the Pacific Northwest. Many of her images are represented for stock by www.MonsoonImages.com.


