Selecting parts of an image in Photoshop is one of the most important skills you can develop. Whether you are going to replace an area or use the selection to limit any adjustments, learning how to make clean selections is key.
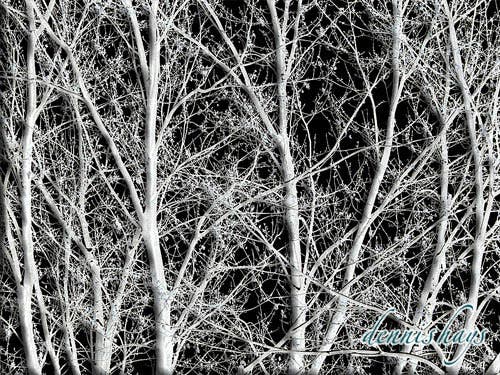
When I got my first digital camera, a five-megapixel Olympus E-20n, I fell in love with the possibilities. One of my first images was taken in late November, of a tree in my backyard. It was a cloudy, gray day, and the resulting image didn’t thrill me; it had low contrast and was really not interesting. That image languished in my computer for a few months until sometime in February, during a snowstorm, when I opened it while speaking to friend on the phone. I wasn’t trying to do anything specific, but somehow, I manipulated the image to a point where I started to see its potential.
Getting the image to match my vision required removing the fall-weather light gray background and replacing it with black, thereby giving the branches some depth. Ten years ago, all I knew how to do was use Photoshop to erase what I didn’t want over a black layer. I spent hours and hours meticulously removing the little bits of gray sky, pixel by pixel.

Silver Maple in Winter Dress: This took me hours to complete by just using Photoshop.
© Dennis Hays
Had I used the Photoshop plug-in OnOne Software’s MaskPro 4, what had taken me days could have been accomplished in minutes.
Masking without plug-ins: Doing it the hard way
Okay, my image was an extreme case, but, from time to time, photographers want to select part of an image so they can creatively adjust that part (or parts) or replace it with something else. Usually, this is done with a mask—a mask which either prevents alteration or allows it (a mask consists of just solid black or solid white, which either covers to prevent or allow adjustments–we’ll stay away from using gray, for now). With Photoshop, the pen tool (and other tools) is used to outline a portion of the image and create an “alpha” channel for the mask. The mask can then be used at any time for that image. A mask allows the same selection to be used more than once and can be saved.
Traditionally, without the use of plug-ins, you would have to spend considerable time tracing the edges. More recently, Adobe has made it somewhat easier with the complement of “magnetic” tools which, in most cases, hug the edge, providing there is enough contrast to discern an edge. And, should you want to trace around diaphanous objects and see the new background through it, such as a bride’s veil, good luck.
Enter Mask Pro 4

As a Photoshop survivor, I’ve made many a selection, and I’ve been lazy enough to just use the magic wand tool and take the easy way out. There are many photographers with exceptional photographic skills but limited Photoshop abilities. Mask Pro 4is designed to be easy enough to use that the basics can be learned in a few minutes with the video tutorials on the onOne Software site.
Recently, I had an opportunity to use onOne Software’s Mask Pro 4 on a few of my images. Mask Pro comes in two flavors; one to remove unwanted portions of an image for replacement and another (Mask Pro Select) to create masks for local area adjustments.
Choosing wanted and unwanted colors is the most-used method and edge selection, using pen tools similar to Photoshop’s on higher contrast images, with clear and well defined edges, is used less. The tutorial states a figure of 90% for choosing keep and drop colors.
To start Mask Pro, open an image in Photoshop (version CS2 or better or Photoshop Elements 4, 5 or 6), make the background layer into Layer 0, so it can be modified, and load an image for the background layer under the original. Select the foreground layer and open Mask Pro 4 by clicking on the OnOne menu item (added when you install Mask Pro 4 or the Plug-In Suite) and select Mask Pro.
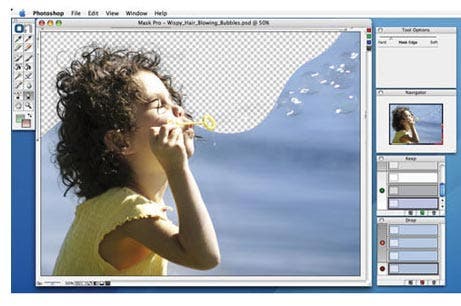
Photoshop minimizes and Mask Pro opens with your image. The basics of using Mask Pro are quite simple. Use the green eye dropper to sample the colors you want to keep. Then, use the red eye dropper to select colors to drop. These should be different as Mask Pro calculates the difference between the colors to determine the keep and drop colors.
As the tutorials suggest, working on portions of the image at a time is the most efficient method. You can keep using the original selected colors as you go from one part of the image to another and you can remove and replace colors as needed.
Now, use the Magic Brush to remove the unwanted portion of the image by erasing the drop colors. You don’t have to be precise with the brush as it will erase only the colors you selected to drop. As you may expect, this works quite well in detailed areas, such as hair and tree leaves.
When you complete the procedure, it may look good to the eye, but not be as precise as you’ll want. In fact, had you just used Photoshop’s tools to remove the unwanted portion of the image, you would get to this stage, albeit quite a while later.

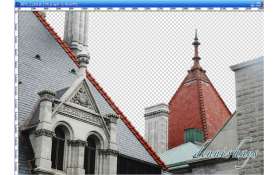
Mask Completed in minutes: New York State Capitol Building, Albany, NY
At the bottom of the Mask Pro window, there are six buttons representing five different view modes: 1 – Original Image, 2 – Preview with a solid color background (any color), 3 – Transparent (shows background as transparent), 4 – Mask View, 5 – Clean Up Mask View and 6 – Composite (shows your working layer on top of the background layer arranged prior to going into Mask Pro.
The Mask View and Mask View Clean Up are the real stars and it’s here, in my opinion, where you can get down to the nitty gritty and make certain you have the most exacting selection or mask.
What you want in a mask are clearly defined areas of black and white. Anything but black or white can allow some transmission of background to show through and that’s what you don’t want. So, the Mask View Clean Up mode enables you to take a brush and “paint” keep (white) or drop (black) directly on the masks.
When satisfied you have the mask or the cutout complete, pressing Apply puts you back in Photoshop with the selected layer now modified by Mask Pro 4.
I have spent hours in Photoshop, making masks and selections, some easier than others, but none as easily and quickly as I did in Mask Pro. One more important item: Many times, when you do image replacement, the top layer, with the foreground image has a halo around the edge. Mask Pro 4 has both a chisel tool and a blur tool to minimize and/or remove the halo. The chisel removes a small amount of the edge containing the halo and the blur tool, if needed, softens the edge to minimize the halo or chiseled edge.
What I’ve described above are the basics of using Mask Pro 4. There are some other tools and adjustments to enhance the operation of creating selections or cutouts, but the tools I’ve described are the ones you’ll use most often.
Mask Pro 4.1 currently costs approximately $130. While you can download a 30-day demo, I highly recommend purchasing onOne Software’s Mask Pro as a “must have” addition to your kit.


