Now is the time to add another piece of equipment…or two!
Underwater flash systems are a critical part of photographing marine life and get the contrast and color back into the equation.
 My equipment of choice for the accompanying images is:
Canon 5D or 5D Mark II in a Seacam Housing with Ikelite DS 160 strobes.
Lens choice for these shots: a Canon EF 15mm f/2.8 fisheye or the Canon 16-35mm f/2.8L II USM ultra wide-angle zoom lens.
- See Adorama’s complete range of underwater housings.
- See Adorama’s complete range of underwater strobes.

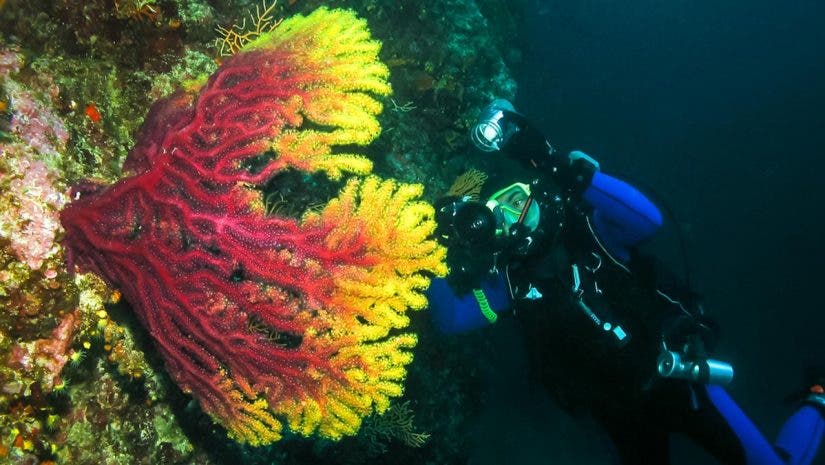
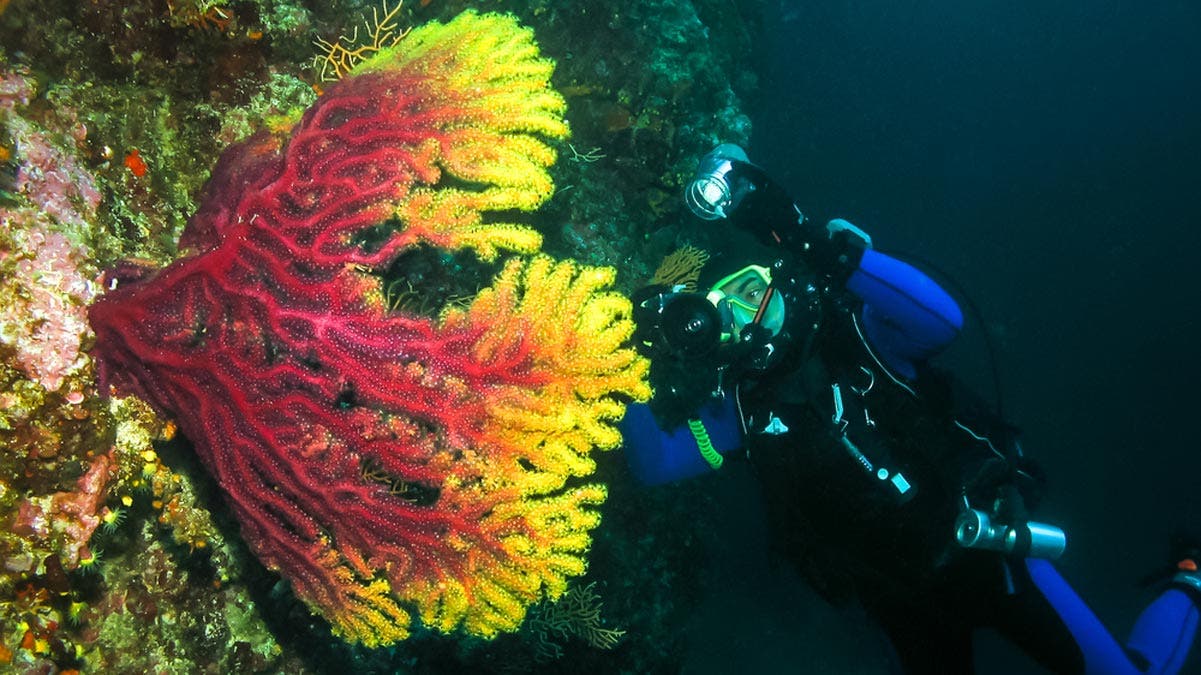
Get all the color you can with strobes. Lens: Canon 16-35 zoom at 40mm, dual strobes
In the early days, underwater photographers had to use flash units and either carry or have complicated charts glued to the flash that provided methods for calculating exposures. The different combinations of ISO ratings, distance and f-stops made it just a bit time consuming to create a pleasant image. And time is a part of our diving experience that we just don’t want to waste!
The good part of digital underwater photography is that we can use electronic flash units that can sync with the camera for TTL (through the lens) exposure, or utilize the LCD to view what we shot and make adjustments from there. Those adjustments can be done by changing the f-stop, ISO rating, or by the power setting on the strobe.

There are several manufacturers of strobes, all of which are available at Adorama. If you have a point and shoot system that has a dedicated flash built into the camera, you will be seriously limited as to its use. I don’t recommend these types of cameras/flashes for obtaining high quality images. They are handy for shallow water and snorkeling “happy snaps”.

Here I am with my Seacam housing for Canon 5D Mark II with dual Ikelite strobes. You’d think the system is larger than me!
Manual, Auto and TTL
Using the dial provided on your strobe, you can regulate everything from a portion of the power to full flash “dump”. Strobes work by discharging light at various power settings. Technically, each power setting relates to a flash duration—the amount of time the bulb emits light—rather than a lower power emission of light. Generally, strobe duration is somewhere close to 1/1000 of a second, far shorter than the time your shutter would normally be open. The lower the power setting, the shorter the flash duration. Note that under ordinary circumstances, your camera and strobe can only sync at certain shutter speeds.
Strobes must recycle after each discharge. Recycle time is an important consideration when selecting a strobe. When a strobe recycles, the batteries transfer a high voltage charge to a capacitor, which dumps the charge into the flash tube when triggered. This is no different than the strobes used by studio photographers, only ours are waterproof.
Many manufacturers offer quite a selection of power settings. In the days of film, photographers still had to use a guide system and bracket with several exposure and power settings. With digital, we can view the results instantly and make the necessary adjustments.
Automatic Exposure mode may or may not be adequate for your images to realize the perfect exposure. The units use a sensor inside the flash head to calculate exposure. It depends on the information that it is given from the camera. A better way, if your camera body and strobe permits is TTL (through the lens). The output is controlled by the ability of the equipment to communicate properly. The message to the strobe is that when the camera sees enough light to the sensor to provide for proper exposure, it shuts the flash down.
You can override this, if necessary, by using the flash-compensation control found on most advance point and shoot and SLR cameras. If you need more light, then adding a plus compensation and vice versa – minus compensation give less flash. Using TTL does have its limitations. For a wide angle scene, you won’t necessarily get a proper reading off the subject. Another thing to consider is with digital, it takes less light to properly expose a subject. My recommendation is to test your strobe or strobes and see what gives you the desired results.

Dual strobes set at ½ power. 15mm fisheye lens
Strobe Connectivity
Obviously, in order for external strobes to sync properly with the camera body, they need to be connected through the use of a sync cord. There are two main ways to connect your strobes – hard wired sync cords and fiber optic cords. Up until recently, the standard way to connect any camera with a hot shoe was with hard wired sync cords, which are electronically connected to your camera by a cord to an electronic bulkhead located near the top of your housing. Recently, however, many housings now come standard with fiber optic bulkheads, which transmit light from the camera’s internal flash to the strobe via a fiber optic cord.
There are benefits and disadvantageous to each connection type. The electronic connection of hard-wired sync cords means that you do not need to use your cameras internal flash, which has a slow recycle speed and drains battery life. However, these cords are both fragile and expensive. A small kink is enough to break the internal wires, so pack them carefully in a padded container. Additionally, because the bulkhead uses electronics, the hard-wired sync cords require o-rings to create a watertight seals, meaning that there is the potential for floods.
Fiber optic cords connect to the outside of the housing, so there is no potential for leaks, and they eliminate the need for extra o-ring maintenance. This also means that you can remove your strobes without worrying about salt water corroding any electronics, which is nice if you decide you want to hop in the water at a moments notice without the burden of cumbersome strobes. The downside of fiber optics is that they rely on the camera’s internal flash, which drains battery life and is slow to recycle. If you are trying to shoot on continuous drive, the internal flash’s slow recycle speed will slow you down significantly, where as strobes connected electronically usually wont you limit you at all.
Note that some cameras are limited to one type of a connection. Many compacts don’t have bulkheads, and therefore strobes can’t be synced electronically. Additionally, many full frame cameras don’t have built in flashes, and therefore, there is no way to sync your external strobes to your camera via fiber optics.
These cords connect to the housing and sealed with “o” rings where the connectors inside the house attach to the camera body. These cords can be bulky and get in the way but once you are used to them, they just become part of the system. Care and maintenance is extremely necessary. They can flood into the wiring if the “o” rings are not properly greased according to the manufacturer directions and if kinked too many times, the internal wires can be broken. Pack them carefully in a padded container or small plastic food container .
Communication for TTL can be a problem with some strobes and camera systems. Make sure when you make your decision on purchase that all “talks to each other”. I have Canon equipment and Ikelite strobes so my safest solution was to purchase a Heinrich circuit board so that I get as many functions from my strobe as possible such as rear curtain sync. This will be discussed in a later chapter when we talk about getting creative.
Flash units can run off of AA’s, C/D cells or manufacturer battery packs. The most important message here is to make sure you have backups – one set that be charging while you are using the other. This is also important if you happen to have a flood in the battery compartment or a failed backup. We spend way too much money for travel and it would be painful not to have backups. What goes for batteries, goes for strobes. I carry a spare when on a long distance trip.
Using single strobe
I’ve always admired the ability of Roger Steene, an Australian photographer, who has mastered the use of a single strobe and still achieves absolutely fabulous images. You certainly wouldn’t know a scene was lit with one strobe when you look at it! However, most of my pictures with a single unit only provide a harsh shadow on the opposite side of the subject.
Using a single strobe in a close-focus wide-angle shot works perfectly fine since you would only be able to light the subject matter closest to the lens. In macro work, a single strobe needs to be placed so that you do not get that harsh shadow. Placing the strobe close to the lens so the light will surround the subject, is about the only way to get a pleasantly lit subject. It is also best if you have a flash unit/tube that is equal to or greater to the size of the subject.

Only one of my strobes fired. Not enough to light the scene.
Here’s another example:

Lower right hand corner could not be lit with only one strobe.

Here’s a situation where one strobe works. Full power directly on the subject.

Another example of a very close focus shot using a 15mm fisheye lens (about 1 foot from the starfish) and one strobe.
Dual Strobes
The best way, and the most popular, is to use a pair of strobes. The configuration can come from a variety of methods but the easiest is to have matching units with either two separate sync cords or a single connector with a “Y” cord that attaches to the strobe. Your housing will dictate the choices here. You can choose to use a single strobe as the primary unit attached to the housing while the second one is slaved to fire with the primary. In this instance, you may want the slave to be smaller so it does not overpower the main unit. There is now a big trend towards using fiber optic cables as opposed to using bulkier cord systems. Check your camera and housing specs to see if this can be achieved.

Soft corals and sea fans tend to absorb the light quickly. This is where powerful, dual strobes can balance the light. I use a diffuser on each strobe to cast a wider, softer light.

Another situation of using dual strobes with diffusers. But I missed the lower right corner due to strobe positioning and a shadow produced by a large seafan.
In using dual strobes, you may want to have a selection of strobe arms of varying lengths. We’ll talk about them when we get ready to set up a system with different lenses. Ultralight Control Systems www.ulcs.com offers a wide variety of arms and ball mounts for your strobes. I like the fact that they are lightweight and the design allows for water to pass through the structure, giving less drag in the water. Also in their list for your goody bag are other attachments for aiming lights. They even make a flip tray that allows you to change from horizontal to vertical format without messing with the strobe placements. One click, a flip, and it’s done!

Although you don’t need strobes at all to get an image of a shark, a little light helps to separate the subject from the blue water background. Because the shark has a bright white underbelly, I reduced the power of the strobes by ½.

Reflective fish create a real problem for exposure. It is important to reduce the output of the strobes.

Using digital provides for instant viewing. I had to reduce the power of my strobes by ½ to keep from over-exposing these reflective fish.

This shot has lots of light-absorbing subjects: sponge, seafans, and corals. I metered off the blue water to get the exposure correct and let the dual strobes “dump” at full power.


