You can easily drop in any background when you shoot your subject in front of a Chroma-key blue or green screen. Here’s how you can do it in Photoshop.
Even before the first Godzilla movie premiered in 1954, I was a big fan of monster movies and special effects films from masters such as Ray Harryhousen. I thought it would be fun to recreate a strip of film from an imaginary monster movie and instead of the legendary Fay Wray, I drafted my wife Mary into playing the damsel in distress.

Chroma key role: I photographed Mary in our kitchen in front of a collapsible Westcott Chroma-key 5×6-foot Blue/Green Background Kit (below) and combined it with a photo of a “T-Rex“. I used the blue side; if your subject is wearing blue, flip it around and use the green side. The Tyrannosaurus Rex was photographed outdoors at the Utah Field House of Natural History in Vernal Utah. I know that Godzilla is not a T-Rex, but that’s the closest I could get to a “real-life” monster. 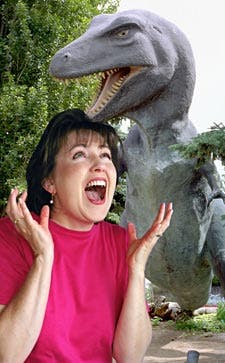
The two different image files were combined using Digital Anarchy’s Primatte Chroma key, an Adobe Photoshop – compatible plug-in that lets you to create a composite image by removing the blue/green screen backdrop from a photograph, leaving the subject against a transparent background. For more information on how to use this blue screen technique to create composite images, stay tuned to this same Bat-time and Bat-channel.
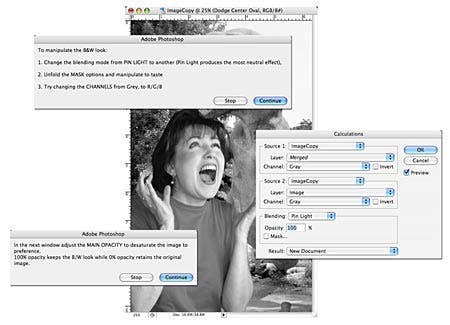
Monochrome madness: The original Gojira (the film’s Japanese title) was a black-and-white movie, so I next converted the color photograph using a free Photoshop Action from PanosFx, which is one of my favorite Web sites offering high-quality inexpensive and free software. His latest freeware is a Black & White Conversion and Image Desaturation Photoshop Action that provides more control for monochrome conversion and image desaturation than Photoshop’s own Desaturate and Grayscale commands. It’s not a one-click operation and the Action will periodically stop and prompt you with some of the dialog boxes you see (although only one-at-a-time) for you to interact or use the defaults like I do.
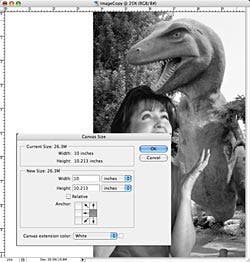
Change the ratio: PanosFx Action uses advanced techniques to produce the best monochrome conversion I’ve ever used, but I was only halfway finished. I knew this vertical image would not crop into a perfect horizontal frame and that I would need to produce an image where Mary isn’t crammed against the left edge. I started by using Photoshop’s Canvas Size (Image > Canvas Size) tool to enlarge the canvas (not the photo) on the left-hand side, filling it with white space. You do this by clicking the dark square in the Canvas Size dialog box to show where you want the center of the new canvas. I clicked on the right-hand side; it gave me blank space on the left-hand side. Then I used the Crop tool to produce a final frame that had an approximate image ratio of 16:9, the same as HDTV but I still had that empty space to fill!
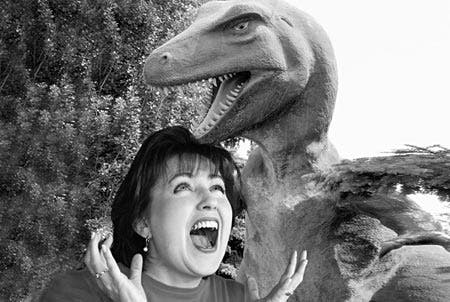
No! Not the Clone Stamp! Using the Clone Stamp tool I recreated the missing part of Mary’s right shoulder. It’s not perfect, but neither were the special effects in the early Godzilla flicks. I then used the Clone tool to fill in the rest of the left-hand side of background with tree branches cloned from other parts of the photograph. This section is decidedly imperfect but I knew that this part of the photograph would only appear in the final frame of the film strip. After a little burning and dodging, I was ready to make the other three film frames that would appear in the filmstrip.
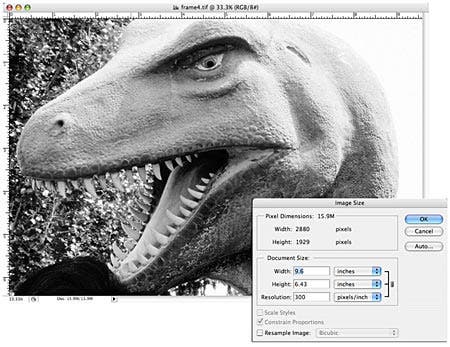
Ready for his close-up: To keep the images frames all the same size I entered the length and width and dpi of the Step 4 image in the Crop tool settings in option bar. To create the look of motion–if only camera motion–in the finished filmstrip, I used the Crop tool to create three other differently cropped images, starting with a close-up of the T-Rex’s face and ending with something not as wide as the final retouched frame. Now I was ready to drop the images into the film frames.

A screamer of a sequence: Once you have the four film frames ready, it’s time to run the Movie Film Photoshop Action that’s also available from PanosFx. It’s free but you have to become a member of the site (that’s free too.) Movie Film combines four landscape layout images to create a movie-camera filmstrip and lets you choose from four different filmstrip variations. On the left edge of the filmstrip, the Action creates the sound waveform stripe. In addition the Action gives you the option to type your own text on the right film edge. I should have used Toho Studios but instead typed “Carl Denham Pictures” as an homage to the original King Kong.
The Movie Film Action creates a really BIG file so when you’re finished you might want to resize or keep it large and print a poster to hang on your wall or give as a gift–or, if you’re a professional photographer–to offer as a fun, offbeat product for your portrait clients!
Joe Farace is the author of a new book called “Getting Started in Digital Imaging” published by Focal Press (ISBN 024080838X.) It’s available in all the best bookstores as well as Amazon.com.

