Sensors are limited as to the range of light that they can capture. Is there more information in a single “flat” digital image that you can tease out in Photoshop? You betcha!
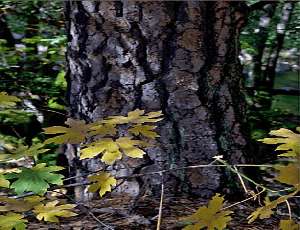
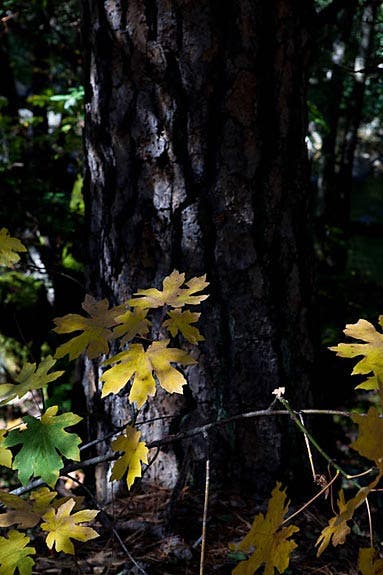
Digital sensors are limited in how well they can capture a wide tonal range such as that found in a scene in bright sunlight with deep shadows. Yes, HDR can help a lot, but that requires shooting multiple images and exposures and merging them later. Let’s see how much info we can tease out of a single image. Here is an image in which the exposure was lowered to keep from blowing out the sunlit leaves, rendering the tree trunk in the shade too dark.
There are several tools in the digital darkroom designed to recover detail in too-dark shadows and too-bright highlights. Tonal adjustments are best done in RAW conversion. But once an image is in Photoshop, major improvements can often be achieved using the Shadows/Highlights adjustment, even after maximizing the image in the RAW converter. It can have variable effects on different images but sometimes it is nothing short of a miracle. For instance, it can often bring out beautiful detail in cumulus clouds. It is accessed from the Image > Adjustments menu.

At the present time, with Photoshop CS4, Shadows/Highlights does not work as an adjustment layer. Therefore it is a good idea to make the adjustment on a duplicate Background layer so you have an out if you decide later you don’t like what you did. Alternatively, you can apply it as a Smart Filter, which lets you alter the parameters later. (See the end of the article for details.)
I prefer to make this adjustment at the start of my workflow on an image, as the results I get with it will dictate the other adjustments needed, which will be made as adjustment layers.
The default Shadows/Highlights dialog box is far too oversimplified, showing only two Amount sliders, for Shadows and Highlights.
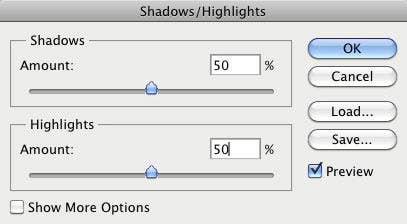
Check the Show More Options box in the lower left to get the controls you need to make this adjustment work its magic:
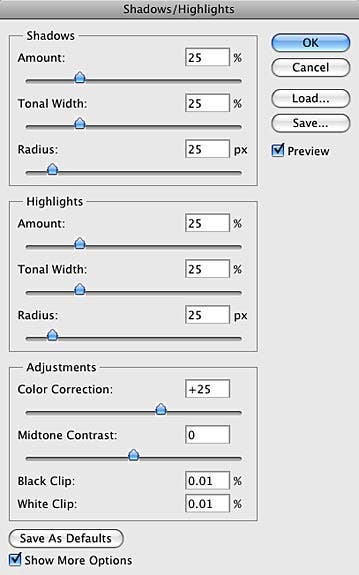
The seeming complexity of the adjustment (which is easily mastered) indicates its power. It works selectively on the darkest or lightest tonal values, giving it more control than mere mortals can achieve with Curves. When you use a Curve adjustment, if you lighten the dark areas by increasing the steepness in the lower left portion, you have to sacrifice contrast in the mid tones and highlights, where the slope of the curve will be decreased. (A Curve adjustment is a zero-sum game.) If you make a complex squiggly-shaped curve, unless you are an expert you are likely to do more harm than good to an image. Shadows/Highlights gives you needed control to maintain a pleasing and realistic contrast while bringing out shadow and highlight detail.
The default values for the sliders are too high for most images. The values you need for each slider will be very different for each image, but a reasonable ballpark starting point is nice. I prefer to set all the values at 25 except Midtone Contrast, which I leave at 0. These values are shown in the figures above. After you have set your preferred starting point for each slider, click the Save as Defaults button in the lower left, and each time you bring up the adjustment it will start with these parameters.
All these sliders may look intimidating but there is a logical order that simplifies things. Start by working on either shadows or highlights, whichever needs the most help. To start with just shadows, pull the Highlight Amount slider to 0 to get it out of the picture, or the converse to start with just highlights.
You need to juggle three sliders: Amount, Tonal Width and Radius. Start by moving the Amount (strength) and Tonal Width (the range of values to be affected). Don’t go too far with the Tonal Width or you will go too far into mid-tones and cause an artificially flat appearance. I have gone a little too far here and caused some loss of contrast in the leaves, so I would back off a little.

Once these are set, zoom in a little to see details better and move the Radius slider until you get the most pleasing effect. A low value will give a very flat result, and too high a value will weaken the effect. I like to choose the position that gives the strongest effect and then, if necessary, back off the Amount or Tonal Width.
Then after either the Shadows or the Highlights are adjusted, leave its settings where they are and see if work on the other will further improve things. (It very likely will.)
Then use the Color Correction slider to increase or decrease saturation if necessary; saturation may be too low in dark areas that have been lightened. If bringing up saturation in the shadows causes too much in the midtones or highlights, leave it at the best overall setting. After you are done with the Shadows/Highlights adjustment, you can increase saturation in the shadows, or decrease it in other areas, with a Hue/Saturation adjustment layer masked to just the needed areas.
Lastly, adjust the Midtone Contrast if necessary. It affects the areas where the shadow and highlight adjustments may have overlapped. But too much movement of this slider can undo the adjustments you just made to the darkest and lightest areas.
Going too far
As with any adjustment to an image, going too far will degrade its appearance. It is easy to flatten contrast in an artificial way. If you have made the adjustment on a duplicate of the Background layer and later decide you went too far, you can simply lower the opacity of the duplicate layer a little to reduce the strength of the effect.
Another problem is that lightening shadows too much can bring out noise, especially if you shot the image at a high ISO or with a pocket camera, which has more noise due to a small sensor. You can only do so much with the information you started with. But sometimes it can be amazing what you can bring out. As I work on an adjustment I use the Preview check box for a reality check on how far I have come from the starting point. This makes it easier to see if I have gone too far.
If you are shooting in raw format, of course you want to bring out as much detail in shadows and highlights with the very powerful tools in the raw converter. After doing that, the Shadows/Highlights adjustment can be even more powerful because it has more information to work with.
In some cases, you may want to select only certain parts of the image to adjust. As with other adjustments, the Shadow/Highlight adjustment will work on selected areas of an image. Just be sure to feather the selection appropriately so you don’t have a sharp edge. Or better yet, make the adjustment on a duplicate Background layer and mask out the parts you don’t like.
In images with low contrast, the Shadows/Highlights adjustment may have the opposite effect, of increasing contrast. If you lower the Midtone Contrast slider and then proceed as above, you may still be able to achieve an improvement in the image.
Shadow/Highlight as a Smart Filter
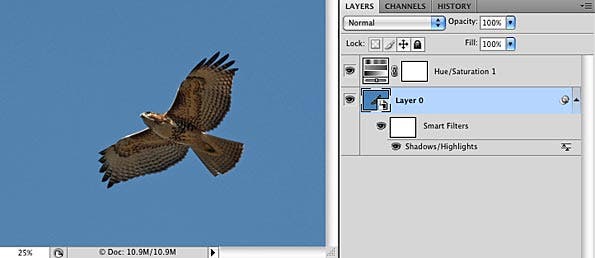
To give yourself the most flexibility with the Shadows/Highlights adjustment, you can use it as a Smart Filter. With the Background layer active (highlighted in the Layers Palette or Panel) go to the menu bar and click Layer > Smart Objects > Convert to Smart Object, or go to the Filter Menu and choose Convert for Smart Filters. Then proceed to make the adjustment as you would otherwise. When an adjustment is done on a Smart Object you can double-click the adjustment (the bottom “layer” in the figure below) any time to go back into the adjustment dialog and alter the parameters.
Diane Miller is a widely exhibited freelance photographer who lives north of San Francisco in the Wine Country and specializes in fine-art nature photography. Her work, which can be found on her web site, http://www.DianeDMiller.com, has been published and exhibited throughout the Pacific Northwest. Many of her images are represented for stock by Monsoon Images and Photolibrary.
