
A total solar eclipse is a once-in-a-lifetime experience but so amazing that some people travel all over the world to witness it more than once. In our solar system, only on Earth does our planet’s moon completely cover the sun’s face, so the solar corona is visible, creating a total eclipse. Partial solar eclipses are a bit more common, with one happening once or twice a year.
When is the solar eclipse?
If you missed the total eclipse on April 8, 2024, that happened over a large swath of North America, with the path of totality cutting a diagonal across Mexico and the U.S., from Texas to Maine and northeastern Canada, you’ll have a couple of chances to see a partial eclipse in 2025.
On March 29th, 2025, a partial eclipse will cover Europe, Asia, Africa, North America, South America, the Atlantic, and the Arctic Ocean. Additionally, a partial eclipse will cover Australia, Antarctica, the Pacific Ocean, and the Atlantic Ocean on Sept. 21, 2025. For a great source of both Solar and Lunar eclipses, check out NASA’s Future Eclipses page.

Solar Eclipse Photography
Outside the “centerline” where the eclipse is total, you will be able to see a partial eclipse — still a great experience. The good news is, you won’t need any specialized equipment to photograph the eclipse. In this column I’ll show you how to use digital cameras and ordinary lenses to do this.
Plan ahead
I’ve seen three total solar eclipses, and they are truly awesome. The important thing is to plan ahead, and the timeanddate.com website has great maps and information on the eclipse from any location.
Simplify your approach and use one camera and lens for photography, especially if this is your first solar eclipse. During the few minutes of totality, you can look at the eclipse with the naked eye. It will be an incredible sensation you will remember for the rest of your life. You’ll want to take in the whole experience. You’ll hear reaction from people around you, the temperature may drop dramatically, animal noises will change, a lot of things will be happening. You won’t want to be spending time adjusting your camera while totality is happening.
Solar Eclipse Photography Gear
Safety Glasses
But remember never to look at the sun directly, before or after totality. Use safe eclipse glasses. Certified glasses have the ISO 12312-2 standard written on the side. More information on safe solar filters is on the American Astronomical Society guide to eclipse glasses and filters. Safe filters block out a huge percentage of visible light and, most importantly, the UVa and UVb rays that can cause permanent retina damage and infrared radiation.
Camera Lens Filters
You’ll also need a safe filter for your camera lens to shoot the partial phase of the eclipse. Baader, Celestron and Thousand Oaks Optical are brands that are safe for looking through a telescope or telephoto lens. Baader and Thousand Oaks make small solar filter sheets that can be cut to fit a lens and are relatively inexpensive.
Some produce a white image of the sun, some produce an orange image. White is technically the correct color of the sun, but I like the orange look for the partial eclipse phase.
Neutral density filters for photographic purposes — including ones from Hoya and NiSi — are meant for photographing solar eclipses, but are not safe for direct solar observing.

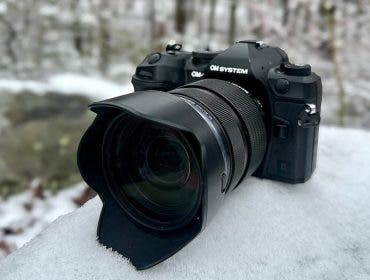
Camera
Any DSLR or mirrorless camera will allow you to get good eclipse photos. Lens choice depends on what kind of picture you want. Most popular might be a telephoto shot of the sun and corona.
Standard telephoto or zoom lens
A modest telephoto or zoom will work in the 70-200 or 70-300mm range. You’ll get a perfectly good photo, and it will be easy to aim at the sun.
Long telephoto or zoom lens
Longer telephotos or zooms in the 100-400mm, 150-600mm, or 200-600mm (or single focal length lenses) will give you a larger image of the eclipsed sun. But the lenses are bigger and more difficult to aim and keep the sun in the frame.
Wide angle lens
A wide angle or the kit lens your camera may have come with can produce a dramatic shot of the surrounding environment and the eclipse.

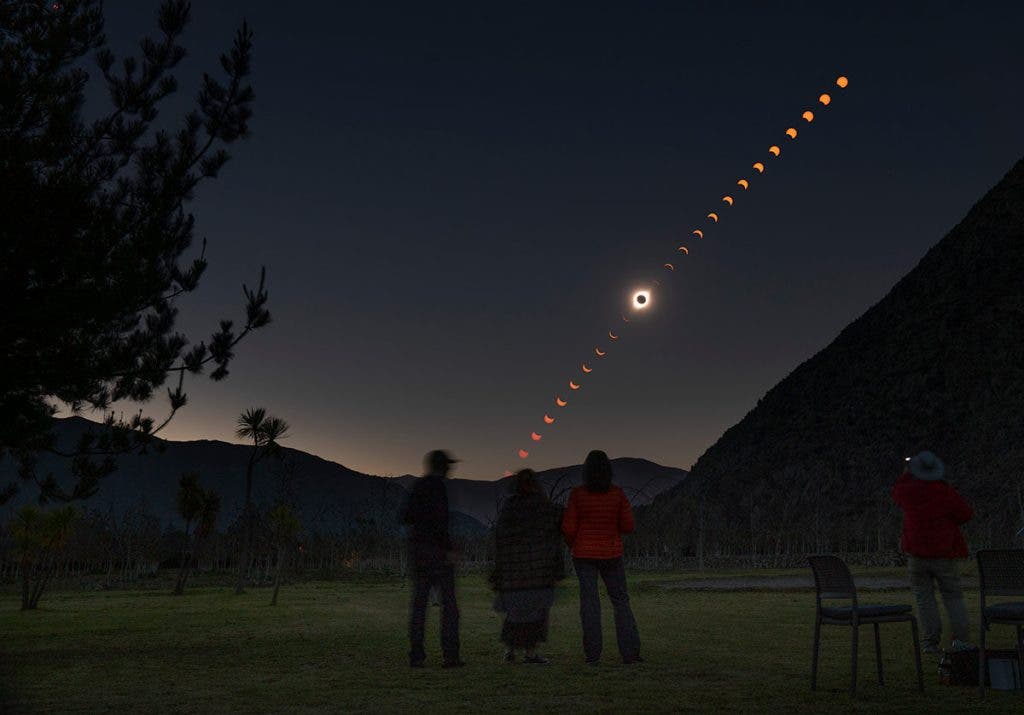
Using a wider focal length minimizes the time you need to frame and focus the shot, leaving you more time to enjoy the eclipse. A wide-angle lens will also allow you to do a composite time-lapse image showing the path of the sun and moon across the sky.
Batteries & memory cards
Make sure to have at least one extra battery for your camera and an extra memory card. You don’t want an equipment failure during totality.
Tripod
A tripod is a must. Smaller travel tripods are fine for the wide angle or kit lenses. A sturdy tripod is needed for the telephoto lenses, though you won’t need anything really big unless your lens is big.
Remote release
A remote release is a good accessory. This allows you to fire the camera without touching it or even looking at it, so you can be looking up at the eclipse.
Solar Eclipse Photography Tips
Know Your Gear
Get familiar with all your equipment several weeks before the eclipse. If you bought one of the solar filter sheets (they look like a sheet of black or silvered plastic), cut a square bigger than the diameter of your lens. You can use gaffer tape or something similar to tape the filter on the front of the lens. Do this before aiming the lens at the sun. Some filters are made in a holder to slip onto the front of a telescope or telephoto lens.
Shoot RAW
The camera should be set for RAW quality. This allows the most flexibility during the image processing. You can start with the white balance on Auto. Sometimes the Daylight (sun icon) setting works best.
Organize Your Setup
Place your camera on a tripod; the filter should be on the lens. With a telephoto zoom, start at the shorter focal lengths, put the sun in the center of the frame, then zoom in. A wide-angle lens should be relatively easy to aim to see the sun.
Set Your Focus & Exposure
You can use autofocus on the sun to find the focus. This usually works better with a telephoto lens. On a wide angle, you can always focus on a distant building or mountain, then attach the filter. For both lenses, after you get a good focus, go to the Manual focus setting on the lens or camera to prevent the focus from shifting. A good idea is to tape the focus ring on the lens to prevent it from moving. Take a photo and zoom in on the image to check the focus.
Have your camera in the manual exposure mode setting (M). You will have to set the ISO, shutter speed and f-stop.
A good starting point for the camera settings is: ISO 400, 1/1000 second, f8. You may have to adjust this to fit the conditions in the sky as well as your equipment.
Select Spot Meter Mode
Find the spot meter mode in the Metering Mode setting. This uses the focus square or dot and just measures the light there. The light meter scale may give you a different setting than above. I like the sun a little bright. The actual brightness can also be adjusted in the image processing.
Check Your Battery Life
If you take many photos during the partial phase, about 10 minutes before totality, check your battery life. If it is 50% or lower, change to a fully charged battery. You want everything working during totality.
Set Your Filter
Whatever exposure you decide on can be used with the filter through the partial phase before totality. When the moon is almost covering the sun and you see a sliver of the sun through the filter, take off the filter. An experienced person near you may shout, “Filters off!”
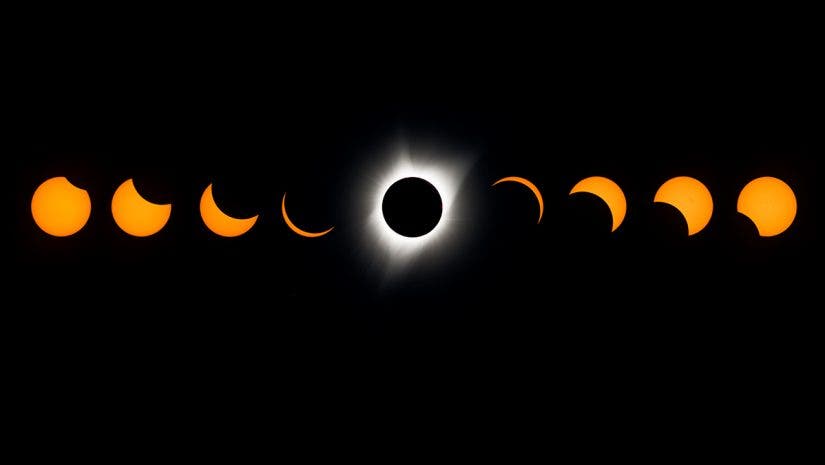
Keep shooting—you will be able to get what is called the “diamond ring” effect and Baily’s Beads.

Shooting During Totality
I have found you don’t need to change the exposure setting at this point. Just keep shooting for about 30 seconds. By then, the moon may be completely covering the sun and you will see the corona, the fuzzy looking outer atmosphere of the sun. Take your eclipse glasses off. You can look directly at the corona, something that is only visible during a total solar eclipse.
The corona is dim compared to the face of the sun so you will need to increase the exposure. If you are at 1/1000 sec, lower the shutter speed to 1/30 sec or even 1/15 sec. This allows more of the corona to show.
Take many photos at this setting. But make sure to look at the eclipse and enjoy yourself.
As soon as you see the direct sunlight, replace the filter on your lens. Readjust the shutter speed to 1/1000 sec, especially if you plan to continue to shoot. Depending on where you are, the totality could last four minutes or more. That time will whiz by, which is why you want a simplified setup for your camera.
For most eclipses, I set up wide-angle and telephoto lenses on two tripods and program the remote shutter release to take a photo at one-minute intervals. After the eclipse, I’ll combine a set of the frames for separate wide angle and telephoto composites.

Have more questions? Get in touch!
Feel free to email me at stan@stanhonda.com for questions on techniques or image processing in solar eclipse photography.
Hope your eclipse watching goes well! It’s an experience you will never forget.