Alright! Everyone has arrived. They have been briefed on the photo shoot ideas, goals and the wardrobe. The model is now in the chair getting his/her initial hair and makeup ready for the first set. In the first article, How to Plan a Model Portfolio Shoot, I went over all the preparations on my checklist that I perform whether it’s over the course of a few weeks or a few days. In the last article, Shooting the Model Portfolio: Part I, I covered everything I do the morning of a photo shoot. In this article, I’m going to tell you my checklist of what I look for during my shoot – as I am shooting.
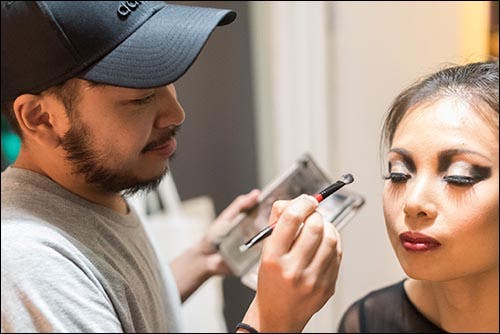
Initial makeup being completed by my makeup artist, Gil Aldrin.
Model: Shoko Fujita
While hair and makeup are in process, my photo assistant(s) and I are putting together the sets and as we do so, I go over any lighting setups that I want to use for a particular set, and why, as I try to also educate my assistants throughout the course of a TFP model portfolio photo shoot as well.
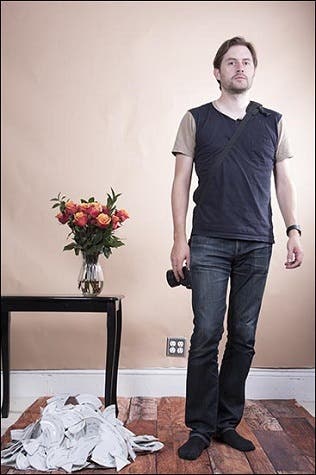
On one of the fun sets I’ve shot, my assistant Yann,
steps in to help me determine lighting placement.
About an hour to an hour and a half later, depending on the detail of the hair and makeup I want, we are ready to shoot. Let’s go!
DURING THE PHOTO SHOOT
As a studio photographer, you are in control of everything during a shoot. From hair and makeup direction to having the last say on wardrobe placement and from set design and its lighting to actually shooting the images, there is plenty that I look for so as to not spend a lot of time in post-production fixing things that could have easily been avoided. Then there are those preventable mistakes that are so big the image is unsalvageable. Below is a checklist of many of the things I look for within my frame before pressing the shutter button.
The Model’s Hair/Makeup
Your model’s appearance is the point of the portfolio shoot. Analyzing every part of him/her prior to pressing the shutter is a must. I have a checklist of things that I’ve learned to look for before taking a shot. Some of these things are hard to prevent, but I do my best to avoid additional work in post.
![]() Hair. Stray hair is difficult to avoid but not only do I look for unruly hairs, I usually have my hair/makeup artist constantly check during the shoot to make sure the hair is as it was originally styled. The big thing for me is making sure the hair is as I originally envisioned it to look.
Hair. Stray hair is difficult to avoid but not only do I look for unruly hairs, I usually have my hair/makeup artist constantly check during the shoot to make sure the hair is as it was originally styled. The big thing for me is making sure the hair is as I originally envisioned it to look.
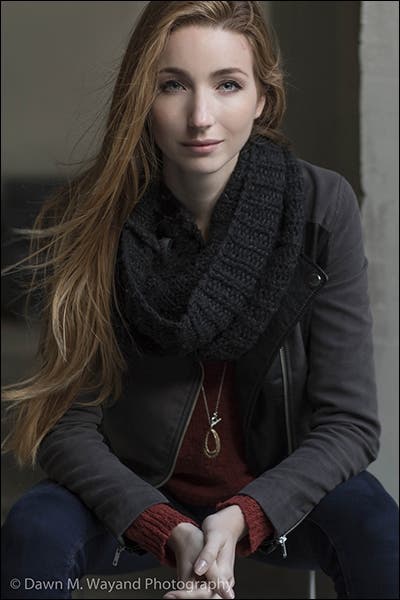
Here we were outdoors and I loved how the wind naturally whisped through her hair.
Model/Actress: Valery Lessard
![]() Makeup. I usually try to include a swatch of colors for my makeup artist that I’m interested in seeing for a set so I check to make sure the end result was also as I envisioned. I look for eyelashes out of place and when using face jewels, that they are placed as I wanted. Does the makeup work with the design of the hair?
Makeup. I usually try to include a swatch of colors for my makeup artist that I’m interested in seeing for a set so I check to make sure the end result was also as I envisioned. I look for eyelashes out of place and when using face jewels, that they are placed as I wanted. Does the makeup work with the design of the hair?
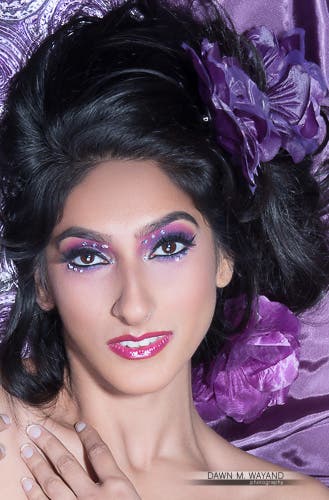
On this nautical set, we were aiming for everything some tone of purple.
Model: Deeksha Chawla
The Model’s Wardrobe
![]() Wrinkles. Wrinkles can be an easy fix before a photo shoot and some can be fixed during a photo shoot, but kind of pain to work with in post-production. Be sure to press any wardrobe prior to the photo shoot and keep it guarded! There are products out there to take some wrinkles out in a pinch without an iron, but major wrinkles need to be ironed.
Wrinkles. Wrinkles can be an easy fix before a photo shoot and some can be fixed during a photo shoot, but kind of pain to work with in post-production. Be sure to press any wardrobe prior to the photo shoot and keep it guarded! There are products out there to take some wrinkles out in a pinch without an iron, but major wrinkles need to be ironed.
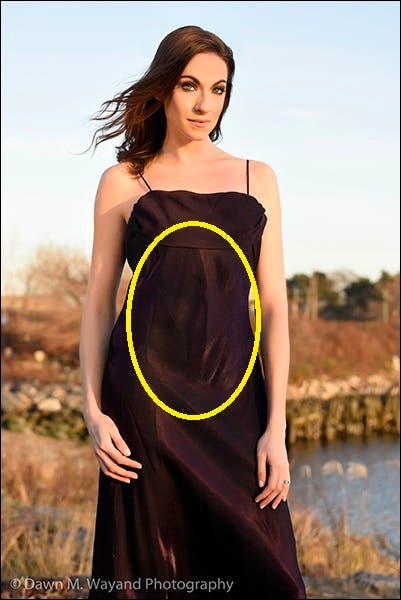
Missed ironing the dress before the shoot!
Model: Katie Buell
![]() Tags. Scarves have these (as seen below) as do any wardrobe piece. They can be easy to miss but it’s good to do a quick once-over with each wardrobe change to make sure no tags are showing.
Tags. Scarves have these (as seen below) as do any wardrobe piece. They can be easy to miss but it’s good to do a quick once-over with each wardrobe change to make sure no tags are showing.
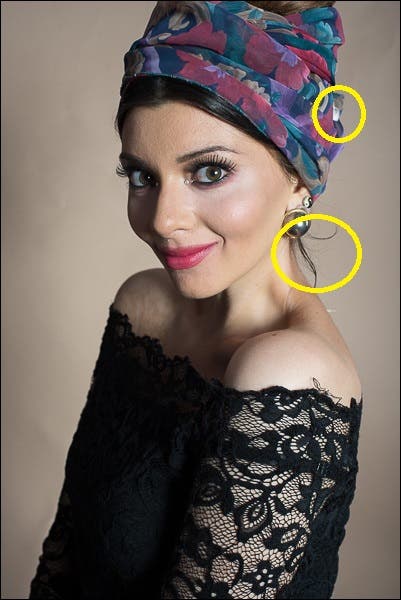
A missed tag on the scarf around her head blended in, yet it didn’t. Rookie mistake.
Model: Maria Iodice
![]() Loose Strings. I once shot an entire set on one of my first few fashion portrait shoots and did not notice there was a stray clothing string on her sleeve until I was working on the images in post-production. It’s also good to do an initial once-over for loose strings stuck to the clothing.
Loose Strings. I once shot an entire set on one of my first few fashion portrait shoots and did not notice there was a stray clothing string on her sleeve until I was working on the images in post-production. It’s also good to do an initial once-over for loose strings stuck to the clothing.
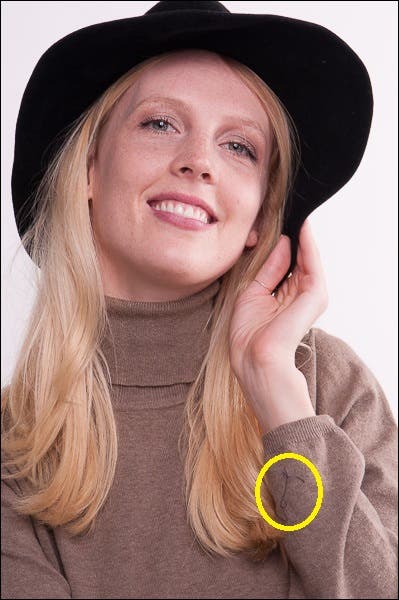
Always check for random clothing strings attached to clothing, hair or shoes.
Model: Sietzka Wiersma
![]() Clothing Fit. Does the wardrobe fit and hang right? On occasion wardrobe pieces might be a bit too big on a model and that’s where those nifty spring clamps, also called “A-Clamps”, come in handy. If the clothing is too big, just clamp the wardrobe piece wherever needed but out of the camera’s view.
Clothing Fit. Does the wardrobe fit and hang right? On occasion wardrobe pieces might be a bit too big on a model and that’s where those nifty spring clamps, also called “A-Clamps”, come in handy. If the clothing is too big, just clamp the wardrobe piece wherever needed but out of the camera’s view.
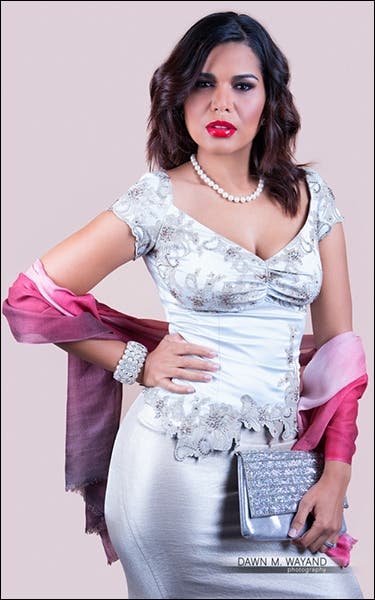
Everything fit in this case and the scarf was draped as we wanted around her arms.
Model: Karen Ramos
![]() Unintentional Bracelets. This is a biggie. Models are known for coming onto a set with their hair tied up ready to be styled. They take the hair band off and put it on their wrist, and because it blended so well with her skin, you miss it, shoot a series of stunning images with the rubber band looking like a bracelet. In the case of the image below, the model was wearing a Hindu bracelet, which photographs as a rubber band on her wrist. Another rookie mistake. Be sure to check wrists to make sure only the intended wrist wear is present.
Unintentional Bracelets. This is a biggie. Models are known for coming onto a set with their hair tied up ready to be styled. They take the hair band off and put it on their wrist, and because it blended so well with her skin, you miss it, shoot a series of stunning images with the rubber band looking like a bracelet. In the case of the image below, the model was wearing a Hindu bracelet, which photographs as a rubber band on her wrist. Another rookie mistake. Be sure to check wrists to make sure only the intended wrist wear is present.
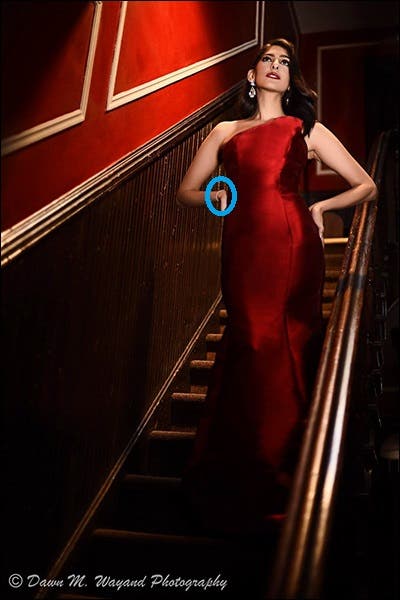
A missed bracelet looks like a rubberband in this image.
Model: Deeksha Chawla
Posing the Model
![]() Dynamic Feet. I always try to make sure the model’s feet are not both posed facing the same direction. When you pose a model to have each foot in a different direction, up on the toe, one lifted slightly higher than the other, etc., the image seems to have a little more energy – it’s more dynamic.
Dynamic Feet. I always try to make sure the model’s feet are not both posed facing the same direction. When you pose a model to have each foot in a different direction, up on the toe, one lifted slightly higher than the other, etc., the image seems to have a little more energy – it’s more dynamic.
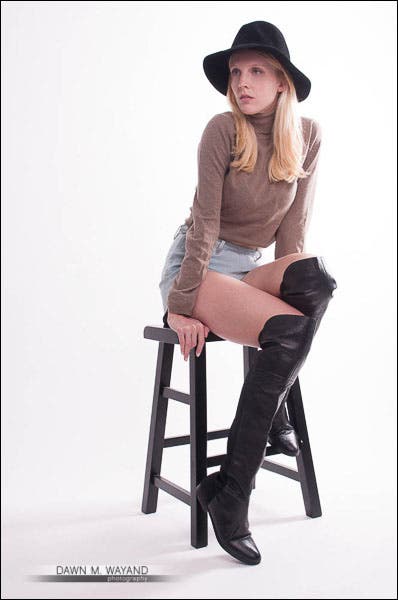
Here I posed the model with one shoe on the rung of the stool and one on a toe on the floor.
Model: Sietzka Wiersma
![]() Angles. The goal of many fashion photographers with beautiful, tall models is to angle their bodies to create geometric triangles. This is also something that creates a more powerful, dynamic looking image. I typically try to make a triangle with one, if not both arms, but if with both arms, not at the same level because it looks too sumo-wrestler-like. I will have her place one hand near her stomach and the other on her hip so that they an uneven. Triangles can be made with legs as well.
Angles. The goal of many fashion photographers with beautiful, tall models is to angle their bodies to create geometric triangles. This is also something that creates a more powerful, dynamic looking image. I typically try to make a triangle with one, if not both arms, but if with both arms, not at the same level because it looks too sumo-wrestler-like. I will have her place one hand near her stomach and the other on her hip so that they an uneven. Triangles can be made with legs as well.
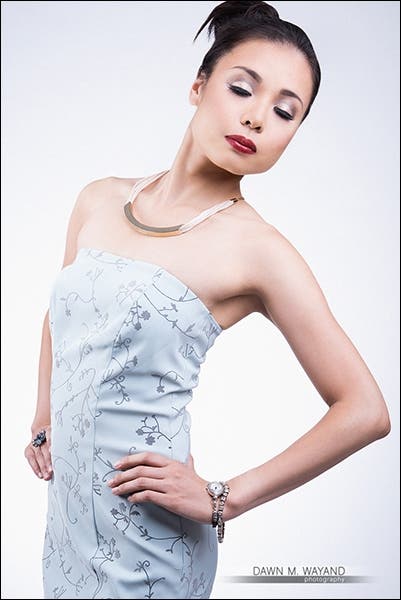
I made sure to include at least one triangle using the arm closest to the camera.
Model: Shoko Fujita
![]() Neck. It’s also necessary when shooting anyone, to expose the neck by elongating it as shown in the image above. Failure to do so can sometimes lead to a short or “no-neck” model in the image. With the wrong lighting, the chin may blend in with the neck. In addition, elongating the neck also helps anyone with a slight double-chin.
Neck. It’s also necessary when shooting anyone, to expose the neck by elongating it as shown in the image above. Failure to do so can sometimes lead to a short or “no-neck” model in the image. With the wrong lighting, the chin may blend in with the neck. In addition, elongating the neck also helps anyone with a slight double-chin.
![]() Head Angle. It’s usually a good idea to angle the head of a model or actor for headshots, even if it is very slightly.
Head Angle. It’s usually a good idea to angle the head of a model or actor for headshots, even if it is very slightly.
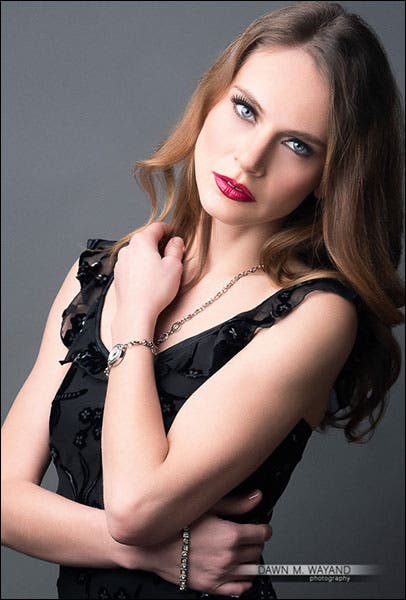
Here I had her tilt her head a little bit combined with a slight lean back.
Model: Daria Komarkova
![]() Chin. Another big one is what I generally joke in the studio calling it the “chicken head”, number one, because it slightly resembles such and number two, it relaxes the model and we all end up having a good laugh. I have my model elongate their neck, pull their chin out and then pull it down. This helps to define the jawline.
Chin. Another big one is what I generally joke in the studio calling it the “chicken head”, number one, because it slightly resembles such and number two, it relaxes the model and we all end up having a good laugh. I have my model elongate their neck, pull their chin out and then pull it down. This helps to define the jawline.
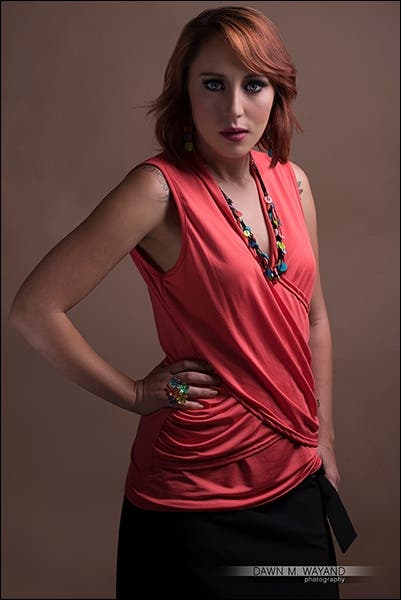
Elongate the neck, chin out and down.
Model/Actress: Celeste Smith
![]() Hands. Hands can be tricky. Nine times out of ten, your model or subject will have very stiff hands in an image. What to do with the hands! For men, it’s a bit easier because we typically portray them as the strong type and their hands should show the same, but a very “light beard grab” works well (as shown below). For ladies, I have them run their fingers through and down their hair lightly or down their body lightly.
Hands. Hands can be tricky. Nine times out of ten, your model or subject will have very stiff hands in an image. What to do with the hands! For men, it’s a bit easier because we typically portray them as the strong type and their hands should show the same, but a very “light beard grab” works well (as shown below). For ladies, I have them run their fingers through and down their hair lightly or down their body lightly.
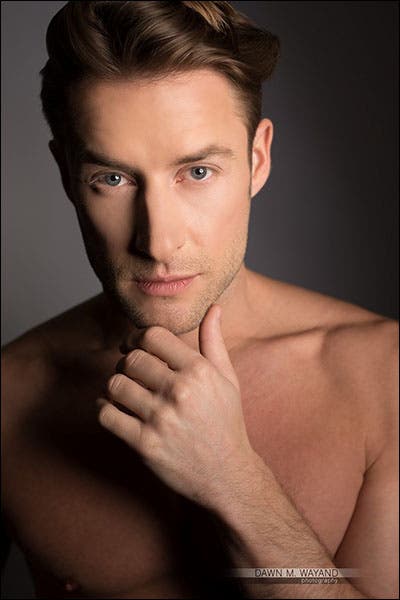
The “light beard grab” help define the jawline of this model.
Model: James Karl Campbell
![]() Facial Expression. Facial expression is really key and can really make or break a photo. This can also be a tricky thing to get right, especially getting what you want from the eyes. Sometimes you may get a model with a “deer in headlights” look, but an amazing thing I try to go for is to get a powerful stare, a look with meaning and lips slightly parted, such as in the image below.
Facial Expression. Facial expression is really key and can really make or break a photo. This can also be a tricky thing to get right, especially getting what you want from the eyes. Sometimes you may get a model with a “deer in headlights” look, but an amazing thing I try to go for is to get a powerful stare, a look with meaning and lips slightly parted, such as in the image below.
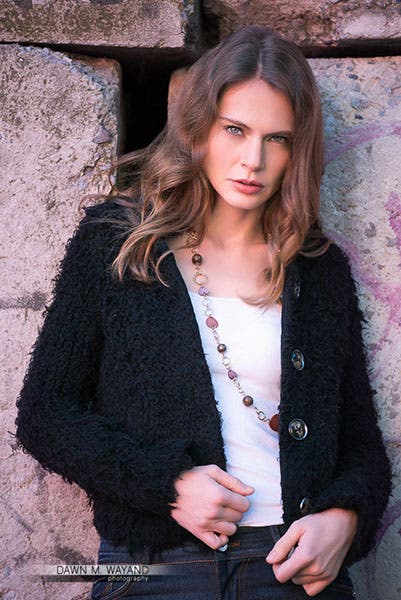
The powerful stare with meaning gets the vote here.
Model: Daria Komarkova
The Frame Around the Model
What’s around your model can also be important and can sometimes cause a problem if it’s not caught right away.
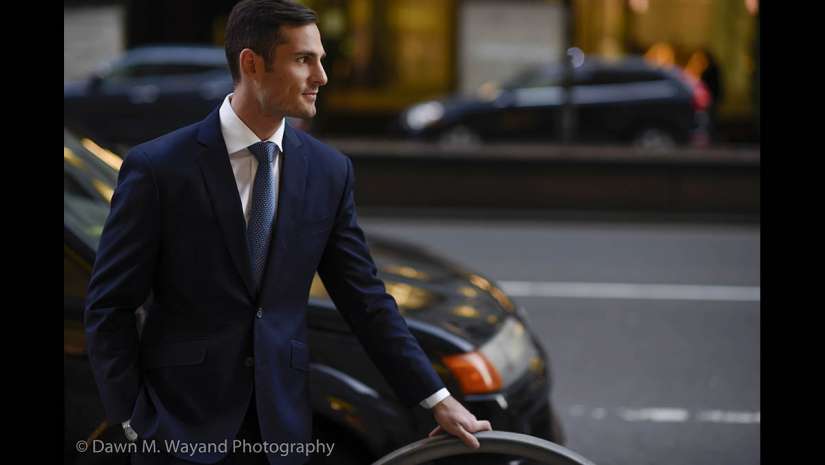
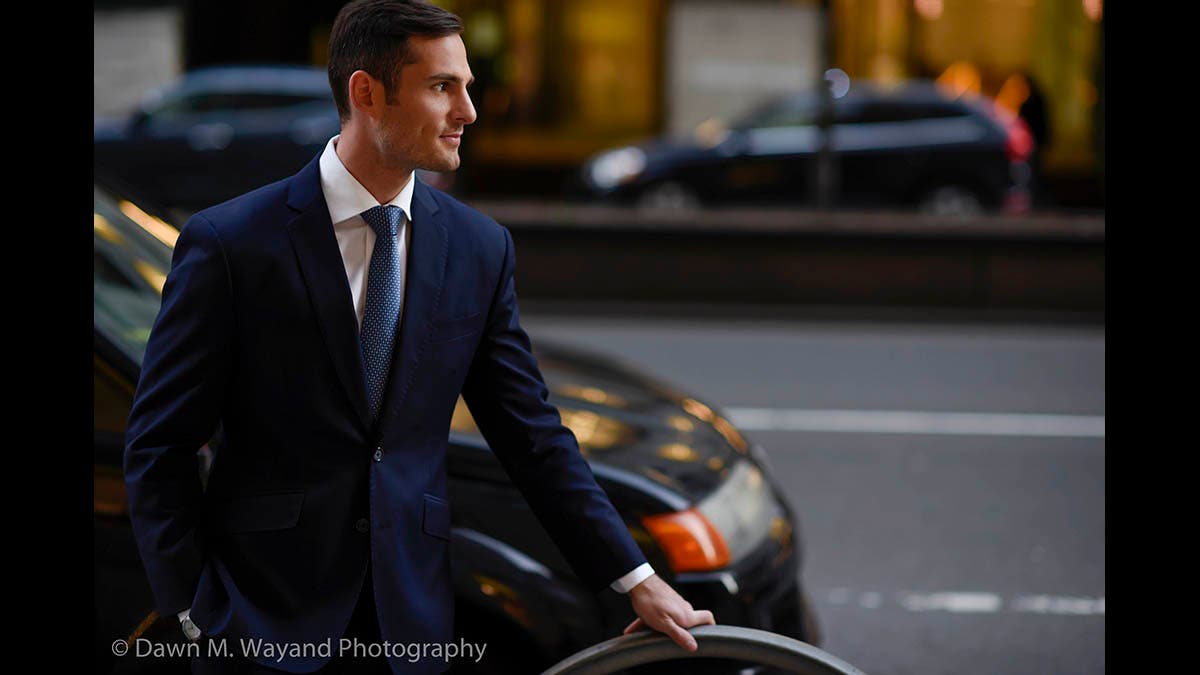
![]() Background/Foreground. A good part of the time when we’re photographing a subject or model, we want the focus to be only on the subject or model and not really on the background or foreground. In those cases, we would decide on depth of field to keep the focus on the subject of the image. In the image below, I needed to show the context of where my model was at, dressed up in his sharp suit, so I created a semi-shallower depth field so that you could still tell the context, but only the model was in focus.
Background/Foreground. A good part of the time when we’re photographing a subject or model, we want the focus to be only on the subject or model and not really on the background or foreground. In those cases, we would decide on depth of field to keep the focus on the subject of the image. In the image below, I needed to show the context of where my model was at, dressed up in his sharp suit, so I created a semi-shallower depth field so that you could still tell the context, but only the model was in focus.
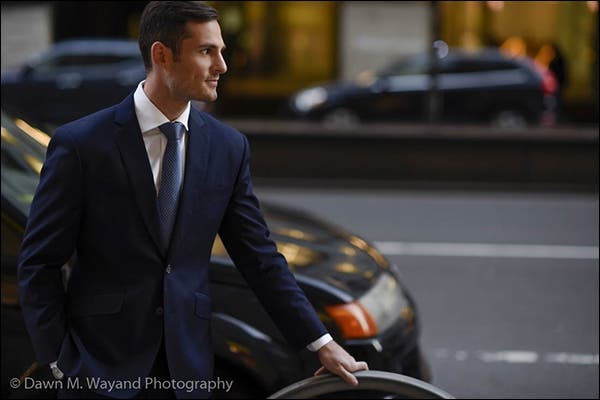
I wanted to do a city shot with the background slightly out of focus for this model’s portfolio image.
Model: Andy Mizerek
![]() Avoid Mergers. A “merger” is when something is directly in front of or behind your subject – one overlapping the other or when that element touches the side of a frame. One common example that comes to mind is when you photograph someone with a dead tree in the background and you have tree branches coming out of your subject’s head! Try to avoid those as much as possible.
Avoid Mergers. A “merger” is when something is directly in front of or behind your subject – one overlapping the other or when that element touches the side of a frame. One common example that comes to mind is when you photograph someone with a dead tree in the background and you have tree branches coming out of your subject’s head! Try to avoid those as much as possible.
![]() Add Props. Props are those ingredients in the image that I’m always cooking up. Since I work in a home studio environment, I use a lot of my own things as props such as my guitars, flowers from my coffee table, my coffee table itself and the list is endless. Since I love giving my models characters to become, in the image below, I made my model a singer using my existing microphone from my own use, but adding more credibility to the image by putting it on a stand and buying a pop filter and headphones to make her look as though I am capturing her in high key at a recording studio. Blue seamless lends to the picture popping with color.
Add Props. Props are those ingredients in the image that I’m always cooking up. Since I work in a home studio environment, I use a lot of my own things as props such as my guitars, flowers from my coffee table, my coffee table itself and the list is endless. Since I love giving my models characters to become, in the image below, I made my model a singer using my existing microphone from my own use, but adding more credibility to the image by putting it on a stand and buying a pop filter and headphones to make her look as though I am capturing her in high key at a recording studio. Blue seamless lends to the picture popping with color.
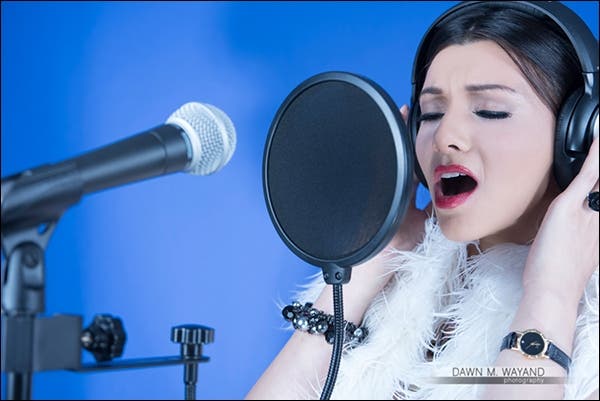
I like to create various creative sets using props I either own or buy.
Model: Maria Iodice
Capture!
That’s about it! At this point it’s time to shoot: whether you’re a slower, methodical shooter, like me, or you are a speed shooter popping off multiple images as your strobe recycling time allows – these steps have proven to help me create some pretty amazing photos for my models, as in the examples of my work and end result shown below.
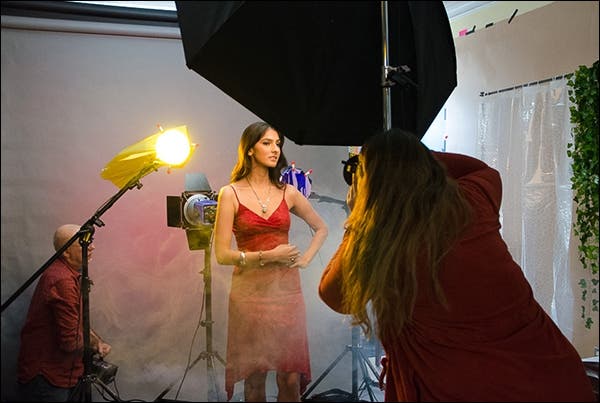
Gelled backlighting, a little fog and a creative photographer takes the cake here.
Model: Deeksha Chawla
And one of the resulting images from this shoot set…
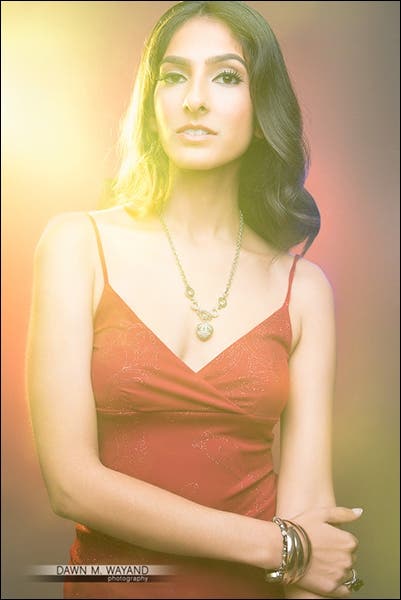
Final image after post-production.
Model: Deeksha Chawla
RINSE AND REPEAT
I typically like to shoot several different sets in one shoot so I’ll rinse and repeat the steps below for every set.
![]()
Change Up Sets or Locations. Sometimes you will be moving from studio to location or from location to studio or from location to location. You may be working completely in the studio and need to change up your set design.
![]()
Change Up Lighting Setups and Modifiers, as Needed. As the sets change, your lighting setups and modifiers may change too. I like to have variety in my lighting styles for a model portfolio shoot so that every image has a different mood/feel.
![]()
Change Up Hair / Makeup. I keep my hair/makeup guy on set for the entire shoot for not only touch-ups, but changeups too.
![]() Change Up Wardrobe. I keep a rack ready for wardrobe and it’s typically fully stocked with my Model Closet wardrobe as well as essentials that I personally invest in for shooting – then reselling. For model portfolio work only, I’ve found it’s just a lot of easier for me to create ideas and concepts when I have a little bit of control over wardrobe. Plus, newer models get excited about what they will be wearing and I notice they get more confident when using clothes other than their own because it tends to make them feel like it’s more of a fashion shoot than just a portfolio shoot.
Change Up Wardrobe. I keep a rack ready for wardrobe and it’s typically fully stocked with my Model Closet wardrobe as well as essentials that I personally invest in for shooting – then reselling. For model portfolio work only, I’ve found it’s just a lot of easier for me to create ideas and concepts when I have a little bit of control over wardrobe. Plus, newer models get excited about what they will be wearing and I notice they get more confident when using clothes other than their own because it tends to make them feel like it’s more of a fashion shoot than just a portfolio shoot.
THAT’S A WRAP!
So these are my steps when shooting a model portfolio. You may find these great steps, you may have more steps or you may find some of these steps do not apply to your situation or style of shooting. In the next and last installment of this series, I will go over all the steps I go through after a model portfolio shoot, so stay tuned!
