Blockbuster genre films incorporate a lot of special effects. To make these special effects possible, a big studio production is afforded a lot of resources to ensure the footage shot can be easily punched up by a post-production magician.It is taken for granted that not only will a green screen be accessible to both the director and cinematographer, but sometimes an entire set, including props, are colored in the way that enables accurate keying.
However, not everyone is a Steven Spielberg, J.J. Abrams , or the director of thelatest entry in the Marvel superhero movie universe. A lot of us, in fact, have to make do with our HDSLRs and a bit of spit and polish. While we might have access to dolly tracks – allowing for a smooth tracking shot – we may never enjoy the use of a computerized motion control system that times a camera’s movements to match a similar sequence created in post. Alas, all we have access to is a tripod or a make-shift camera stabilizer of some sort.
Yet the desire to create a really cool, special effects-driven video that has the potential to go viral on YouTube might be too hard to pass up. So how does one approach this with limited resources and the budget of next to nothing? Turns out, it is not that difficult. As long as the filmmaker or videographer understands how the process is completed in post, and how the way you shoot a scene can make it easier – or more challenging – for that process.
Let’s use a hypothetical, scripted scenario. The screenplay reads:
EXT. BUILDING – ROOF
The PROTAGONIST steps outside. He stops in his tracks and sees…
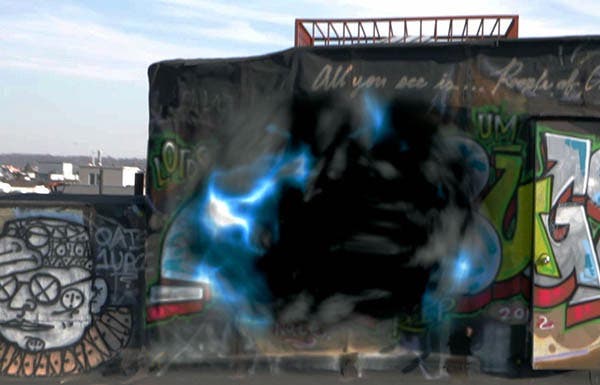
On a graffiti covered wall, a magical portal of sorts (an entrance into another dimension, perhaps?) opens up.
Now there are many ways one can creatively approach this scene. The simplest of which would involve a close-up of the protagonists face reacting to what he sees then cut to a static wide shot of the wall as the portal opens up. Not only is this simple to shoot, it results in the least time-consuming post-production process. All one has to do is slap the layer of computer-generated graphics onto that wall and presto! The sequence is ready to render.
But that’s kind of boring, isn’t it? Especially when the cinematographer wants to show off his or her skills and approach this in a unique way. Maybe you want the portal to appear as the camera tracks along the side, thus presenting the protagonist’s POV as if he is walking parallel to the wall. Or better yet, maybe you want to bring an air of verisimilitude to the proceedings by utilizing a verite approach while shooting everything handheld.
At this point, a dialog needs to be set up between the director, cinematographer and sfx specialist to establish what limits (if any) can hinder the process in post. If you’re working on a low budget, the most extensive tool you have access to might be iMovie or Premiere Pro. Sure, you can composite footage on top of a layer of additional footage within a non-linear editing system, but your ability to match the movement of the camera is seriously limited by the plug-ins made available through those tools. So the hand-held approach may prove fruitless not to mention a waste of time if your editor cannot provide the effect to match.
So if that represents your current limitation, then the static wide shot of the wall may be the only way to go.
Yet, what if you had access to a compositing tool like After Effects or knew someone who did? Then a new host of opportunities will open at your doorstep. However, this does not mean you should be less aware of how approaching a shoot can hinder effects completion in post. Let’s say we’ve decided to go the most challenging route: POV shot, walking parallel to the wall, completely handheld. This will incur a lot of motion blur, jumps in the background, etc. So what can we do to prep the footage so that our chosen compositor doesn’t exit the editing room in a frustrated meltdown?
First, let me offer up some tips. And then I will provide the “why.”
1. Use a wide-angle, deep focus lens.
You want to keep as much in the shot in focus as possible. Not just the wall in the background but any object that might enter the foreground as well should the camera pass by it. Also, allow as much space as possible to appear in the frame surrounding the area targeted for the composited effects shot. I will elaborate on this later but the short-hand reason is that you want to give your post-production guy the flexibility to not only scale up the footage in post, but have ample room so that his motion tracking pins will continue to record data even if your targeted area disappears off the frame. It’s not necessarily a deal breaker if you don’t do this. But it is something to be aware of should your editor not have access to really intuitive tracking software.
The sample footage featured below was shot with a Canon 17-55mm wide-angle lens. Because it was a very sunny day, I kept the ISO to 200, utilizing a frame rate of 23.95 and a shutter speed of 50. Thanks to these settings (along with the properly adjusted aperture), I was able to enjoy a lengthy depth of field.
2. Have some very colorful, hard-to-miss tape handy. Bright yellow is preferable.

Obtainable at any hardware store, brightly colored tape – whether it be electrical, duct or masking (even painter’s tape will do) – can be used to create those “Xs” that help tracking software record the movement of an object targeted in post. Depending on the program, it is possible this may not even be necessary but you’re better off being safe than sorry. Assess the area that will play host to the special effect. Create “Xs” out of the tape and place them on the four outer corners of that space (see image). Defining those corners help to establish a “plane” in a virtual, 3D environment. Ergo, should you pan in on the wall, track along side it or dolly in on that zone, those markers will pinpoint the skew, rotation and perspective of that area so that your composite can match it.

3. Foreground images: while not impossible to deal with, might make the editor’s/sfx artist’s job a tad more difficult.
Just, you know, something to keep in mind. As you can see in the sample footage presented at the bottom of the article, a chimney enters into the foreground from the right side of the frame. Although I decided to keep it in rather than reshoot the whole thing (or cut the clip just before the chimney passes in front of the wall), this will require additional work in post as the editor will have to mask out the chimney and therefore provide yet another composite to the scene. Not only is this more job intensive, it could result in longer rendering times when exporting into a .mov file.
There you have it: three basic tips when preparing to shoot a special effects driven scene. Let’s now discuss how the motion tracking process works from a post-production standpoint. The goal is to explain the complexities and possible limitations involved when shooting for post. Hopefully this will bring about a better understanding for the DP and director when it comes to setting up sfx shots.
When tracking movement in a scene, whether it’s focused on following the camera or an object in motion, the software attempts to figure out the speed and shifting perspective of the targeted area. One way of doing this is by applying “pins” to markers appearing in the footage such as the ones I placed on the wall. A “pin” resembles a square box that will be placed on top of that maker and hopefully “trap” it, hence why the marker needs to be colorful and stand out. This forces the pin to follow that marker as the computer records the motion data. Using the wall as an example, you not only want the computer to record the camera movement, but also the changing scale and perspective (or skew) of the targeted area. This would then require placing a pin on each marker thus creating a shifting rectangle covering the entire space.
![]()
![]()
Although AE’s tool is really easy to use, its efficiency rests within recording data existing in the frame but not outside of it. So if the wall moves beyond the frame, then the computer stops recording that data. At this point the editor is forced to have to manually key frame his composite, which can be a painstaking process and inaccurate to boot. This is why I recommended allowing more room within the frame so that the tracker can complete the process, then scale up the footage should you want it to appear as if the tracker has continued off frame.
A second option involves AE’s 3D Camera Tracker. Accessible via the Effects panel, this tool was made available as recently as the upgrade prior to the CC version. And it is pretty good. It works by assessing the camera movement of the scene then ends up with generated markers filling the footage. The best part? The tracking data continues off frame. The drawback to using this tool is that it doesn’t always pick up the corners of the area you want to track even if markers were manually placed in front of the camera. So it can result in a lot of trial and error.
![]()
Which leaves us with the third available option: a software package bundled with AE titled Mocha. Developed by Imagineer Systems, this limited edition version of their Pro application is really wonderful to work with. Instead of applying pins to specific markers or points in a plane, Mocha allows one to draw around the space with any shape in ways that are similar to rotoscoping. The resulting data is copied then pasted on the composite image or footage. If there is any drawback (isn’t there always?), the tracking process can sometimes be sabotaged by an invading, foreground object such as the chimney featured in the sample footage. Since the right side markers disappear behind said object, Mocha searches for a replacement. In terms of my sample footage, the tracker latched onto the corner of the first “S” in the graffiti appearing on that chimney. This results in “squeezing” the composite as the chimney inches closer to (and completely in front of) the much-needed background. Alas, this required some manual tweaking on my end. However, thanks to Mocha’s intuitive tracking ability and easy to use interface, it didn’t require that much effort. And like AE’s 3D Camera Tracker tool, data continues to record even after the targeted object exits out of the frame.

There are other examples of great tracking options I haven’t even gotten into that are not restricted to After Effects alone. Hopefully, you have gained a better understanding of the process (and limitations) involved with applying an effect to your footage. Ultimately, it comes down to that discussion you will need to have with your editor or special effects artist. Is this achievable if we approach the scene this way? What are our limitations? Do we have access to the technology to pull this off? If not, what are the other options? This will lead to the most important question, “so, then, what’s the best way to shoot this scene?”
