
In this second installment of a two-part series on outdoor portrait photography, we search for the best outdoor light, and found it in the shadows.
Ideal outdoor light
The best outdoor lighting is the type where direct sunlight isn’t around. A light overcast day is ideal: the big white sky acts like a large light box, which gives soft overall lighting that tends to flatter the subject. If you are using a compact camera (which you can buy at the Digital Camera Department at Adorama, set it on “portrait” mode and it’ll find the right exposure. For more advanced photographers using a DSLR or MILC, take a light reading off the palm of your hand–which reflects approximately the equivalent of 18 percent grey. When shooting portrait photography in the shade, open up around half a stop more and you’ll get nice open lighting on your subject.
More advanced shooters may want to have a reflector (there are many reflectors available at Adorama; learn more about reflectors) on hand to bounce even more light into your subject’s face. This will put a sparkle in his or her eye that is very appealing.

Perfect portrait light: Bright overcast days offer the best light. The sky provides even white light, working like a huge light box. Use a bounce flash or reflector to bounce a little light into the shadows on the lower part of the face, otherwise the forehead and hair might be too light. Note also how the photographer here chose a simple, nondistracting background, and used a large aperture to throw the background out of focus, drawing the eye to the subject.
Shade foreground, bright background
Try to avoid situations where your subject is in the shade but the background is in bright sunlight. The bright sunlight will either overwhelm the light meter reading, throwing your subject’s face into deep shadow, or if you use spot metering and base the exposure on a correct exposure of your subject, your background will be seriously overexposed.
If you have no choice it what’s in the background, the correctly exposed subject and overexposed background is the lesser of the two evils. However, a third choice is to add light via a reflector or fill-in flash. This will help to even out the difference between the background light value and the light hitting the subject.

Wide dynamic range: The boy is in shade while the background is in bright midday sun. How do you get a good shot of his face without blowing out the background? Use a fill flash, as was done here, or a reflector to bounce the sunlight into the shadow area. Can you get a photo like this with a compact digital camera? If you’re shooting this close, yes! Just set it to “flash on” and shoot away.
Advanced users with multiple flashes can avoid the flat on-camera flash look here. Both flash units should be off camera, at approximately 45 degree angles, to add modeling to the light, which give the subject’s face dimensionality.
Partial shade
When shooting a picnic or backyard portrait, beware of how the light is filtering through the leaves in the trees. Dappled patches of sunlight hitting a subject’s face will mess up exposure, creating unwanted highlights and shadows on the subject’s face where even lighting is needed.
One easy fix is to turn the subject around so that if light gets through, it will hit the back of their heads, creating desirable backlighting. Expose for the face, and use your fill-in flash if there isn’t enough light. Photo Alexander Hafemann
Watch your backgrounds
When you’re shooting outside, you may not have much control over what’s going on behind your subject. If there is a lot of color, activity and light behind the subject, these may become distracting elements in the composition. A busy background will pull the viewers attention away from the subject of your photograph. Simplify! Whenever possible, place you and your subject so the background has no distracting elements,
You can also smooth out the distractions by choosing your lens’s widest aperture–which will throw your background out of focus–and by using a moderate telephoto lens, which also limits depth of focus and helps to separate the subject from a potentially distracting background. (This also gives you the added benefit of a faster shutter speed, which can help prevent camera shake if you’re handholding your camera.)
Avoid wide-angle lenses for portrait work because they tend to distort facial features, which your subject might not be too happy about. The only time a wide-angle lens is appropriate for outdoor portraits is when you want to include other elements in the image because they tell something about the person being photographed. (This is called environmental portraiture, and is worth an entire article of its own.)
Oh yeah–make sure there are no trees directly behind the person you’re photographing or it will look like the tree is growing out of her head!
![]()
![]()

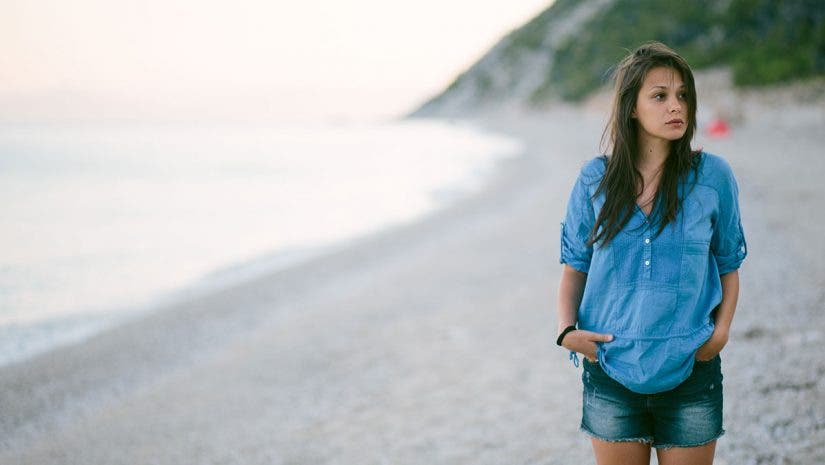
What’s wrong with this portrait?
- The background is brighter than the subject, drawing the viewer’s eye away from her.
- The two people in the background, even though they are blurred, are distracting.
- There’s a tree growing out of her head!

Better: The photographer chose a more subdued, less obtrusive background without any distracting elements. The viewer’s eye is now guided straight to the subject. Also, the over-the-shoulder look is more dynamic. She looks like she’s on her way to class.
A few random tips:
- When photographing a dark-skinned subject, overexpose by 1-2 stops in order to show facial detail more clearly. When using fill flash, also boost the power to show detail in dark skin.
- The brighter the day, the more likely that your subject will squint. Shoot in the shade!
- Use image stabilization or a tripod. Since better light is generally found in the shade–which requires longer exposures and therefore is more prone to producing shaky images, use IS if your camera’s got it. Otherwise, bring a tripod to keep the camera from moving.
- Move closer! The tighter your composition, the fewer distracting elements you’ll have in your image. Read Steve Sint’s article on portrait composition rules for more.