Even when you don’t have control of lighting, you can still make flattering and natural portraits in Adobe Photoshop.
Portraits are such a great subject, whether of a friend or loved one or a chance encounter with an interesting character. You can often get great results with a grab shot; it can capture a spontaneity that is truly special. But we all know grab shots can have pitfalls. A portrait should reveal so much more about a person than the surface of their face. To reach its potential, it shouldn’t be hampered by technical problems, but sometimes you can’t eliminate them before you shoot.
Poor lighting and bad backgrounds can be mitigated, to some extent, in the digital darkroom. The camera can reveal skin colorations, textures, and blemishes that are arguably beyond the reality of what we see in a person, and they can also be corrected to some degree. When you retouch a portrait, no matter how informal, you want to show the person in a special light. However, you are not obligated to do a facelift or a professional makeup job. You want the person to be flattered but also to recognize himself. Fortunately, keeping it real but honoring your subject is often not difficult.
I recently made a couple of far-too-casual grab shots that need work. My husband was taking a friend for a ride in his Stearman, a restored 1940s open cockpit biplane. I wanted to shoot some pictures for the friend but it was a bright, sunny day and I had forgotten my flash to fill shadows.
I’m using Photoshop CS4 but any version as far back as I can remember will work, as should recently-announced Photoshop CS5. You may be able to use a different image editor, but you’ll need one that allows masked adjustment layers.
Correcting lighting
It is common that eyes or faces are too dark and too low in contrast. The Quick Mask technique covered in my tutorial “Virtual Fill Flash” can work miracles on faces, to lighten them and punch up contrast and color. Be careful to keep the edges of the mask feathered and keep the area to be lightened completely inside the face. If the edges of the face are left a little dark it will add a 3D look, but if the lightened area extends into the background it will create an artificial halo.
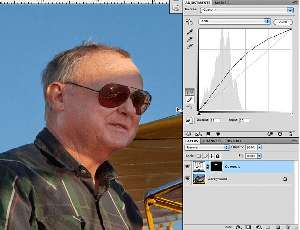
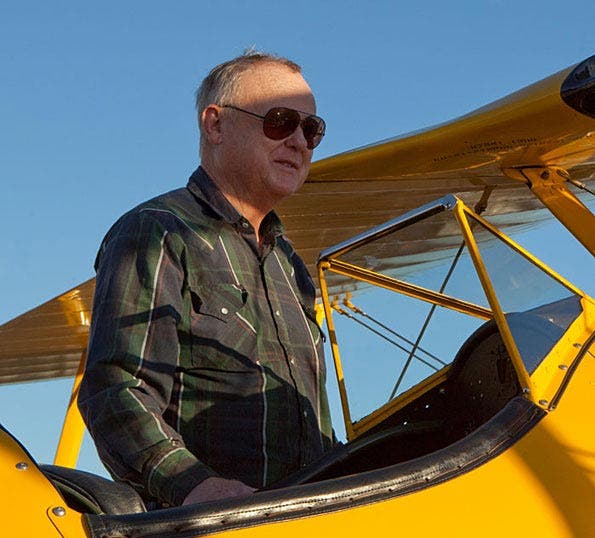
In the first picture Ted’s face is in partial shade. The Fill slider in Camera Raw made a great improvement, but going too far with it can create artifacts along shadow edges. So I chose to be conservative with it and do a little more lightening in Photoshop using the Quick Mask method to select the shadowed parts of the face. The edges of the shadow can be tedious to get correct, but with a masked adjustment layer you can keep painting the mask edges until you get it right after the adjustment has been made.
The method is outlined in the tutorial cited above, but here’s a quick summary of its effect on this image. Here’s the starting image from Camera Raw conversion.
Here’s the mask I painted:
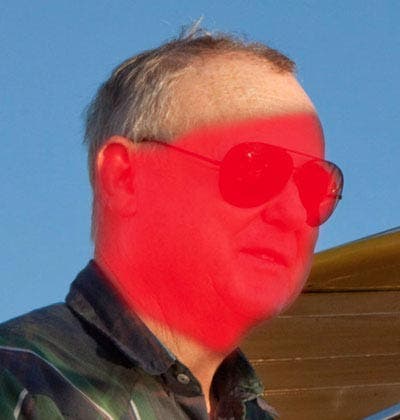
After hitting Q to get out of Quick Mask mode and into selection mode, I made a Curves adjustment layer:

Below is the result of lightening the shadow with Curves. I might pull down the point near the lower left of the curve a bit more, to darken the darks and hold contrast in the lightened area, but with faces you don’t want contrast to get too harsh. I have gone a bit extreme here in the lightening to show the result more clearly.

Now that I can see the effects of the adjustment, I can paint the mask further to refine the edges, as shown in the previous tutorial. You can adjust the size and opacity of the brush as needed. You usually want the brush at 0% hardness for this kind of work.
If the shadows are too complex, do what you can to lighten them in raw conversion, primarily by reducing contrast and using the Fill slider, then resort to the Shadows-Highlights adjustment in Photoshop. See my previous tutorial, “The Shadows/Highlights Adjustment in Photoshop.” The Color Correction slider in the Shadows-Highlights dialog can be useful with faces, as it will lower saturation.
Skin color
It is common for skin to photograph too red and you can use the same masking technique to deal with color problems. A mask and a selection are different incarnations of the same thing. If you made a selection which became incorporated into a mask on an adjustment layer, you can reload it as a selection with Select > Load Selection. If you have several adjustment layers, the active one will be the default choice. If that isn’t the one you want, click the dropdown, circled in red, to choose the one that contains the desired mask.

Once the desired area is selected you can make a Hue and Saturation adjustment layer, using the shortcut (black and white circle) at the bottom of the Layers palette (or panel, if you have CS4) or from the menu bar.
The quick fix for red skin is to go to the Red channel and desaturate it slightly. If this results in a bluish cast, move the Hue slider just slightly to the right to add some yellow. (You can also do color corrections in the color channels of your existing Curves adjustment, by moving the mid points of the color channel curves up or down.)
Once the desired area is selected you can make a Hue and Saturation adjustment layer, using the shortcut (black and white circle) at the bottom of the Layers palette (or panel, if you have CS4) or from the menu bar. Go to the Red channel and desaturate it slightly. If this results in a bluish cast, move the Hue slider just slightly to the right to add some yellow.
You can also do color corrections in the color channels of your existing Curves adjustment, by moving the mid points of the color channel curves up or down, or by using Color Balance or Selective Color, both as adjustment layers.
Whitening teeth and eyes
The same strategy can be used to whiten and lighten teeth and eyes. Just make the desired selection and use a Curves or Levels to lighten the area. If there is a color issue, as with yellowish teeth, use the color correction method above.
Red eye
There is a red eye correction tool in Adobe Camera Raw (one of the tools in the upper left), in Lightroom (in the tools under the histogram) and in Photoshop. In Photoshop it is located in the Toolbar, in the same tool group as the Spot Healing Brush, mentioned below. It is quite straightforward; just click and drag over the red area and it will be desaturated and darkened. You can also correct red eye with the same method used to whiten teeth: make a Quick Mask of the red area and make a Hue and Saturation adjustment layer. Desaturate the Red channel and darken as needed with the bottom slider in the Hue and Saturation dialog box.
Blemishes and wrinkles
There are several strategies for complexion work. For small blemishes in otherwise clear areas, the Spot Healing Brush tool can be a miracle. Just set the needed diameter and tap the spot and it will be blended out using information from the surrounding areas. If a spot is close to an area of different tonality, such as a dark eyebrow, the Healing Brush may pick up unwanted information from it resulting in a dark smear in the healed area. In this case you will need to resort to cloning.

Cloning can also be effective for isolated areas. You can lower the opacity of the cloning brush on the Options Bar (at the top of the screen) to make the adjustment more subtle. In some cases it might be helpful to change the Mode for the clone tool (also on the Options Bar) to Lighten so it will affect only the darker tones of spots, shadows and wrinkles. Use the smallest brush practical and keep it soft (Hardness set to 0). Here are the options to be aware of for the Clone Stamp tool:

For a face with a lot of wrinkles, cloning and healing are not the best solution. Here’s a good strategy:
Duplicate the Background layer. Then link the two layers so you can’t inadvertently move the copy layer. Select both layers by clicking one and Command-clicking the second. (Control-click for PC). Then click the Link Layers icon as shown. In the second figure below you will see the link icon has appeared on the right of the two layers.
Caution: don’t leave both active (highlighted). You generally only want one active; that designates which one will be affected by whatever you want to do.

With the duplicate layer active, go to Filter > Blur > Gaussian Blur and blur it just enough to make the wrinkles more subtle. Then you want to add an all-black mask, which will block the entire blurred layer. Do this by holding the Alt key (Opt for Mac) while clicking on the mask icon at the bottom of the Layers panel/palette. You will now see the original image, with the blurred layer completely hidden.

You can now use a white brush to paint on the image where the wrinkles are, which cuts holes in the mask to reveal the softened areas. Zoom in on the image and take a soft-edged brush of appropriate size. Set the Foreground color (at the bottom of the Toolbar) to white by clicking the tiny black and white overlapping squares above the larger squares. Or you can hit the D key for the default white foreground color. You now have a brush that will paint with white on the black mask, thereby erasing it and revealing the blurred areas on that layer. Paint over the most wrinkled areas and you are done.
Here is the mask I painted:

And here is the result:

Or you can reverse the process and make a regular “white” mask (just click the new mask icon at the bottom of the Layers panel/palette without the modifier key) and use a black brush to paint out the areas you want to be sharp, revealing the sharp Background layer below the blurred layer.
If you decide later you have blurred too much, you can reduce the opacity of the blurred layer.
Diane Miller is a widely exhibited freelance photographer who lives north of San Francisco in the Wine Country and specializes in fine-art nature photography. Her work, which can be found on her web site, http://www.DianeDMiller.com, has been published and exhibited throughout the Pacific Northwest. Many of her images are represented for stock by Monsoon Images and Photolibrary.
