OnOne claims Perfect Layers lets you work in layers even if your image-editing software doesn’t have this option. Is it a low-cost way to do layers, or too buggy for prime time?
The new Perfect Layers plug-in from OnOne Software is another step in the advancement of Adobe Lightroom and Apple Aperture, adding more power to their image editor functions. It also works as a standalone to let you combine images from any source, including RAW images.
This program doesn’t give you any capabilities you don’t have in Photoshop (even considerably older versions) and some other image editors, but it streamlines your workflow by letting you stay in Lightroom or Aperture for more kinds of image adjustments. And if you don’t have Photoshop or an image editor that does layers, you will gain valuable capabilities; working with layers gives you tremendous creative power.
A lot of people who use Photoshop haven’t delved into layers, and for those folks Perfect Layers is an introduction, providing an interface that makes it easy to learn the concepts and possibilities, and what you learn will carry over to Photoshop.
Perfect Layers allows you to open several files as a stack of layers. You can stack pixel layers and conceal parts of the top layer to reveal the underlying layer by painting with a Masking Brush or by making gradients or vignettes with a MaskingBug. You can also add a solid color fill layer to simulate colored filters on a lens. You can change the order of layers in the stack by dragging and dropping. You can change the opacity of a layer. And you can change the blending mode of a layer to alter how it interacts with the layer below, which will change the image’s appearance. You have the most commonly used modes available: Normal, Lighten, Darken, Screen, Multiply, Overlay, Soft Light, Hard Light and Color.
Installation is simple and straightforward and there is an introductory screen with an overview of the program and a link to online videos. The program is accessed from Lightroom by going to File > Plug-In Extras > Perfect Layers. It can also be run as a stand-alone program. To load the desired files (PSD, TIFF, JPEG or RAW) go to File > Open and navigate to them. To save your layered image, go to File > Save. It will be saved as a Photoshop .psd file with the layers intact and editable.
My first try at using the program encountered a problem. I opened the program as a stand-alone and chose two RAW files from my Canon 5D Mk II. One had a bright area but it was not blown out. But in the Perfect Layers preview window the highlights were significantly blown out and the mid to dark tones were very flat and washed out. When I saved the file, the resulting PSD file showed the same tonalities, shown in the figure below.

Below is the image as it appears in Lightroom and Adobe Camera Raw, showing perfect exposure and no blown-out highlights.

However, when I opened the same RAW files into Perfect Layers from Lightroom, the exposure was perfect. Either I had found a program bug, which I’m sure will be addressed, or the stand-alone version is not meant to be used with RAW files; it worked fine with JPEGs, TIFFs and PSD files.
The next surprise was when I saved a layered file and then opened it in Photoshop and saw that the color profile embedded was “Generic RGB.” That led me to look at the Perfect Layer Preferences. In the General tab I found could set the Working Color Space to Adobe RGB, to match my Photoshop working space (sRGB and ProPhoto are also options). And in the Lightroom Plug-Ins tab I could set the bit depth to 16 bits and choose a resolution so the Photoshop file generated will match my chosen resolution for my other files. (Of course, I should have done this up front; it is always necessary to look at Preferences when you set up a new program.)
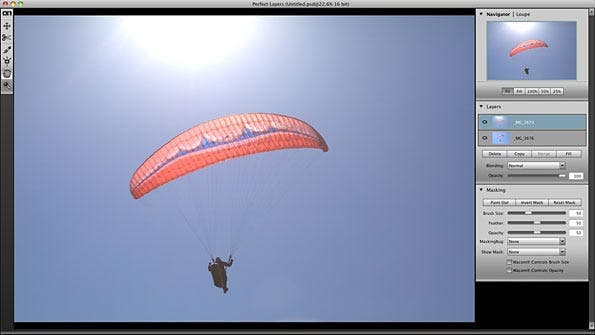
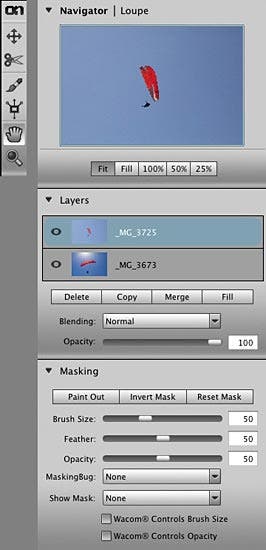
In the first figure above you can see the Perfect Layers screen layout. Here is a better view of the working panels, including the toolbar, which appears to the left of the image preview area:

A common use of layers is to combine two images by stacking one on top of the other as layers and masking out part of the top one. Here I have stacked two images of paragliders with the image of the smaller one on the top layer. I want to “cut out” around it to have it appear as though the two were shot together.
But the two paragliders are both in the center of the image, on top of one another. I clicked on the top layer to make it active and lowered its opacity to 50 percent so I could see through to the bottom layer. Then I chose the Transform tool (the second one down) and clicked and dragged to move the layer to the right. The moving operation was funky; it didn’t want to move at first, then letting go and grabbing it again persuaded it to move. I assume this is an issue that will be fixed.
Then I chose the Masking Brush from the Toolbar on the left and in the Masking Panel (the bottom panel in the figure above) I set the size, opacity and feather I felt was best. Clicking the first of the three buttons labeled Paint Out, Invert Mask and Rest Mask, you can toggle through three choices: Paint Out, Paint In or Erase. I set Paint Out and painted over the area of sky in the top layer that is over the larger glider, which is on the bottom layer, to erase that area of sky in the top image and let the bottom image show through.
A unique bug?
The first few times I tried to paint, nothing happened. Then suddenly, it worked. This happened several times; I have no idea why but I assume it is another thing that will be fixed. I was disappointed in the feel of the brush, which drags. I have a powerful MacPro computer with 14 GB of memory (and most of it was free at the time) and I use a Wacom Intuos tablet. I have never had a similar problem with any of the tools or brushes in any other program.
With a Wacom tablet, pen pressure controls brush size or opacity or both. I masked out the sky on the top image where it blocks the paraglider on the bottom image. To go back and forth between erasing and un-erasing, the “x” key toggles, or you can click Paint Out and Paint In, just below the word Masking.
There is also a MaskingBug tool that lets you do gradients in circular or square patterns. If you make a mistake you apparently have several levels of Undo, from the menu bar, but I had trouble recovering from mistakes with the Masking Bug and I finally had to quit the program and start over. This tool isn’t exactly intuitive but there is a tutorial video on the OnOne web site.
The images I tried proved to be a poor choice, though, as the skies were different tonalities, and the bottom layer had a strong tonal gradient of darker to lighter. I could deal with that in Photoshop, with a clipped adjustment layer with a masked gradient, but not here. So masking one layer to reveal parts of the one below it requires well-matched layers.

The other uses of the program proved much more straightforward. Changing layer opacity is simple; just highlight the desired layer and move the Opacity slider in the Layers panel.
You can change the blending mode of a layer to alter the image’s appearance. The available modes are Normal, Lighten, Darken, Screen, Multiply, Overlay, Soft Light, Hard Light and Color. Changing the mode of a layer affects how it interacts with the layer immediately below. For instance, you can duplicate a single layer and put the top one in Multiply mode to darken light areas and mask out the areas that are made too dark. If the image becomes too dark you can reduce the opacity of the top layer. There is a tutorial showing this on the OnOne web site, with a sunset scene with a dark foreground and light sky.
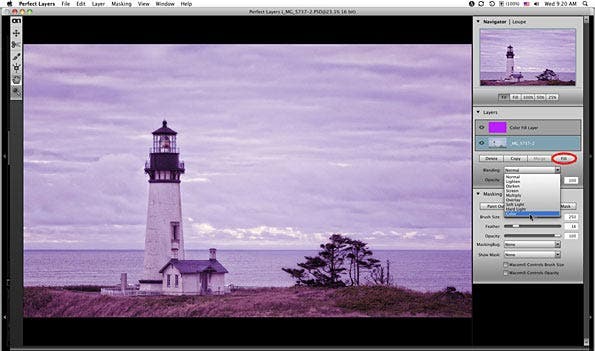
And you can add a solid color fill layer to simulate colored filters on a lens. Just click Fill, circled in red in the figure below. You can click on the blending modes to preview their effect. You can adjust the opacity of the color layer and brush out parts with the masking tools, if desired. The blending mode will change how the colors interact with the layer below (or the composite of the layers, if there are two or more masked pixel layers). But if you want to tweak the color you apparently have to make another layer; I couldn’t find a way to change the color, as I can in Photoshop.

There are tutorial videos on the OnOne web site.
onOne Perfect Layers is currently available through Adorama for under $70.

