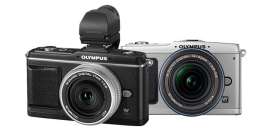
Within months of the groundbreaking E-P1, Olympus introduced the interchangeable-lens, compact Micro Four Thirds E-P2. Is this camera a minor refinement, or a significant upgrade?

Key features:
• 12.3-megapixel image quality
• In-body Image Stabilization (three modes)
• Multi-aspect image ratios
• HD video capture; HDMI output
• New Continuous Autofocus (C-AF) Tracking System
• Double Exposure Capability
• Shadow Adjustment Technology
• Face Detection Technology
• Dust Reduction technology
• Bracketing functions for white balance and exposure
• 3/fps with sequential shooting (max. 10 in RAW mode)
• 3-inch LCD preview screen
• SD memory card slot (SDHC compatible)
• Uses Micro Four Thirds system mount
• All-digital lenses (Four-Thirds mount compatibility with MMF-1 adapter)
• VF-2 Electronic Viewfinder
Camera options:
• FL-series speedlight
What’s missing?
• No built-in Flash
• It’s Pricey
Best suited for:
• General photography
• Low and available light (ISO 100 – 6400)
• Special effects w/8-Built-in Art Filters (two more than E-P1)
• People Photography (e-Portrait mode)
• Landscapes
• Travel photography
Price: (accurate as of January 7, 2009)
• $ 1,099.99 with Zuiko 14-42mm f/3.5-5.6 ED black lens
• $1,099.99 with 17mm f/2.8 ED lens, black

After testing the Olympus E-P1 I boldly predicted that an E-P2 model would arrive on the scene shortly thereafter. This new camera, I speculated, would have a lighter weight polycarbonate body, a few less features—maybe not as many Art Filters— and would be less expensive. Boy was I wrong! The E-P2 has a black metal body, two more Art Filters, and costs more.
For equipment snobs who were put off by that fact that, unlike the original film-based Olympus Pen, eye level viewing was not possible with the E-P1, Olympus hammers back by providing the E-P2 with an oh-so-retro VF-2 digital viewfinder that tilts, no less. It makes me look like Gene Smith—only fatter—when I use it.
A button on the VF-2 lets you switch back and forth between the E-P2’s three-inch LCD preview screen and the electronic viewfinder but like every EVF camera I’ve ever used I was usually in a different mode than I wanted, especially when I needed to review images in playback mode on that big, beautiful screen.
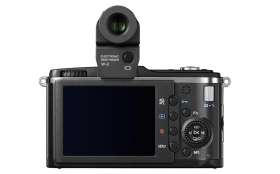
The VF-2 electronic viewfinder is connected to the body through a dedicated accessory port located on the back of the camera that effectively blocks the hot shoe, making any kind of flash photography impossible when it’s attached. Since the E-P2, like its sibling E-P1, lacks a built-in flash, this might be seen as a major oversight, or not, depending on the shooter. It bothered the heck out of me, but maybe not if you’re an available-light shooter.
The VF-2 provides a 100% field of view and is tiltable up to 90 degrees, so anyone doing close-up work might find it useful, while street shooters might like it for surreptitious photography. Unlike difficult-to-use EVFs that I’ve tried from other manufacturers, the high=resolution VF-2 is one of the best I’ve seen, although it doesn’t works as well in low light. (More later.) Olympus says this port may have other uses in the future, starting with an external adapter for a variety of microphones that is expected to follow “real soon now.”
 Olympus’s VF-2 electronic viewfinder provides a 100% field of view and is tiltable by up to 90 degrees so people doing close-up work might find it useful and street shooters might like it for sneak shots.

No Flash? No problem. This available light shot of my wife, Mary, was made with the E-P2 and the M.Zuiko Digital ED 14-150mm f/4.0-5.6 with an exposure of 1/20 sec at f/4.8 and ISO 640. The in-body image stabilization made it easy to hand hold the slow shutter speed and control provided by the TruePic V processor produced infinitesimally sized noise at this ISO setting. ©2010 Joe Farace
These days it seems that any new digicam isn’t marketable without some kind of video capture function—even if most photographers never use it—and so the E-P2 is capable of recording 1280x720p HD resolution AVI movies at 30/fps and offers PCM (Pulse Code Modulation) sound quality. Serious video shooters will want to take advantage of that external microphone adapter when it’s available.
Seven minutes of footage can be recorded in a single shot making the E-P2 an ideal vessel for YouTubers capturing Junior’s first steps or producing their own music videos. Unlike some other cameras offering video capture, many still photography functions, including Olympus’s Art Filters, depth-of-field, angle-of-view and autofocus tracking, are operational in movie mode but this is still a digital still camera and that’s how I used it.
It’s a still camera. Really it is!
Like the E-P1 that I kinda liked, the E-P2 uses the Micro Four Thirds lens system. (Not to be confused with the 4800 calorie Fifth Third Burger served in minor league baseball’s West Michigan Whitecaps stadium.) The Micro Four Thirds standard features the same Four Thirds type (18 x 13.5mm) image sensor but in a 6mm smaller lens mount that adds two signal contacts for smoother Live View shooting, shorter lag time, and faster communication between lens and body that manifests itself in fast autofocus and overall operation. There’s also a 50% reduction in flange back length that means smaller bodies such as the E-P1, E-P2, and Panasonic’s fascinating looking but untested by me DMC-GF1 camera.
If you read my review of the E-P1 (insert link here) you will be regaled with the variety of lens adapters that will fit the E-P2 including two offered by Olympus. The MMF-1 adapter lets you attach standard Four Thirds mount lenses from Olympus, Sigma, and Leica/Panasonic to the E-P2. Oly’s MF-2 adapter lets you mount manual focus OM film camera lens to the E-P2, some of which are available from Adorama’s Used Department as well on on-line auction sites such as eBay.

In addition to the 14-42mm f/3.5-5.6 ED lens I tested or 17mm f/2.8 pancake, Olympus promises other lenses, including an M.Zuiko Digital ED 9-18mm f/4.0-5.6 that, because of the camera’s 2X multiplication factor, produces the equivalent of 18-36mm. Look for the M.Zuiko Digital ED 14-150mm f/4.0-5.6 about the same time.
The E-P2 is available with either the M.Zuiko Digital 17mm f/2.8 pancake lens or 14-42mm f/3.5-5.6 ED lens that I tested. When shot at 14mm, the 14-42mm f/3.5-5.6 ED lens retains all of the characteristics of any other really wide-angle lens—including perspective distortion—but with the angle-of-view of a 28mm lens. Perspective distortion is a warping of an object, especially near the edges and can typically be seen in images shot using a wide-angle lens.

As you can see in this 14mm shot of the Platte Valley Medical Center, the pyramid tower is slightly bent, which can easily be fixed in Photoshop. I could have changed the composition and placed the tower nearer to the center to eliminate or minimize the effect but liked this composition better. Interestingly vertical shots made at about the same distance and at a slightly longer focal length on the 14-42mm f/3.5-5.6 ED lens exhibited little if any perspective distortion. ©2010 Joe Farace
The recommended operating temperatures for the E-P2 are 32-104 degrees Fahrenheit and 68-140 storage. For our Canadian readers, that’s 0 – 40? for operation, -20 to 60? storage. I didn’t get to experience shooting in any of those warmer temperatures, and all of the outdoor photography I did was at temperatures well below the 32 degrees Olympus specifies but in all my inadvertent cold weather testing, sometimes with temperatures in the teens, there were no failures of any camera function and all the LCD displays on the camera and VF-2 worked perfectly while I was looking forward to a cup of Hot Chocolate.
The exposure was 1/320 sec at f/10 and ISO 1600 but my exposure was to an air temperature of 21 degrees, well below the E-P2’s specification—and with a breeze blowing off the frozen lake behind me the wind chill factor was minus nine degrees. Brrrrrrr. ©2010 Joe Farace
I ran the E-P2 through low-light tests and found the noise levels produced were low for a camera with such a small imaging chip. I shot the test with Noise Reduction ON and used the Standard noise reduction filter to maximize image sharpness while reducing noise levels. At ISO 6400 the image was noisy, but interestingly the image on both the three-inch LCD screen and VF-2 displayed their own form of (what looked like) video noise that I don’t remember experiencing when testing the E-P1. This defect was not visible on the image files.
Typically, I find that one of the best ways to minimize noise is to use RAW capture to reduce JPEG artifacts, and any noise that remains can be eliminated or minimized by using noise reduction software. In this case, however, the JPEG files I shot had significantly lower noise than the RAW files because of the E-P2’s excellent built-in noise reduction.

I made this photo of the Brighton Cultural Center at ISO 6400, 3200, and 1600. This is the 1600 ISO shot, with an exposure of 1/20 sec at f/3.5. ISO 6400 let me shoot at a hand-holdable 1/80 sec, but all the shots in the bracketed sequence are sharp because of the E-P2’s excellent in-camera image stabilization. Noise is predictably reduced when lowering the ISO from really noisy at ISO 6400 to hardly noisy at all at 1600. Any remaining noise can be further reduced or eliminated by using third-party software solutions such as Nik Software’s Dfine.
As I write this, Adobe Camera RAW 5.6 (part of Photoshop CS4) is compatible with the camera’s ORF-format RAW files and Olympus provides its Master software in the box along with a trial version of their Studio software for RAW conversion and enhancement. Olympus Studio 2 can be useful, but I found its batch-processing feature to be confusing. Since the E-P2 can shoot aspect ratios other than the default 4:3, the Studio software displays the full frame and an outline showing the 3:2, 16:9, or 6:6 image areas if they were originally selected. When shooting at other than 4:3 ratio, the images are also visible in either LCD display in the selected aspect ratio.

Adobe Camera RAW 5.6 is part of Photoshop CS4 and is compatible with the camera’s ORF (Olympus Raw Format) files. It’s my first choice for working with RAW format image files from the E-P2, such as this shot, which I made under low light (ISO 6400) tests on my model train layout. ©2010 Joe Farace
Filter, we’ve got filters…
Like its predecessor, the E-P2 offers a choice of aspect ratios and multiple exposures. Also retained from the E-P1 is the level gauge, i-Auto mode, and e-Portrait option. e-Portrait retouches the subject’s appearance while the shot is being made, and recognizes faces automatically, making facial skin appear smoother, brighter and more youthful. The new i-Enhance function boosts specified colors within the frame to add more punch to the image
Two new Art Filters join the six that are included with the E-P1. You can use Diorama to “enhance a composition’s depth of field to give the image an unreal touch and model-like structure” or the Cross Process filter that produces color and contrast shifts similar to those produced through cross processing silver halide film. All of the Art Filters can be used in still or movie mode. The new filters are shown below compared to an unfiltered image.
All of the other filters, which are also included on the E-P1, can be seen in my E-P1 review. If you’re worried that you might change your mind and wished you had the original color file, you can shoot using the E-P2’s RAW+JPEG mode and get two files: a color RAW file and a JPEG image with the filter applied. What’s more, the E-P2 offers four different RAW+JPEG options with different sized levels of JPEG capture.

The image at left is the unfiltered image, captured with an exposure of 1/20 sec at f/4.7 and ISO 160. The E-P2’s excellent face detection software even picked out Snoopy’s face and focused on it. The middle image was shot with the Cross Process filter, producing a noticeable increase in contrast and color shift, yet Snoopy remains white. The Diorama Art Filter (at right) creates a slight increase in contrast accompanied by some edge softness producing an overall effect that might be a good choice for real portraits. ©2010 Joe Farace

While doing some cold weather testing of the E-P2 I made this image using the camera’s Grainy Film Art Filter. Exposure was 1/640 sec at f/14 and ISO 640 with a plus two-thirds stop exposure compensation. The filter is designed to create grainy, high-contrast monochrome images but when overexposed produces this Kodalith-like effect. ©2010 Joe Farace

There’s more than one way to capture monochrome images than using the Grainy Film Art Filter. The top shot was made in the E-P2’s Natural Color mode with an exposure of 1/320 sec at f/8 and ISO 160. I used those same exposure settings to make the middle shot using the camera’s Monotone mode with the (digital) Red filter applied to add some depth to the sky. The bottom photo was made using the Grainy Film Art Filter for yet another interpretation to the scene. ©2010 Joe Farace
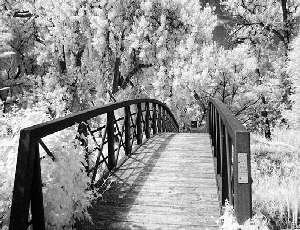
Olympus cameras have always been somewhat infrared sensitive when used with on-camera filters, and all of the filtered images in my book “The Complete Guide to Digital Infrared Photography” were made with Olympus DSLRs. Recently I’ve noticed a somewhat diminished IR sensitivity in their cameras, but because it’s Winter in Colorado the effects of IR capture are going to vary not only by time of day but also by time of year. Here’s a comparison made in the same location but at different times of year and different weather conditions. The first IR image made with the E-P1 in August; the one with the E-P2 was done in late December under much, much different temperatures.

This summer I tried IR capture with the E-P1 using a Hoya R72 filter held in front of the lens and the results were surprisingly good but also not so surprisingly filled with accumulative noise caused by a 20-second exposure. ©2010 Joe Farace

Right now at the same place in the same park, there are no leaves on the trees and the bridge is covered in snow and temperatures in the low 20’s. Using the same process (but higher ISO with shorter exposure) I created this snowy result with the E-P2. ©2010 Joe Farace
Final thoughts and recommendations
Whether or not you choose the E-P1 or E-P2 depends on your shooting style. If you’re an available light shooter who needs eye-level viewing, the E-P2 is the camera for you. If you’re a street shooter, be sure to order the camera with the M.Zuiko Digital 17mm f/2.8 ED lens because it will be less fiddly. With experience, you’ll get used to its angle-of-view, and will be able to work faster. The price is the same with either lens, so someone looking for Olympus Pen F functionality in an all-digital world won’t go wrong with either pick.
The image quality produced by the E-P2 is impressive and for a camera in the price range —a 15-megapixel Canon EOS 50D with IS lens only costs $30 more— but that should not be surprising. The camera’s TruePic V image processor automatically enhances color range, saturation, brightness, sharpness, as well as reduces image noise and improves edge reproduction, enhancing image quality. The Olympus E-P2 is easy to use and supports Art Filters, HD movie quality recording, and low light sensitivity up to ISO 6400. It’s a clever and capable camera.
Joe Farace is the author of a new book called “Digital Monochrome Special Effects” published by Lark Books and that’s available at Barnes & Noble and Amazon.com.


