Perhaps you’ve heard that you can now sell your photographs online as limited edition art with something called non-fungible tokens, or NFTs. It’s an exciting time as we move into the future of art, but it also means that the process may involve new and somewhat complicated processes. In this article I’m going to teach you how to create and sell your very first piece of NFT art in 10 steps.
Unfortunately, it’s not as easy as selecting a photo and slapping a price tag on. It involves cryptocurrency, crypto wallets, minting, “gas fees” and more. This isn’t meant to intimidate you by any means, but setting up for your first piece will take a little time and effort. I will say that I’m giving you an overview of the process, but you’ll definitely need to do a bit more research based upon where and when you decide to sell your first piece — different platforms have slightly different processes.

If you want to follow along with my NFT art, be sure to check it out here.
Here is how to create your first NFT in 10 steps:
- What are NFTs?
- Buy Ethereum on Coinbase
- Set up your wallet
- Transfer money to wallet
- Select the platform or marketplace and connect your wallet
- “Mint” and pay first “gas fee”
- “List” and pay second “gas fee”
- Promote on social platforms
- Wait for bids
- Receive payment after sale
It’s a lot to think about, so, let’s let’s dig into the details.
1. What are NFTs?
The first step to creating, minting, and listing your first NFT is to learn more about what they are. You think I’m joking, but a lot of photographers and artists hear the hype about it being a quick way to make money, and they jump right into it.
You’ll want to do more research, and I’d suggest that you begin by watching my first video above. I explain in detail how NFTs create digital scarcity and act like certificates of authenticity. I take you through the essentials of the lingo, what the Non-Fungible Tokens are, and what they mean to the art world and photographers.
Also, I recommend you look into other successful photographers and other artists in the space. They will not only inspire you but give you ideas for best practices but also how you, too, may find success.
Speaking of, my third and final video in this series covers my experience with selling my very first NFT and best practices in the space… so stay tuned for that.
2. Buy Ethereum on Coinbase
One of the things you may not have realized is that minting and listing your NFT is that it will actually cost you money upfront. I’ll talk about this later, but you are going to have to begin by purchasing some currency you can use to pay for the process.
In particular, you will have to purchase a cryptocurrency called Ethereum. This is about to get lingo heavy, so let’s start with some basic terminology.
- Cryptocurrency: a digital currency that is decentralized. In other words it’s not controlled by a bank or government. You may have heard of bitcoin before? That is a cryptocurrency.
- Ethereum: Often seen as ETH, is the specific currency used for the creating, buying and selling of NFTs among other things. NFTs are created and recorded on the “ethereum network” and that’s why you’ll need to use this particular digital currency.
- Cyptocurrency Exchange: where you can buy, sell, and send these digital currencies. Its the same idea as a normal currency exchange like when you travel and need to get the local money… except this is dealing with cryptocurrency.
Okay, so we got some lingo out of the way. What do we do with this knowledge?
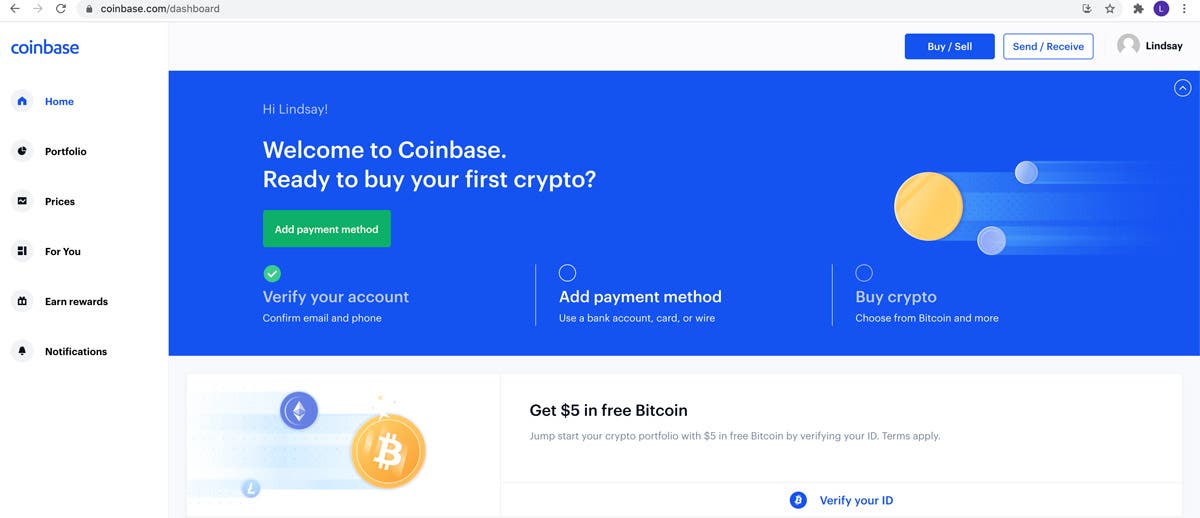
You’ll need to begin by creating an account with Coinbase, a cryptocurrency exchange. You use your “real” money, in my case US dollars, to purchase cryptocurrency. As I just mentioned, certain things, like NFTs in particular, can usually only be bought, sold, and created using this specific currency. If you have Bitcoin or Dogecoin or anything else, its like trying to buy something in Thailand with Euros — you’ve got the wrong money.
There are a few ways to pay for your crypto, but typically you’ll either pay via debit card or a bank transfer. Here’s the kicker. If you use a debit card there is usually an initial limit on what you can spend, which may not even be enough to get your started in making your first piece. If you do a bank transfer, it can take up to two weeks. For me, the money transfer took 10 days.
So, if you plan on doing an NFT soon, you should probably do this part of the process right away.
You, of course, will need to decide how much money you want to exchange. I’d say you’ll probably want to start out with a $150-200 USD or so to make sure you cover your necessary fees in creating your art, which we will talk about later. You can get away with less, but you don’t want to be short.
You can see in this instance that I decided to convert $1000 USD. Coinbase will then let me know when the money is in my account.
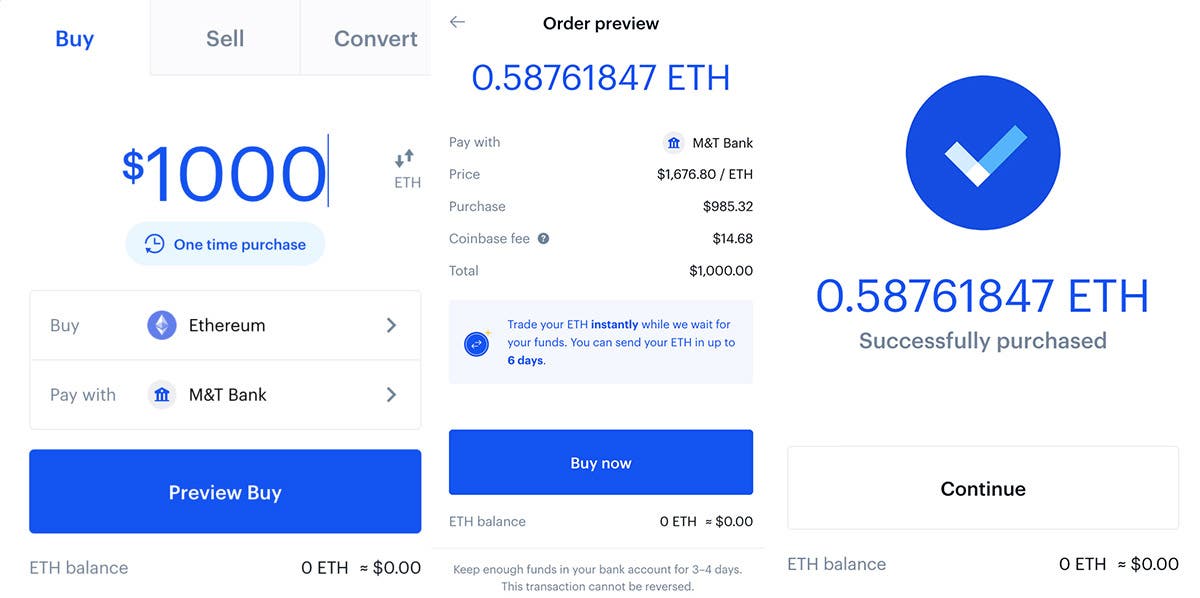
Oh, and by the way, if you’ve ever gotten money at a currency exchange in another country you know that it’s not free — they charge you a fee. It’s the same thing with these crypto exchanges — so just a heads up.
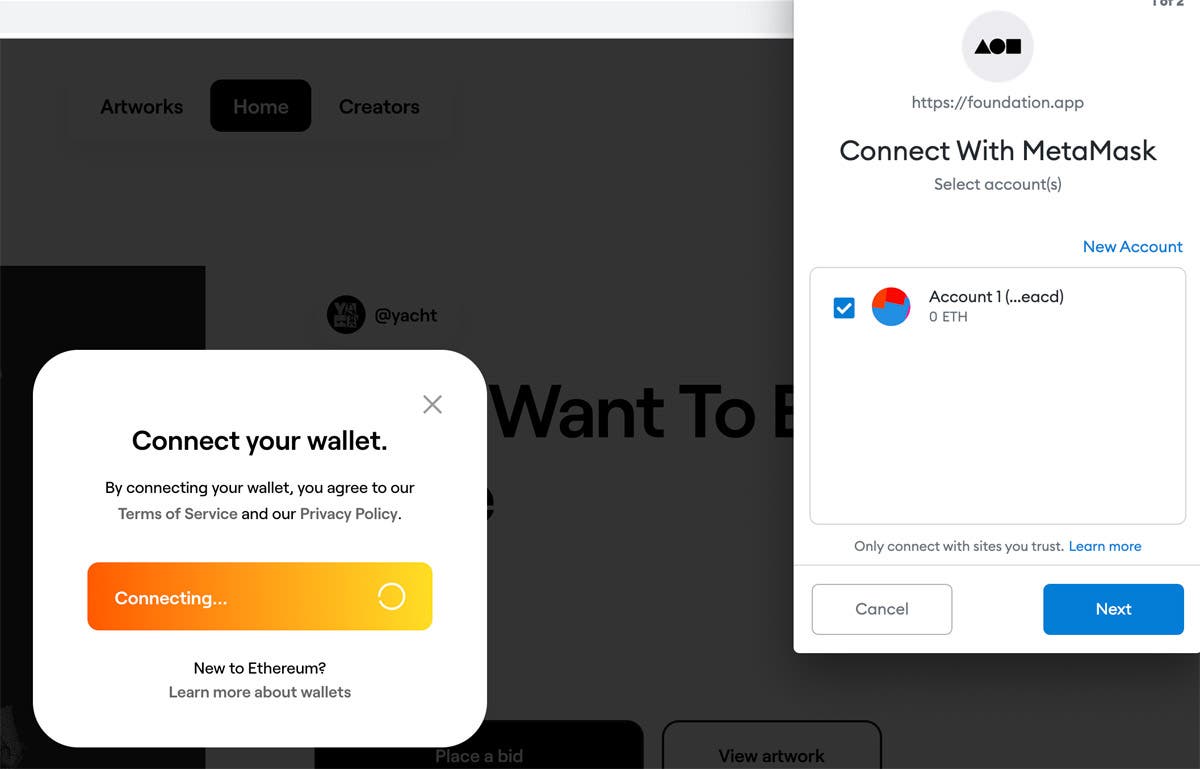
3. Set up your wallet
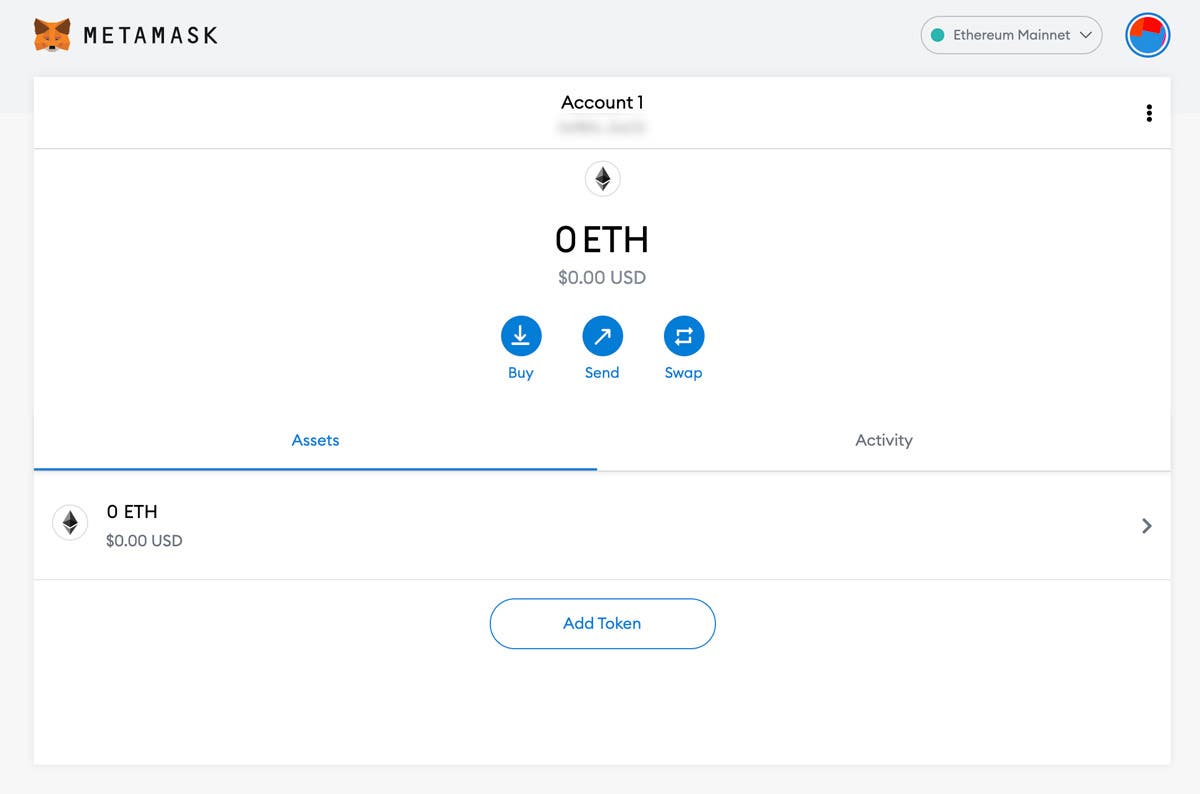
You’ve purchased some crypto to spend, but now you need a wallet to put it in. These wallets allow you to interact with different platforms to buy and sell things.
While it’s not exactly the same thing, you know how on a lot of websites you can easily one click pay with PayPal? Your wallet does that same thing. With just a click of a button you can pay for what you need without having to do transfers or anything that takes too much time — it’s instant.
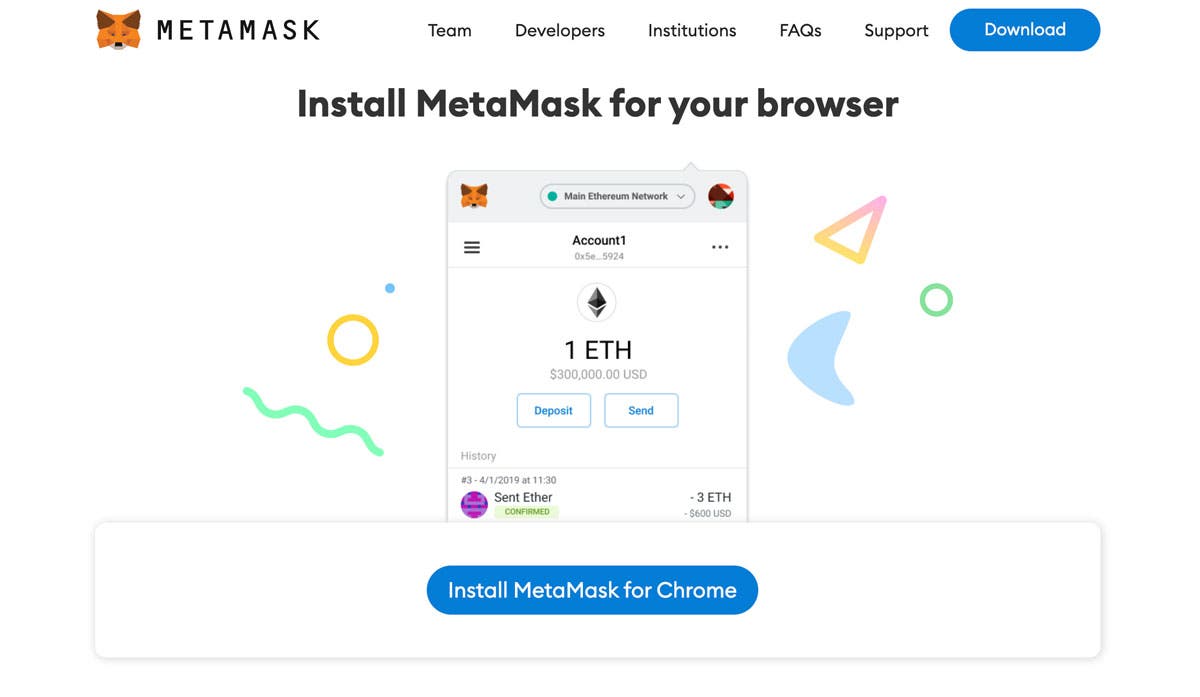
There are many wallets out there, but one of the most common and ubiquitous is Metamask. It has a browser extension that makes using Ethereum much, much easier.

When you sign up for Metamask, you are going to create a password and have a special code called a “seed phrase” that is a series of words. You have to keep this info in a very, very, very safe place.
I don’t mean to stress you out, but I do mean to stress you out. If you lose this seed phrase there is no “password reset.” Your account cannot be accessed and your money will get stuck there. So be careful!
4. Transfer money to wallet
To be able to easily spend your cryptocurrency, you have to connect your Coinbase account (where you exchanged the money) to your wallet (in my case, Metamask).
Your wallet creates a unique address, a place where money can be sent. Simply copy that code (usually saying “Account #1”), and return to Coinbase where you can “send/receive” money. Give it your address, select the amount to send, and then wait a few minutes.
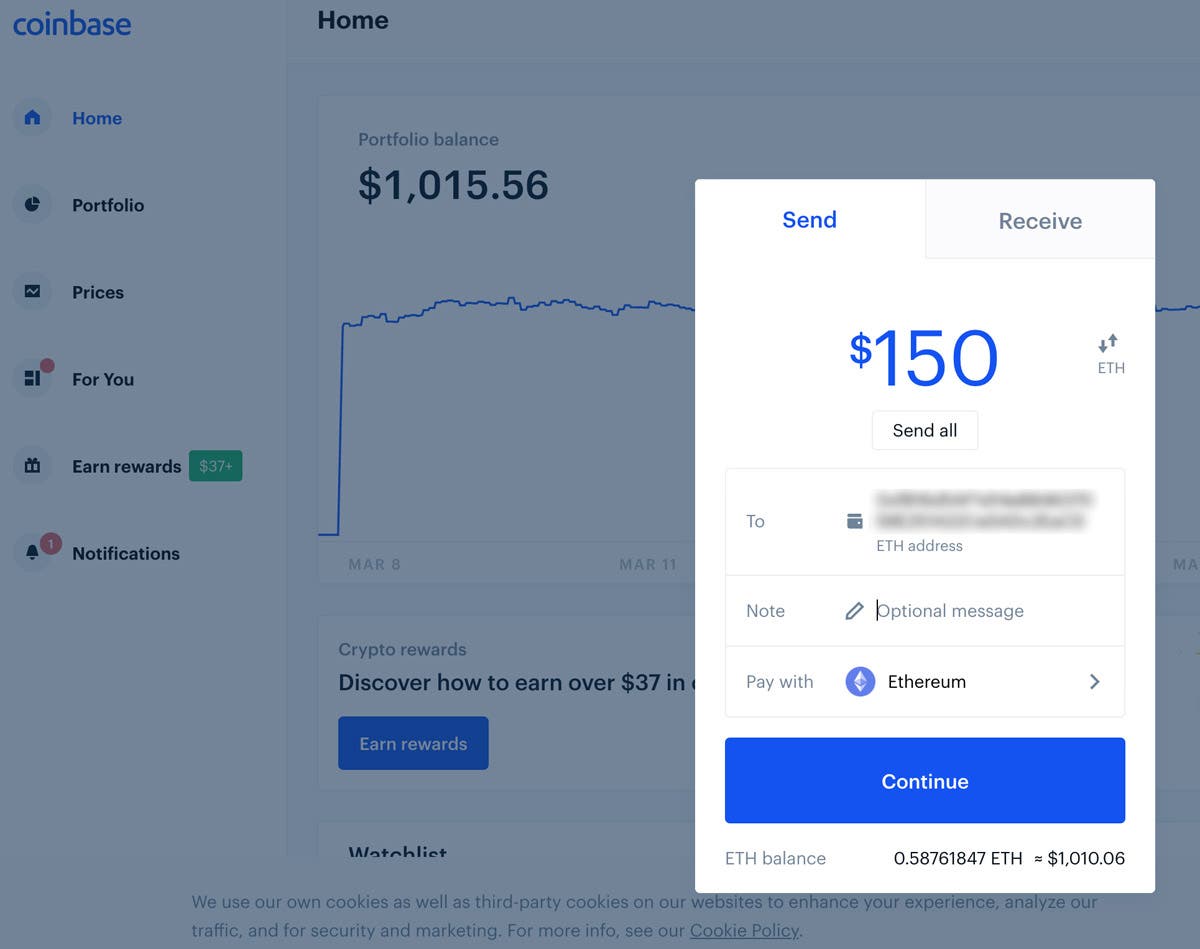
I personally started with a low amount to test it out the process. I selected $150 to transfer, and then it shows up in my wallet shortly thereafter, ready to spend!
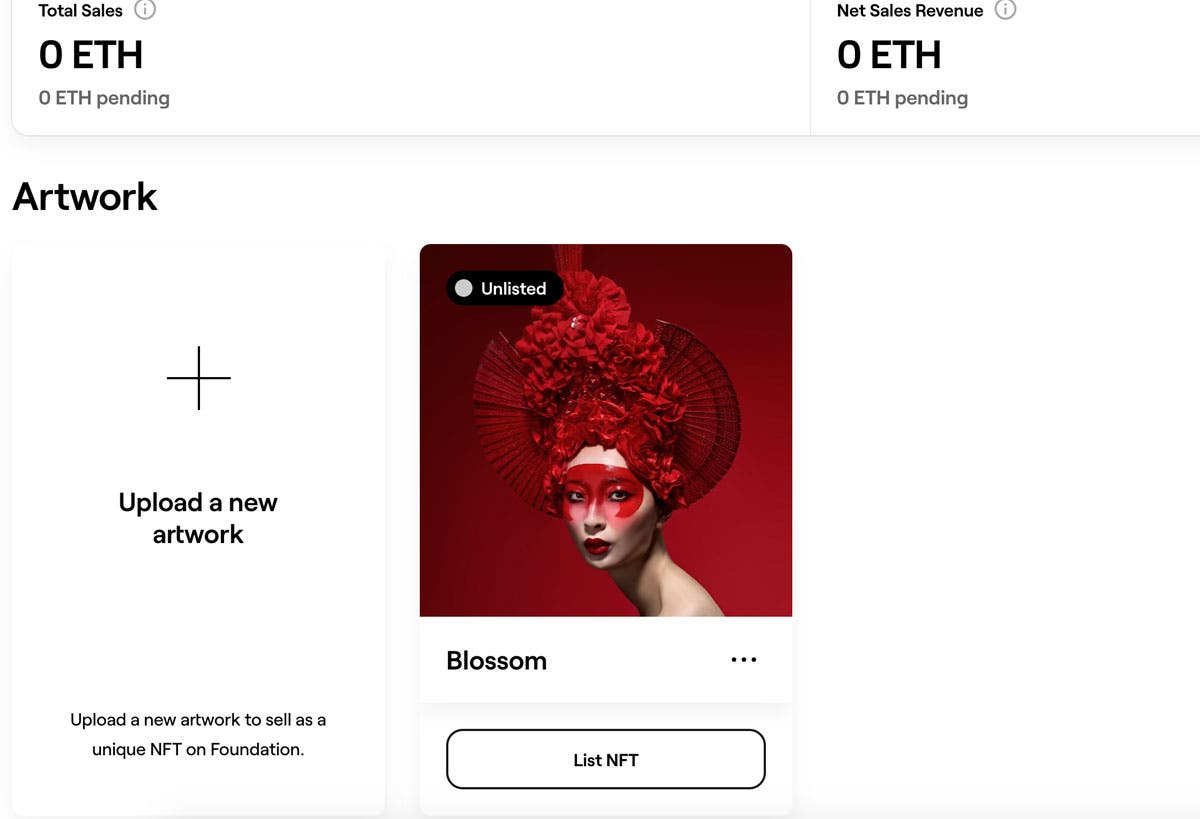
5. Select the platform or marketplace and connect your wallet
When you display and sell your artwork in real life, typically you will do so in a gallery. Think of your NFT platform or marketplace like a gallery. It’s a place where other artists are selling and displaying their work, and there is already a loyal group of interested art collectors.
These platforms also help you through the process of putting your NFT into blockchain (“minting”) and then listing your piece (aka, making it available for sale).
There are many different platforms, and each has different types of art they display, different features, different protocols. Some platforms have still photographs present and others are almost exclusively digital illustration and animation.
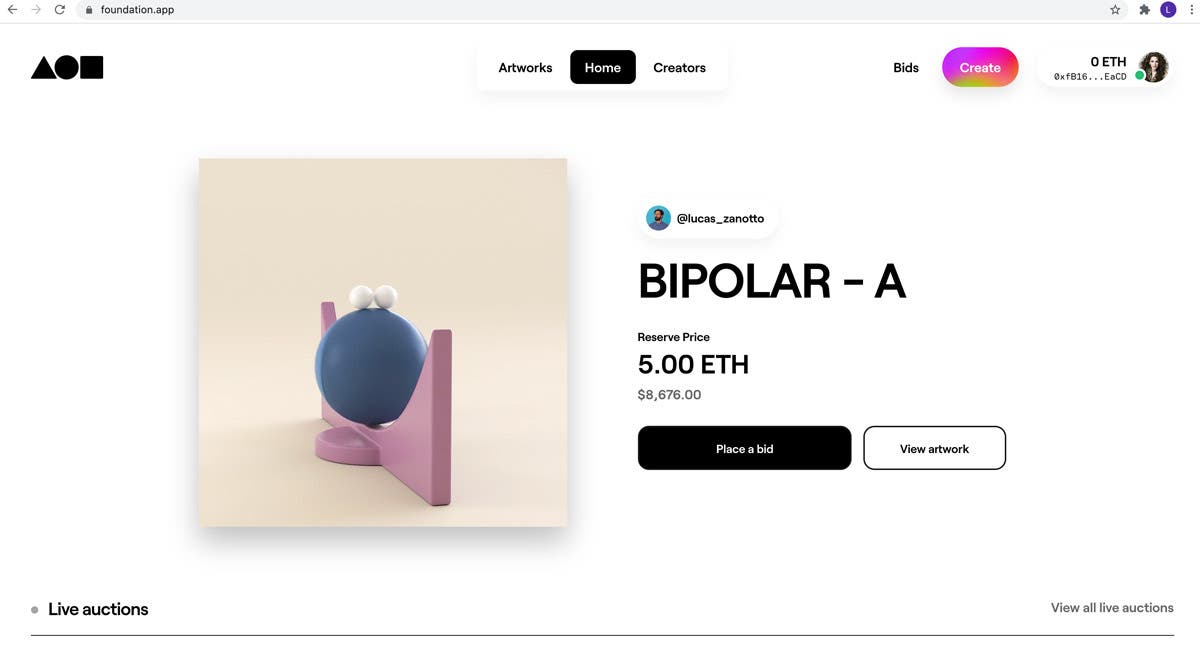
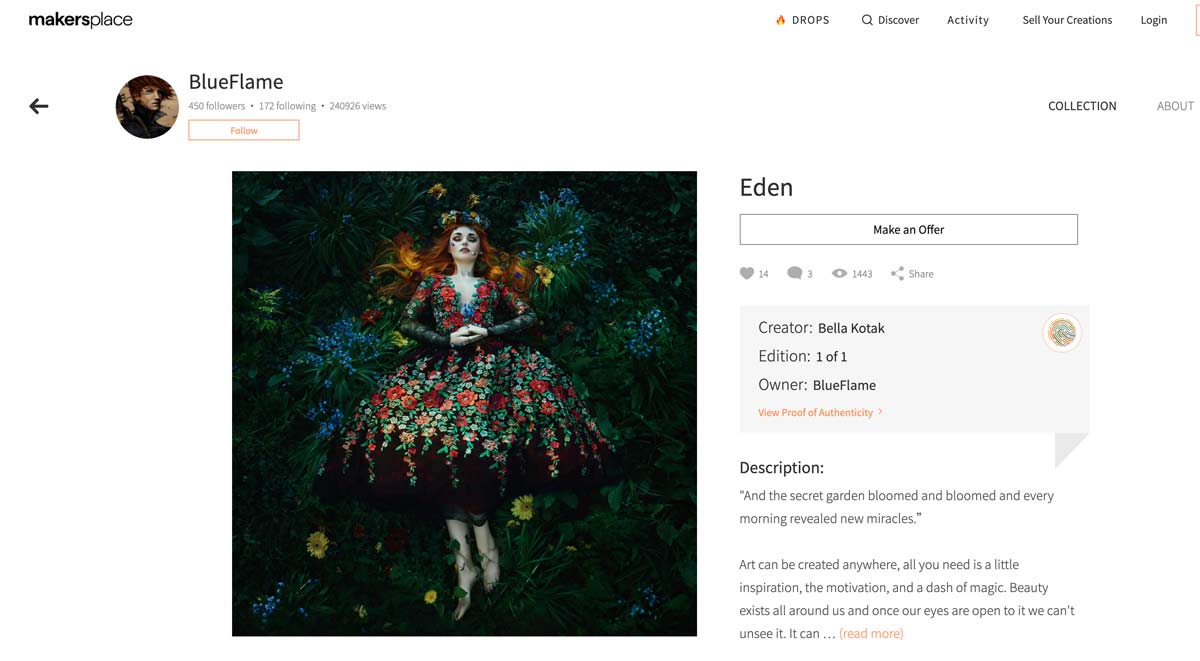
For example, for my very first NFT creation, which often called a “drop” or “genesis drop”, I chose the platform Foundation.
What I like about Foundation is that it has a great community of artists, including photographers, and all the artwork has one-of-one editions. In other words, you can only sell one NFT for a particular piece of artwork. Furthermore, the community is invite only, and invites are given to a creator once they sell a piece. In other words, it is artist curated. I love that idea, and after selling my first piece I got to invite two artists that I really admire onto the platform.
Of course, there are many other marketplaces and you’ll have to research which fits you best.
- Makersplace is a platform that is specific to NFT artists, and does allow the artist to choose different editions.
- On SuperRare artists must apply and it is carefully curated, exclusive art.
- OpenSea is one of the oldest and biggest NFT marketplaces. It’s not just art but other digital collectibles like trading cards, 3D objects, and more. There is no screening process, so you can get started right away.
- Of course there are more and I recommend you look at other platforms like Rarible, Niftygateway, and more.
After you’ve selected your marketplace, you need to connect your wallet. For example, with Foundation you aren’t creating an account — you just connect your wallet and that is your account. If you have metamask up and running as a browser extension and you are signed in, you just hit “connect” and it does it for you. This does vary based upon the platform you’ve chosen.
6. “Mint” and pay first “gas fee”
You’ve got your crypto currency, you’ve set up your wallet, you’ve selected your marketplace for your art, you’ve connected your wallet. Now it’s time to mint your first piece.
Minting is when you actually create your NFT that lives on blockchain that cannot be edited or deleted.
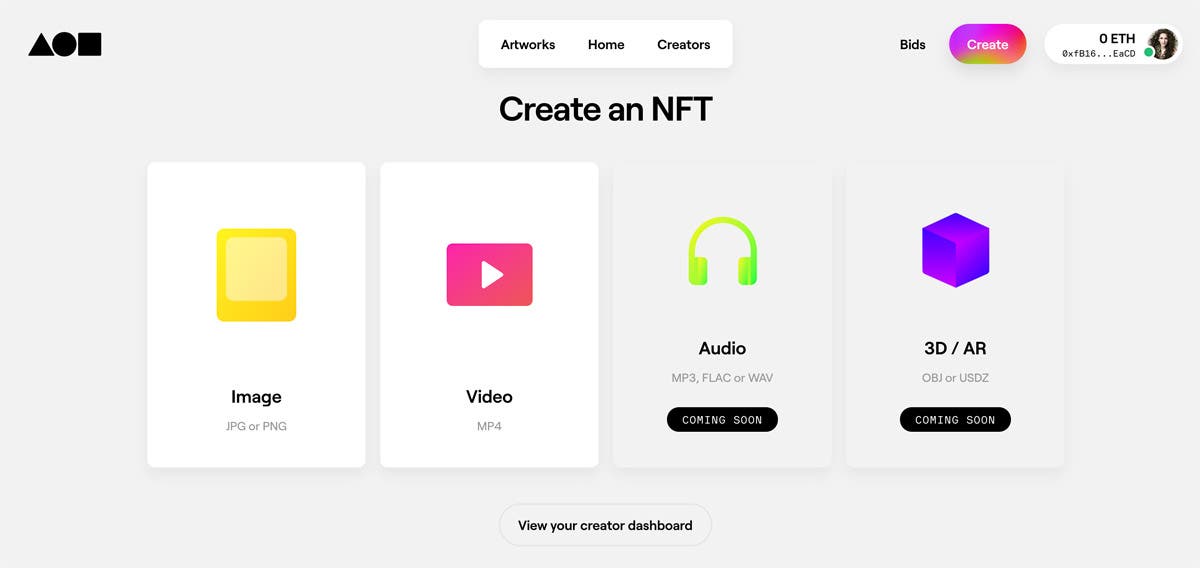
This is the point in the process where you select your artwork, add a title and description, and then upload your piece. Depending on what marketplace you use, this is where you decide upon your edition.
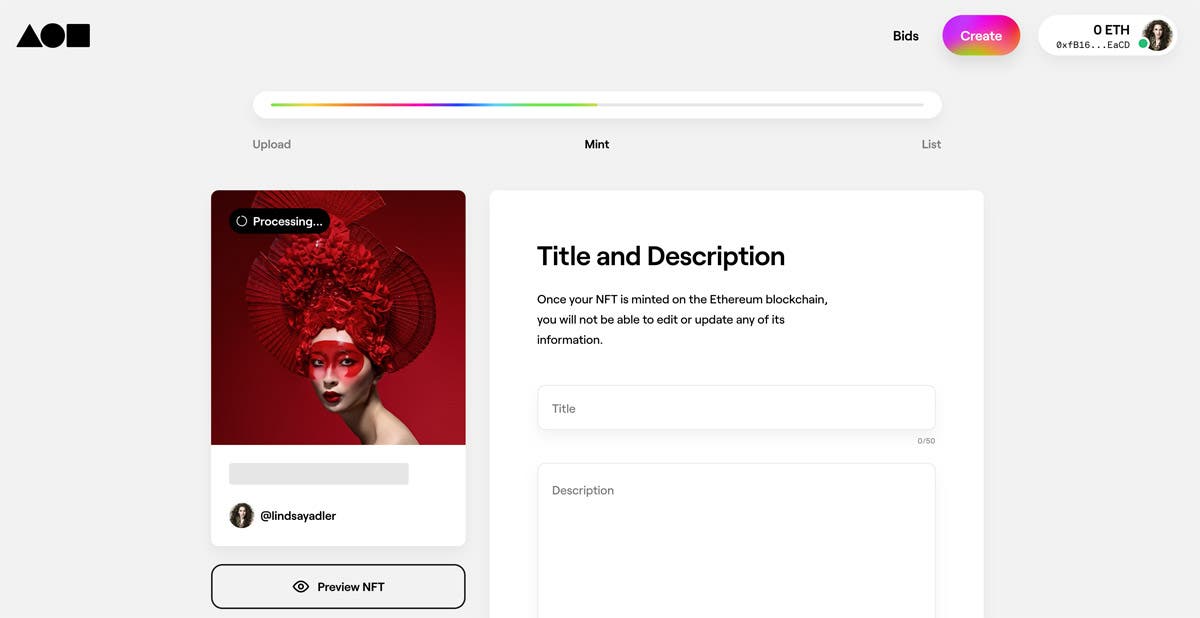
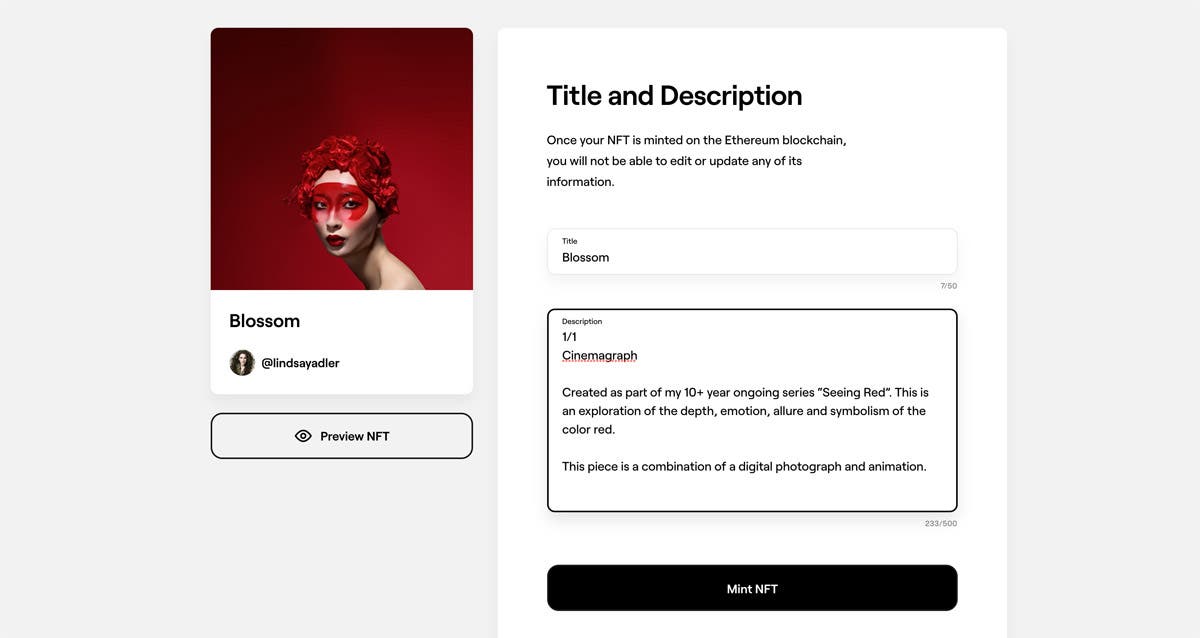
You’ll want to double and triple check to make sure you don’t have any spelling errors or other mistakes, because once the piece is minted you cannot change it.
Minting also costs money, so if you have to delete aka “burn” your piece to destroy it, you’ll have to pay to mint it again. So check your work carefully.
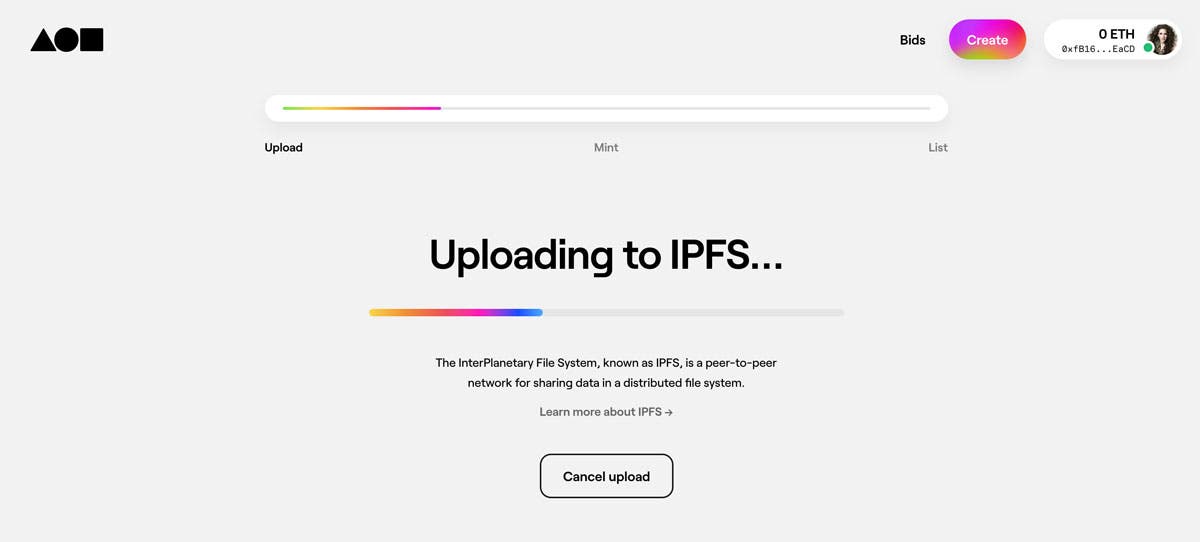
As you go through the minting process you’ll need to upload your file. To clarify, you don’t upload your piece onto the blockchain — that would just take up way too much information. When you upload your piece you will probably see some notification about IPFS, which cutely stands for “interplanetary file system”. This is just a safe place where your file is stored, and your NFT is connected to the piece, but only the NFT goes up on blockchain.
Have you double checked everything? Great. Now hit “Mint NFT” you are then prompted to “sign” your NFT on Metamask just like signing your artwork. The words and button may vary based upon the platform, but the idea is the same.
Then you must approve your first “gas fee”. A “gas fee” is a payment to cover the computing power needed to process the NFT up onto the blockchain. Basically you are helping pay for the people that make the system work. These fees are not consistent because they are based upon the demand to the system, and there are certain times of day or days of the week where gas fees will be more or less money.
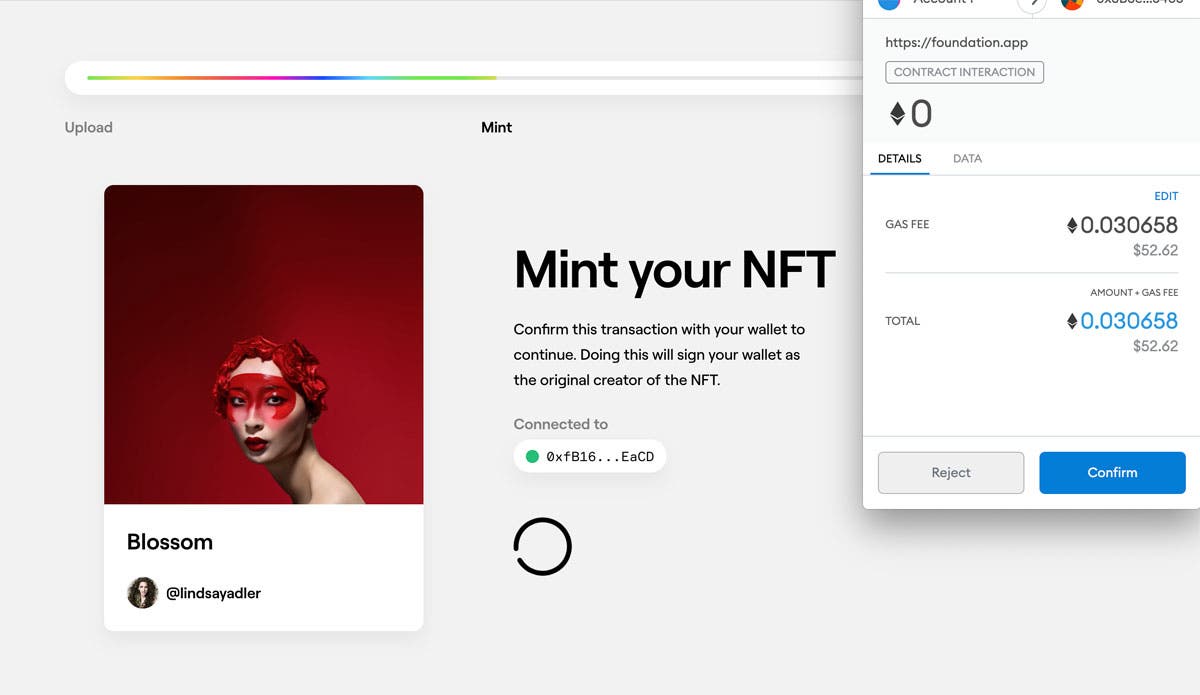
In some systems you can actually decide the maximum you want to pay for the gas fee, tell the system, and it will only process when it’s within the acceptable price range.
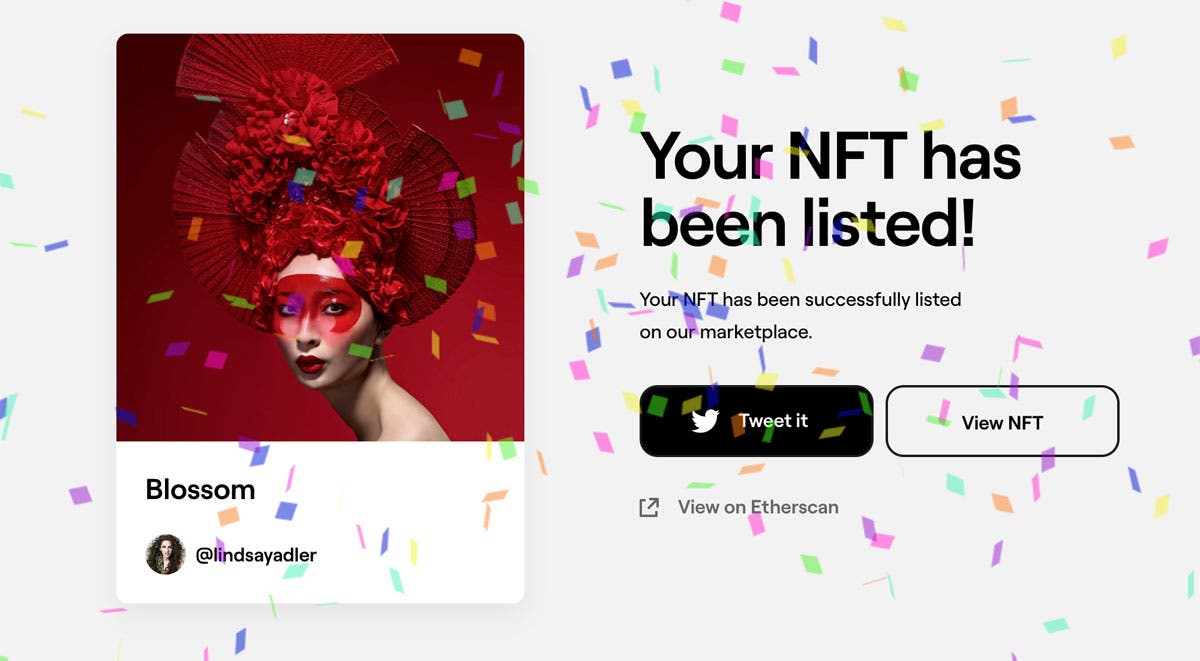
7. “List” and pay second “gas fee”
After a few minutes of processing, your first NFT has been minted and it’s up on the blockchain. Now, you need to list your piece. Listing your piece is basically making it available for sale or auction.
This is where you will determine things like your reserve price, or the minimum you will sell your piece for.
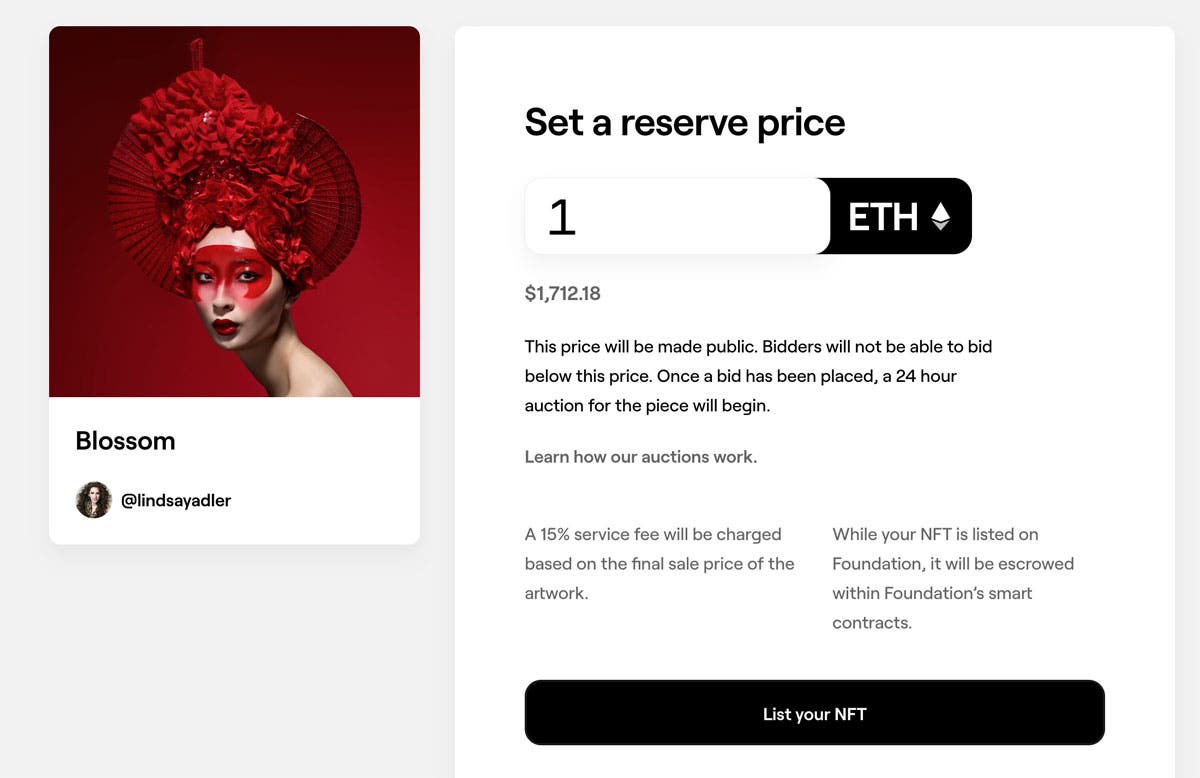
Depending on your platform, this is where you will decide how much you want to receive as royalties on future sales.
Guess what? Unfortunately, when you list your piece, there is one more gas fee to pay.
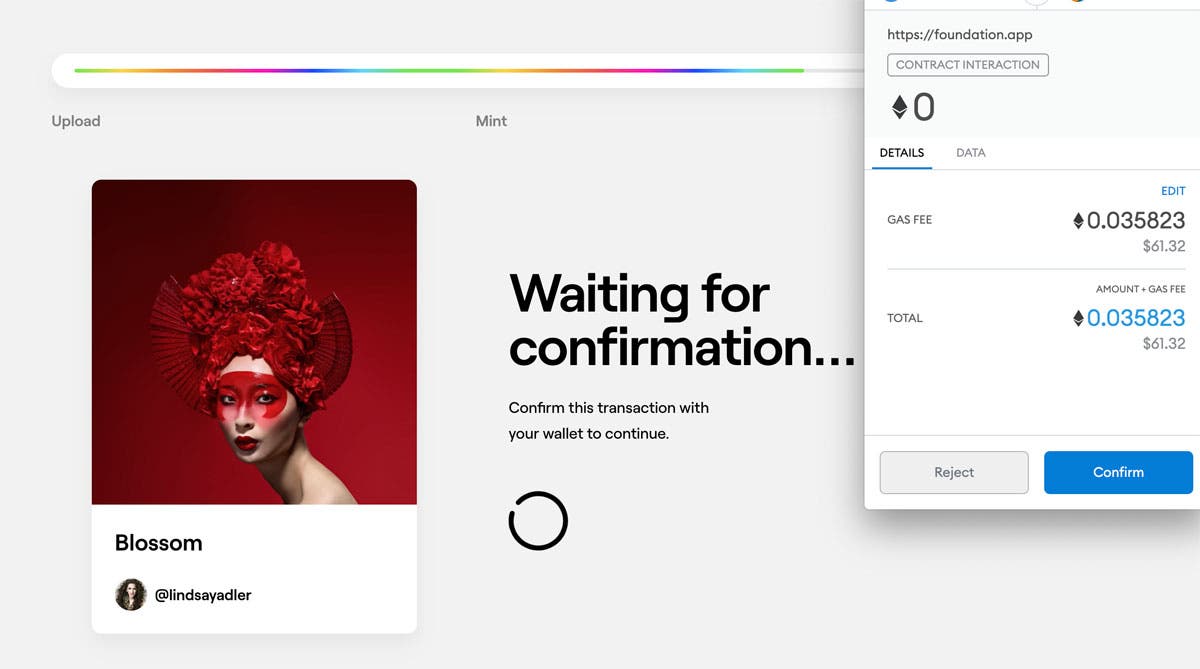
Again, gas fees vary dramatically, but at the time of recording this video when I created my first NFT, each of my gas fees cost me around $60 USD — so about $120 total cost. Plus there were some fees for exchanging currency — so upfront costs around $135.
8. Promote on social platforms
Your piece is out in the world, but its time to let the world know about it. You need to promote your artwork. Share it on social media, let your audience know, and consider being more active on Twitter. At the moment it seems that NFT collectors are most active on Twitter, and this is where you can begin to network. Also, there are a lot of active discussion groups on Clubhouse with both collectors and artists.
Furthermore, many NFT marketplaces (including Foundation) have their own Discord channels, which is fundamentally a group chat platform for sharing a wide range of content. You can join the conversation to meet collectors, share your work, have conversations, and just create a general buzz.
9. Wait for bids
It took a lot to get to here, but now you are waiting for bids. You’ll want to keep promoting your work and try to not bite off all your fingernails waiting for your first sale. Some pieces may sell instantly, and others may never sell.
In the end, it is a gamble to some extent, and you may have some piece you love never gain the love of a collector. Or, all of a sudden three weeks later, it will suddenly sell.
My first piece received its first bid within 20 minutes of me listing the piece, and then didn’t receive another bid over the 24-hour auction period set by Foundation. It can be totally unpredictable, but still super rewarding to sell your first piece.
To see the piece, check it out here.
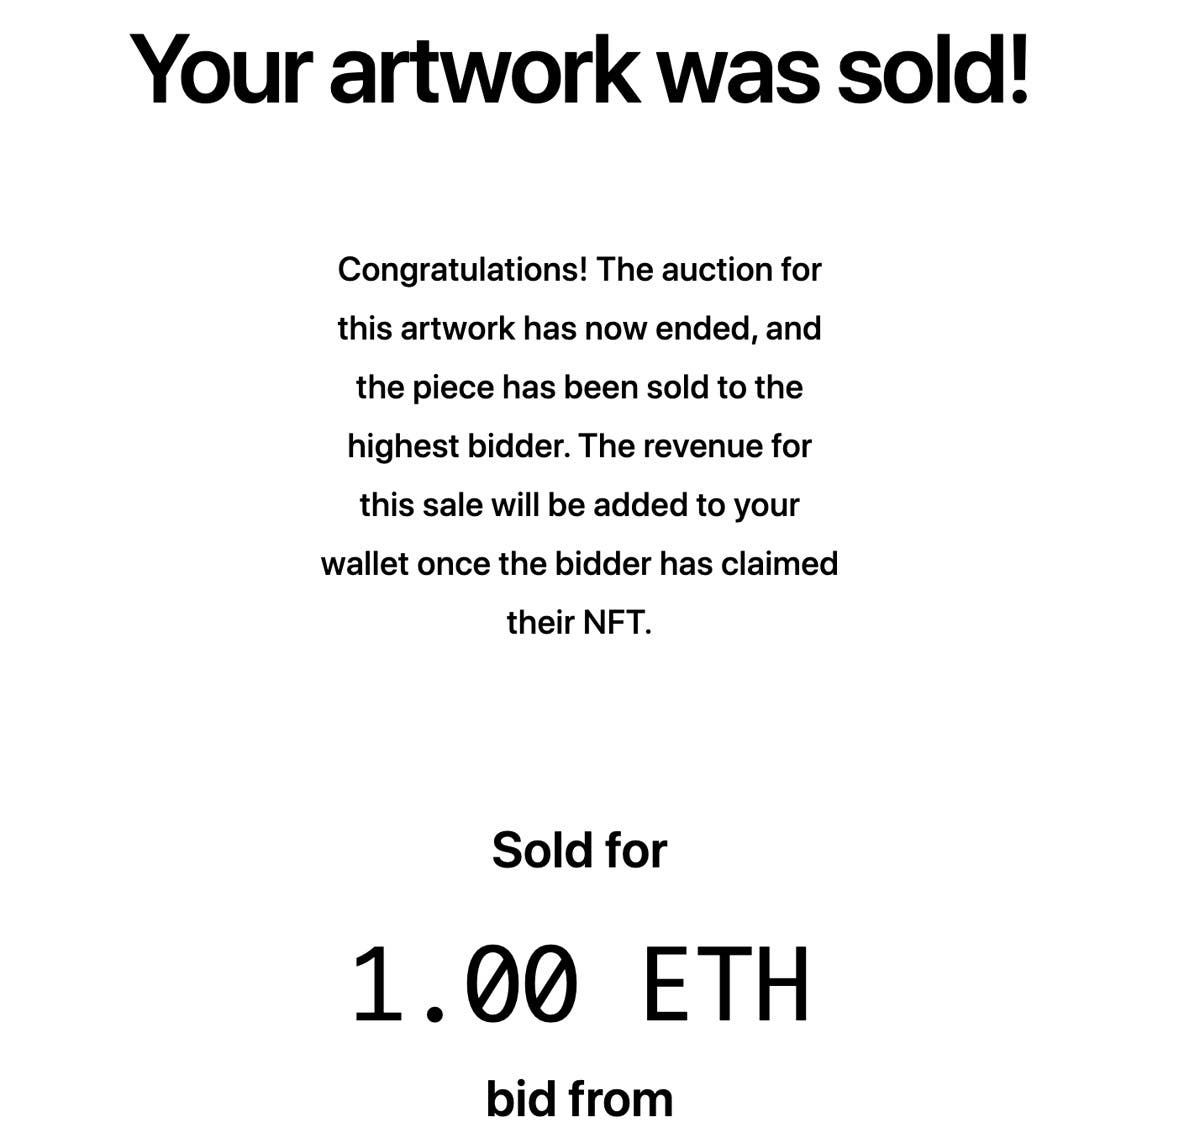
10. Receive payment after sale
Alright, step 10, your piece has finally sold! Your work caught someone’s attention and they bought the piece at or above your reserve price. You can see here I set my reserve price to 1 ETH, at the time around $1,600 USD.
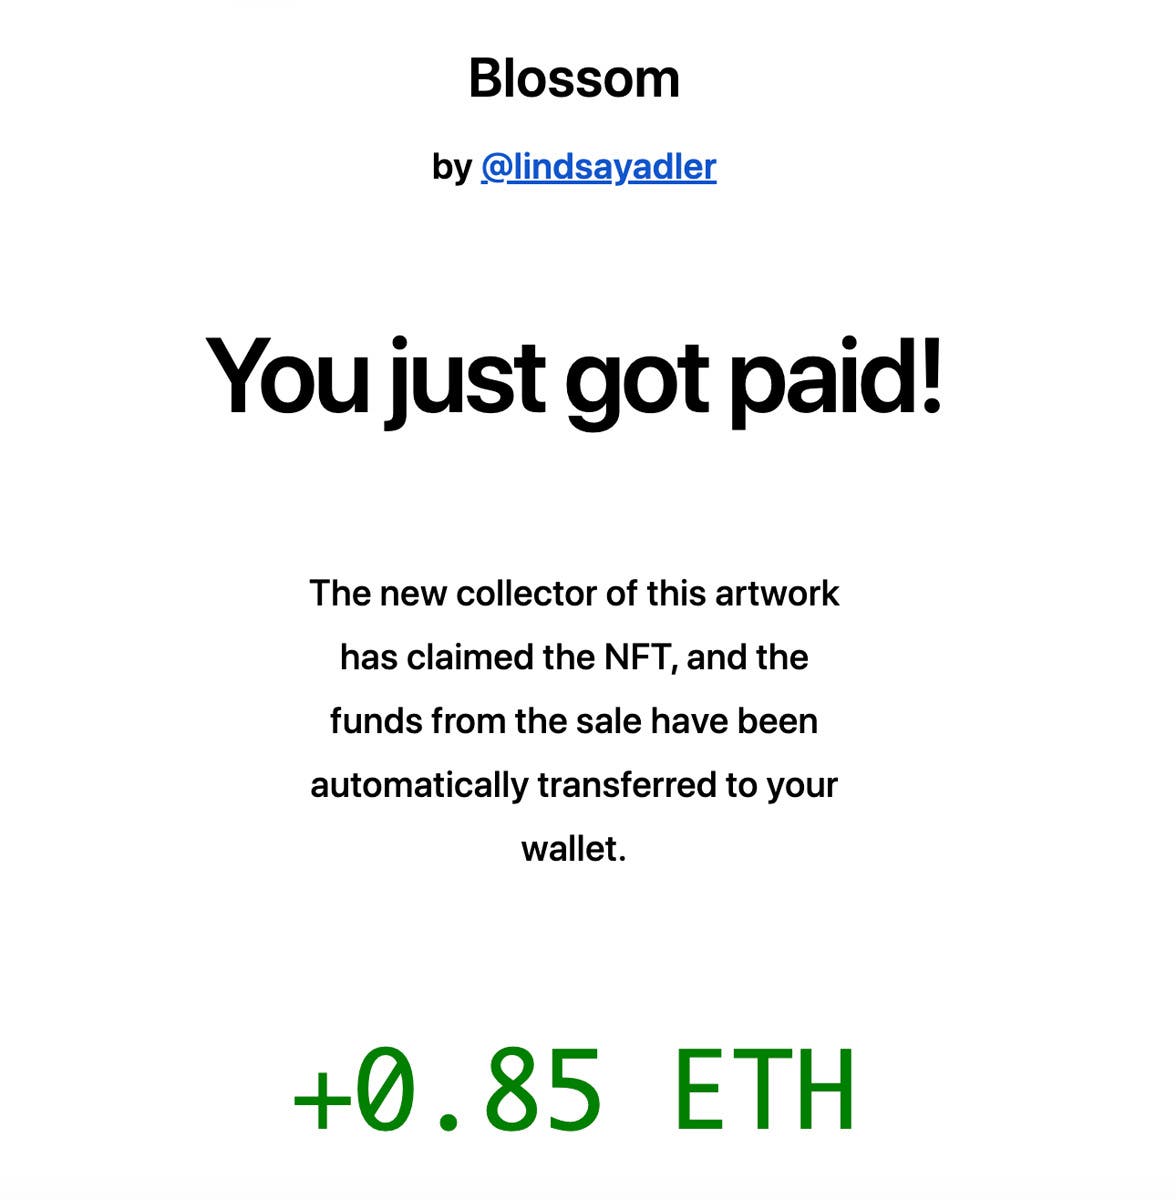
When the piece is sold the money is immediately transferred into my wallet, minus a transaction fee from the platform.
Now, I can choose to use that money to mint another piece, buy someone else’s NFT, or let the Ethereum sit there and hopefully gain value. Or, of course, I can trade the earnings back to US dollars.
Conclusion:
There it is — your 10-step process to mint, sell, and make money from your first NFT. Before we wrap things up, I did want to encourage you to continue to do your own research on this topic. Don’t just stop with this video and article.
First, in this “futuristic world” of NFTs, technology is constantly changing. Some of these elements may shift around depending on the time, advancements in the tech, and even community standards. For example, there has even been some talk about drastically reducing or eliminating gas fees. Who knows in a few months’ time that may be a different step in the process altogether.
You’ll also need to do research on the specific marketplace or platform you choose. There are different rules on editions, royalties, and when gas fees are paid.
Next, you’ll want to look into other ethical elements of NFTs. People raise concerns about intellectual property, environmental concerns, and equitability. You may be confused about something digital having a significant environmental impact. However, all of this technology around NFTs actually takes a great number of computers and processing, all of which consumes energy. In fact, some research suggests the environmental impact can be quite significant, so do your research to understand these potentially negative impacts of your art.
Lastly, you’ll want to look into other developments in the capabilities of NFTs. For example, as an artist you can provide “unlockable content” only available to the owner of the piece. You could provide high res files, contact info for physical items, access keys to other bonuses, and more. It can be fun to think of the possibilities.
Now you are equipped with the knowledge you need to create, mint, list, and sell your first NFT. Be sure to stay tuned for my next video on my personal experience selling my first NFT and then then best practices I’ve learned from other photographers who are finding success with NFTs.
Feature photo by Tania Mousinho on Unsplash