The Blackmagic ATEM Mini Pro is a hardware device that connects multiple cameras, computers, and other devices and switches between them. This enables you to live stream to your favorite platforms — YouTube, Twitch, and even professional meeting platforms like Zoom and Google Meetings.
In addition to live streaming, the ATEM Mini allows you to create recordings of events, training sessions, sporting events, or almost anything you can imagine. You can edit the recordings in your favorite video editing software and upload or distribute them later.
Quick Links to Chapters
- What You Need to Get Started With the ATEM Mini Pro
- Getting Everything Connected to the ATEM Mini Pro
- Understanding the Buttons on the ATEM Mini Pro
- Switching Modes on the ATEM Mini Pro
- Using the ATEM MIni as a Webcam
- Going live with the ATEM Mini Pro
- Recommended Cameras for Streaming with the ATEM Mini Pro
The ATEM Mini Pro is Expandable
The ATEM Mini works in an “open” environment, meaning it can be expanded and work with non-proprietary software to create a tool that is perfect for your needs. You can add graphical elements to your stream, use a green screen, playback pre-recorded videos, show live user interaction, and more.
Additionally, you can connect the ATEM Mini Pro to other devices, such as playback decks or an additional audio console. Further, you could add a remote connection for live streaming with someone across the country or the other side of the world. You can even connect advanced control surfaces for complete customization of your setup.
The ATEM Mini opens up unlimited possibilities for podcasters, educators, influencers, streamers, or anyone who has a message to share with the world.
What You Need to Get Started with the ATEM Mini Pro
ATEM Mini Pro
The ATEM Mini is available in three versions. Each version also allows you to choose HDMI or SDI inputs. Most people outside large production houses choose the HDMI version. For this article, we’ll assume you’re using HDMI inputs.
SDI vs HDMI, what’s the difference?
HDMI is used for consumer electronics, while SDI is used for professional video production. SDI cables are longer, more secure, and can support higher resolutions than HDMI cables. If you need to connect cameras or other gear at distances longer than 40 feet or if you are using resolutions higher than 1080p, you probably need to use SDI cables and equipment.
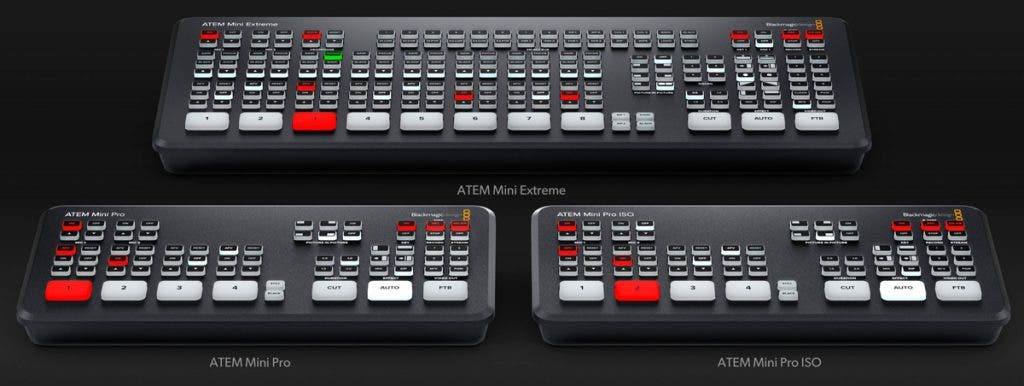
- ATEM Mini Pro
- This is the “base” model. It has 4 inputs and one output. It can stream and record at the same time. It only has one USB-C port, which means it can either record a live event or tether to a 5G device for wireless streaming, but not both. The Mini Pro records a single file that is an exact copy of the live stream.
- ATEM Mini Pro ISO
- The same as the Mini Pro, the “ISO” isolates each input and makes a separate recording of each. This means you can import these files into your favorite video editing software and edit your live broadcast for uploading later, and because you have a clean feed of all inputs you have the maximum flexibility in post-production. Did you make a mistake during the live event? No problem, with the ISO recordings you can easily fix it in post.
- ATEM Mini Extreme ISO
- All the features of the Mini Pro ISO and a lot more. This ATEM Mini is made for those who want the maximum power for their streaming. 8 HDMI inputs, 16 way multiview, 4 ATEM Advanced Chroma keyers, SuperSource with 4 extra DVE’s, 2 HDMI outputs, 2 USB ports and a more powerful control panel.
Video Sources for the ATEM Mini Pro
With ATEM Mini you can use anything that has an HDMI output as a video source. This gives you unlimited options for your streaming setup. You can use very expensive high-end video cameras or use secondhand low-cost cameras. You can stream pre-recorded videos from a playback deck. Use an iPad for graphics or stored videos. Connect a computer for software demonstrations. The possibilities are limitless.
Computer for ATEM Software Control
The ATEM mini is configured and advanced features are controlled with the ATEM Software Control and ATEM Setup applications. You’ll need to connect a computer to your ATEM mini to take full advantage of its features. You don’t need a high-powered computer, even a budget laptop will work just fine.
HDMI TV or Monitor
The ATEM mini uses “multiview’ on an external display to show you all your sources, streaming health, and other important information. The external display is connected via HDMI. Most people use a normal television to keep costs down. You can also use smaller HDMI displays if you want portability or have other needs in your workflow.
Wired Ethernet connection
The ATEM Mini has a built-in hardware streaming engine. That means you can stream directly to the Internet from the ATEM without the need for a computer. You get much higher quality and things are simplified.
This also means you need a wired ethernet connection. You can connect directly to your router or use a network switch for more flexibility. I’ll talk a bit more about this in the getting everything connected section.
Router
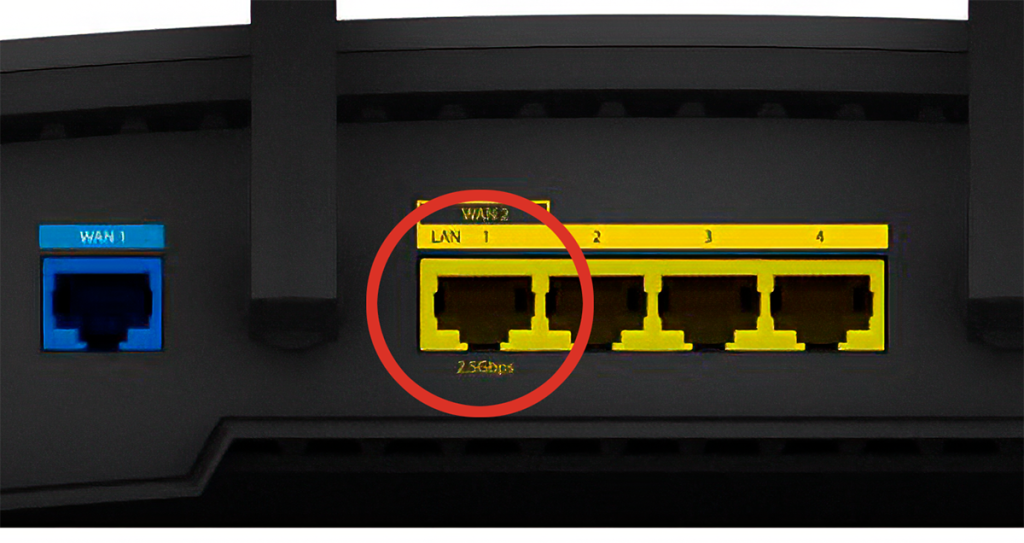
If you have high speed Internet in your house or studio, you already have a router. You just need to connect the ATEM Mini to the router with a network cable. Most routers will have an outlet on the back that says “LAN” or “Ethernet” for adding external connections. Simply plug your ATEM into this port.
Network switch
If you are using multiple devices to connect to your ATEM Mini, a network switch makes things a lot easier. You can connect your network switch to the router and then connect everything else to the switch. You don’t need a network switch for a basic setup, but if you are planning to expand or do remote work, you’ll need one.
A network switch can be used if you want to manually configure a network. This is useful if you are using your ATEM Mini as a recording device and don’t want to be connected to the Internet or you’re working remotely and a router isn’t available.
If you are using Blackmagic HyperDecks for recording or playback, it’s a good idea to have a network switch for remote control and power.
More about setting up your ATEM with a network switch in Getting Everything Connected.
Cables
It’s important to use high-quality cables. You can save some money by using less expensive cables, but you’ll risk cameras disconnecting during your live stream. Save yourself the hassle and get quality cables from the very start.
HDMI Cables
You can use high quality HDMI cables up to 60 feet. If you need to place your cameras farther away, use SDI cables with HDMI converters or opt for a complete SDI setup.
SDI Cables
SDI cables come in 3G, 6G, and 12G variants. Since the ATEM Mini is only 1080P, you only need 3G cables. If you’re planning on upgrading your system to a higher end ATEM in the future, you may want to purchase higher bandwidth SDI cables now. You’ll save money in the long run.
Here are the SDI cable variants:
- 3G – 1080P30
- 6G – 4K30
- 12G – 4k60
Network Cables
Any CAT6 Ethernet cable will work just fine with the ATEM Mini. This will also allow you to use POE (Power Over Ethernet) if you expand your system in the future. The length of the cable will depend on your specific setup.
Microphones and Audio For the ATEM Mini Pro
With two independent 3.5mm stereo audio inputs, you can connect desktop and lapel microphones. Microphones can also be connected directly to a camera, and the audio can be mixed from that HDMI input using the ATEM Software Control application. The audio and video from the camera can then be controlled independently.
Getting Everything Connected to the ATEM Mini Pro
Connecting your cameras and gear to the ATEM is very simple and straightforward. Follow these steps:
- Connect your sources (cameras, computers, game console) to the HDMI ports that are labeled 1-8.
- Connect the HDMI OUT to a television or HDMI monitor.
- Connect the ATEM CONTROL ethernet port to your router or network switch.
- Connect the computer that’s running your ATEM Software Control application to the same router or network switch.
Power on the ATEM and all of your devices. You should see all of your sources show up on the TV running your Multiview.
Connecting the network
It’s important that the computer running your ATEM Software Control and the ATEM Mini are on the same network. The default network settings on the ATEM Mini work for 90% of the situations you’ll encounter. However, if you find that you are having issues connecting the ATEM Software Control to your ATEM Mini, double-check your network settings.
You can use the ATEM Setup software to configure the network settings on your ATEM Mini if needed.
Options for the USB-C port on the ATEM Mini Pro
The USB-C port can be used for four different things.
- Connecting directly to your computer for ATEM Software Control, firmware updates, and configuring your ATEM using the ATEM Setup software.
- Connecting to an external hard drive to record video to disk.
- Connecting to your computer to use the ATEM Mini as a webcam.
- Connecting to a phone to stream over a 5G network when a normal connection isn’t available.
You may want to do two of these things at the same time, if so, make sure you purchase one of the extreme ATEM Mini options, they are configured with two USB-C ports.
NOTE: The first time you use the ATEM Setup software to configure your ATEM Mini, you’ll need to connect the ATEM Mini to your computer with a USB-C cable. By default, the software doesn’t allow changing settings over the network.
A Sample Setup
Here’s a diagram that shows you one way to set up your ATEM Mini system. This setup may not mirror your exact setup, but that’s okay; we’re just looking at the basics.
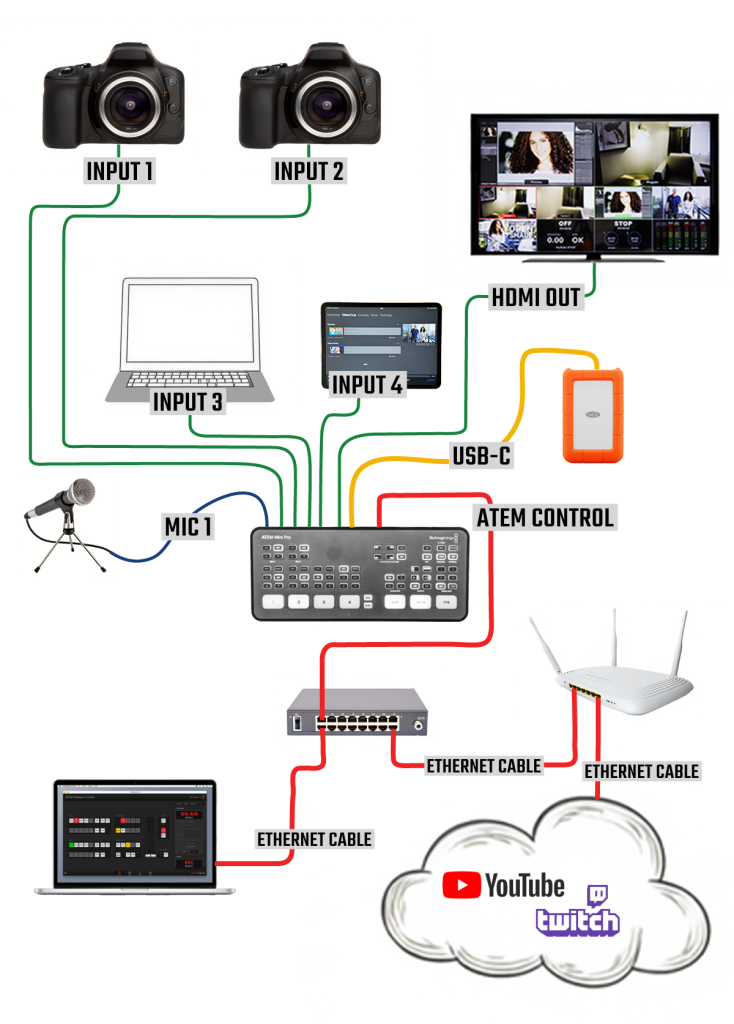
In this example, there are four inputs: a microphone, two cameras, a laptop, and an iPad. The video inputs are all connected with HDMI cables (green).
The HDMI Out is connected to a flat-screen TV. This will allow us to use the Multiview and monitor our inputs on a large screen.
The USB-C is connected to a hard drive. This will record our live stream for editing later.
The ATEM Mini and a different computer are connected to a network switch. The second computer will be used for the ATEM Software Control.
The switch is connected to the Internet router, and the router is connected to the Internet.
USE USB-C to configure ATEM for the first time
Understanding the Buttons
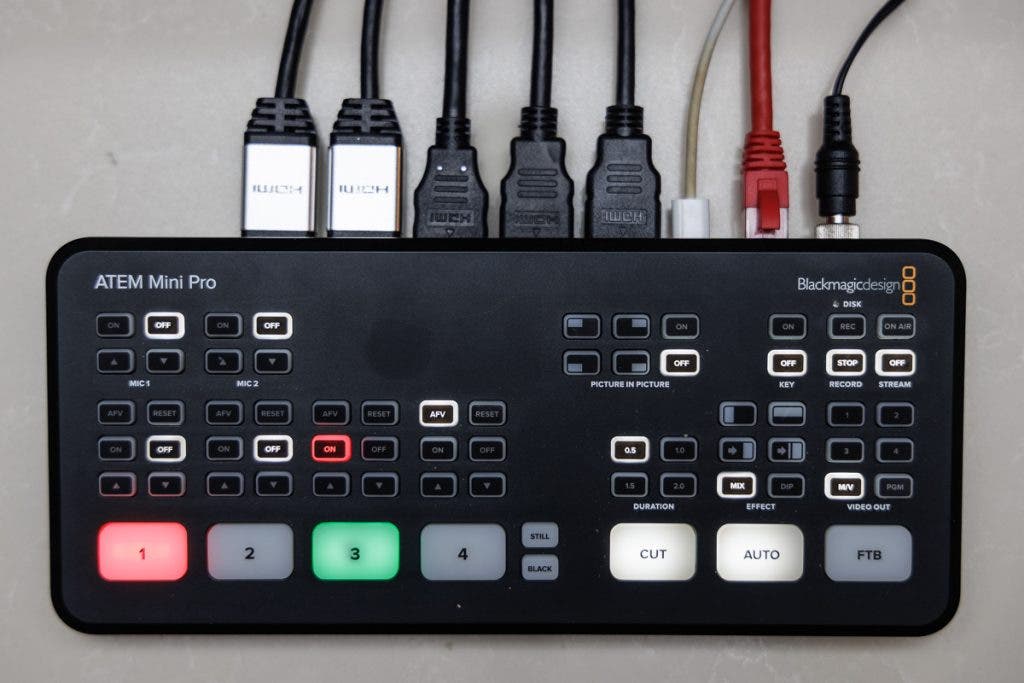
The first time you look at the ATEM Mini, it can be overwhelming. There are so many buttons! But don’t fear; once you understand the layout of the control panel, things will make perfect sense. Let’s break it down.
It’s a good idea to set up your ATEM and press the buttons while you read this article. You can’t mess anything up, so press the buttons and learn as you go.
The ATEM mini is a switcher, it allows you to switch from one video source in your broadcast to another. All of the buttons on the control panel are laid out in a way that makes it easy and quick to do just that.
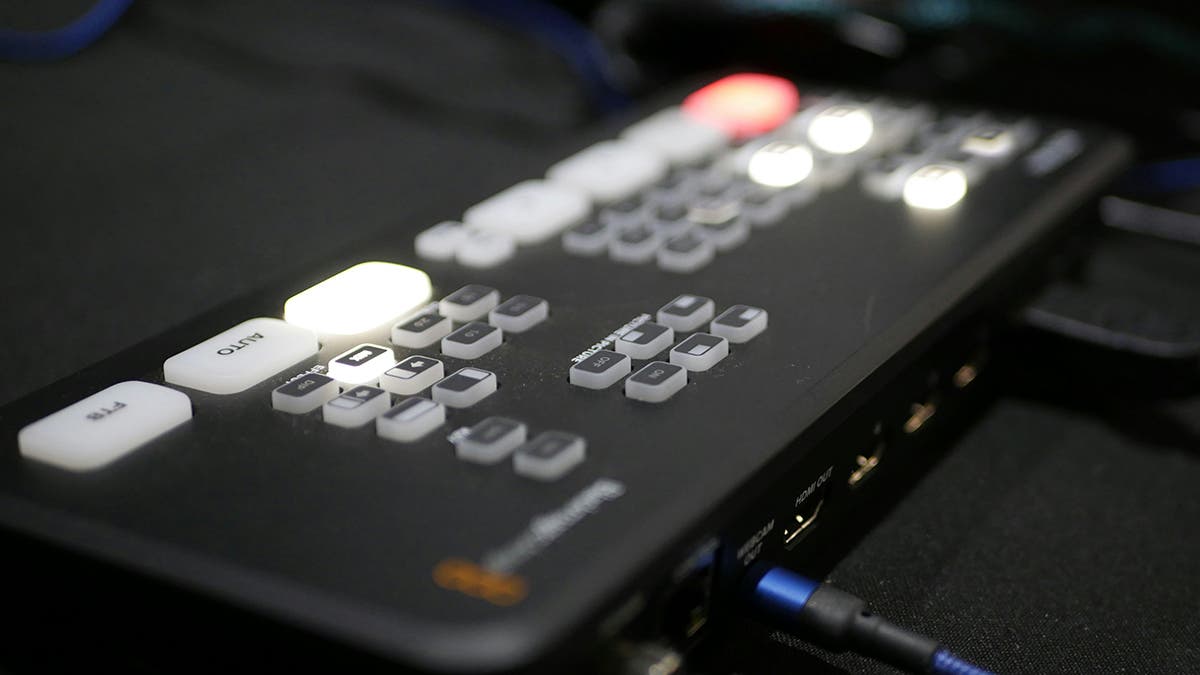
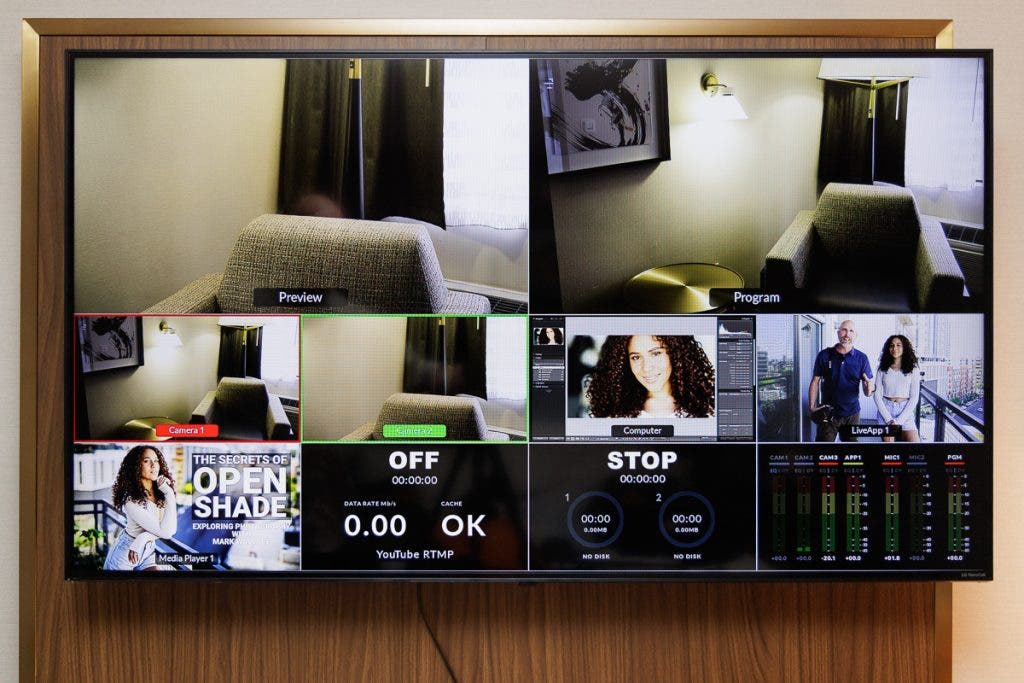
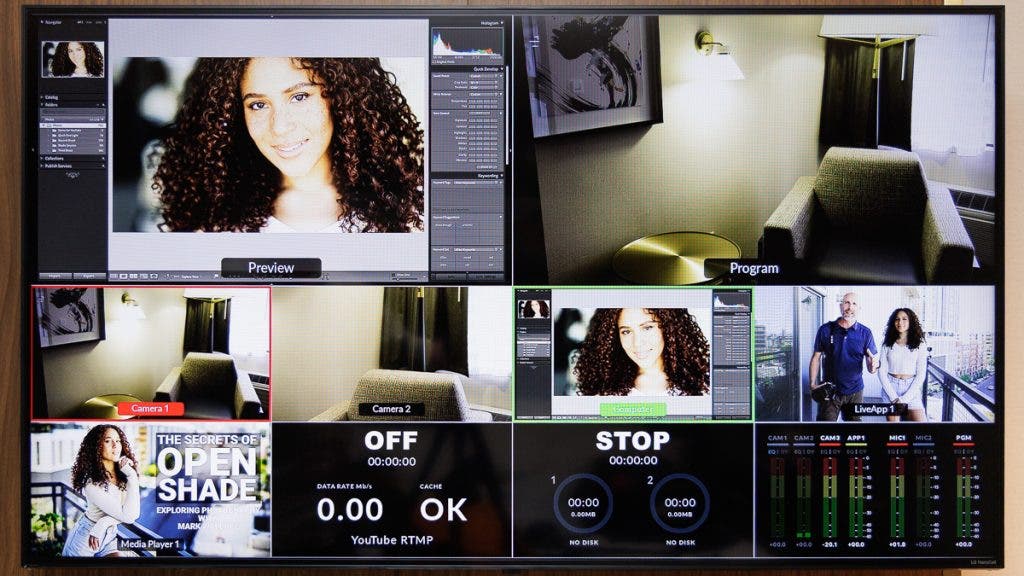
The big buttons on the bottom row are the input buttons. If the button is red, that means that source is being sent to the “program,” another way of saying it’s live.

First press “CUT” or “AUTO” to tell the ATEM how to transition between the sources. CUT will immediately switch to the source you choose. Auto will fade between the current source and the source you choose.
Let’s try a cut.
- Press “cut”
- Press the input buttons. You’ll see the Multiview changing. The current live shot will show up in the “program” window, and the thumbnail will have a red outline to show you that your source is live.
Now, let’s try fading between sources.
- Press “Auto”
- Press the input buttons. Now, you’ll see the sources fading between each other.
In addition to the large input buttons, there are two, or more, depending on your ATEM model, input buttons:
- STILL – this can hold static images (jpg, png, etc). You can use these for titles and even overlays. You can assign the graphic to this button by adding it to the Media Player using the Media tab in the ATEM Software Control. The ATEM Mini Extreme has two STILL buttons that are defined by Media Player 1 and 2.
- BLACK – A totally black screen.
When you use the ATEM software control you can also use two additional colors, define custom colors, and quickly change the images in the Media Player. This is also how you setup your SuperSource graphics and other advanced video compositing.
The FTB key is used to fade to black. This is useful at the end of a production or if you need to take a break. Push the key once to fade to black. Push it again to fade back in. The button will flash red when FTB is active.
Auto Options
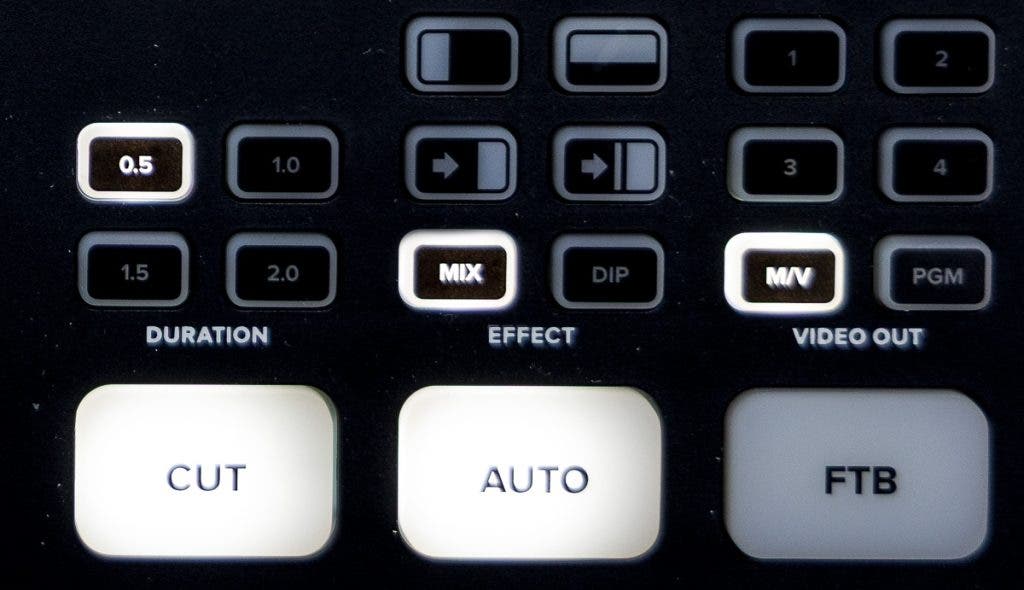
The Duration buttons determine how long the transition lasts when using Auto.
The buttons above the AUTO button allow you to select different transition styles when AUTO is selected.
- MIX – sets the transition to dissolve when using AUTO. It simply dissolves from one source to the next.
- DIP – tells the Atem to “dip” to a color between transitions. By default, this color is white. Your source will fade to a color very quickly and then fade back to your new source.
- You can also select horizontal and vertical swipe transitions by selecting one of the buttons above MIX/DIP.
The ATEM Software Control gives you many additional transition options. You can also change the DIP color and set custom transition durations.
The last set of buttons above the FTB button determines what is displayed on the TV or monitor you’ve connected to the HDMI Out port. You can press these buttons to get a better view of a specific source or the program output.
- MV – Multiview: this is the default output for the HDMI port.
- PGM – Program, this will show a full screen view of the current “live” source. This is what your audience is seeing when you are streaming.
- 1,2,3,4, etc – These allow you to preview your video sources full screen.
The Audio Controls
There are two microphone inputs for adding audio. Additionally, every HDMI input can also be used as an audio source. This makes it very easy to mount microphones to cameras or use the audio from a gaming console or other device.
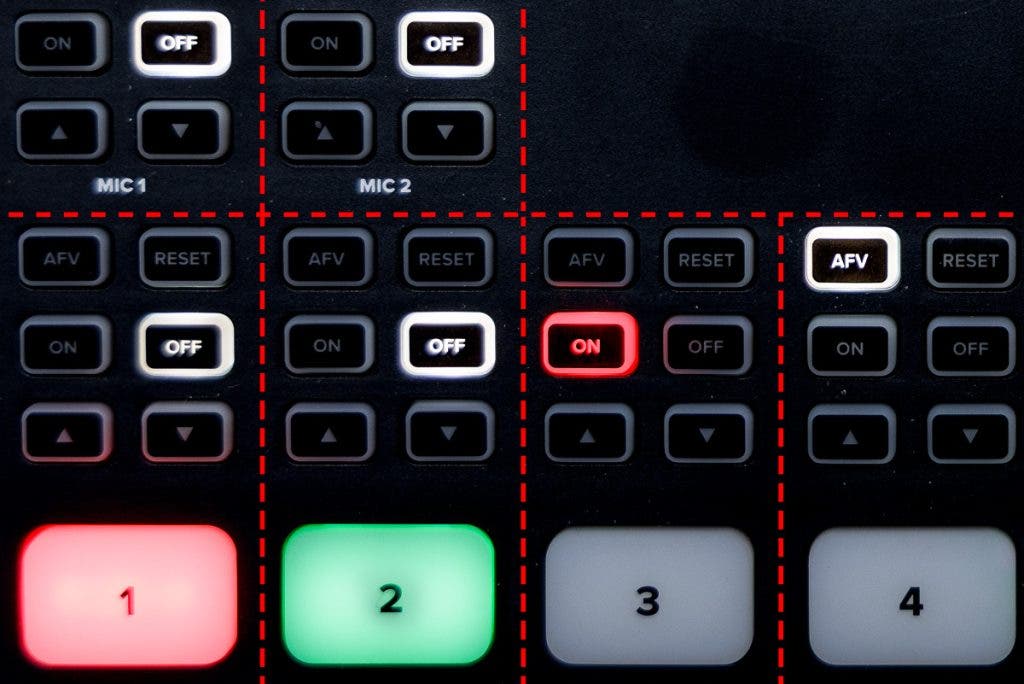
Above each input button are the buttons that allow you to control the audio for that source. These buttons allow you to control the most basic audio functions. Notice that these buttons repeat; the same options exist for every source. I’ve added some lines to the photo to make it easier to understand.
MIC 1 & MIC 2
- ON/OFF – these buttons turn the microphone input on or off.
- UP & DOWN ARROW – these buttons increase or decrease the gain by +/- 3db.
Source Audio Controls
Each source has the same ON/OFF and UP/DOWN buttons as the microphone inputs. They also have two additional buttons.
- AFV – This means Auto Follow Video. In other words, when the video is live, the audio is also live. The audio is muted at all other times. This is a great option if you only want the audio from a device to be heard when the video is also being shown.
- RESET – This will reset all the adjustments you’ve made to the audio settings for this source.
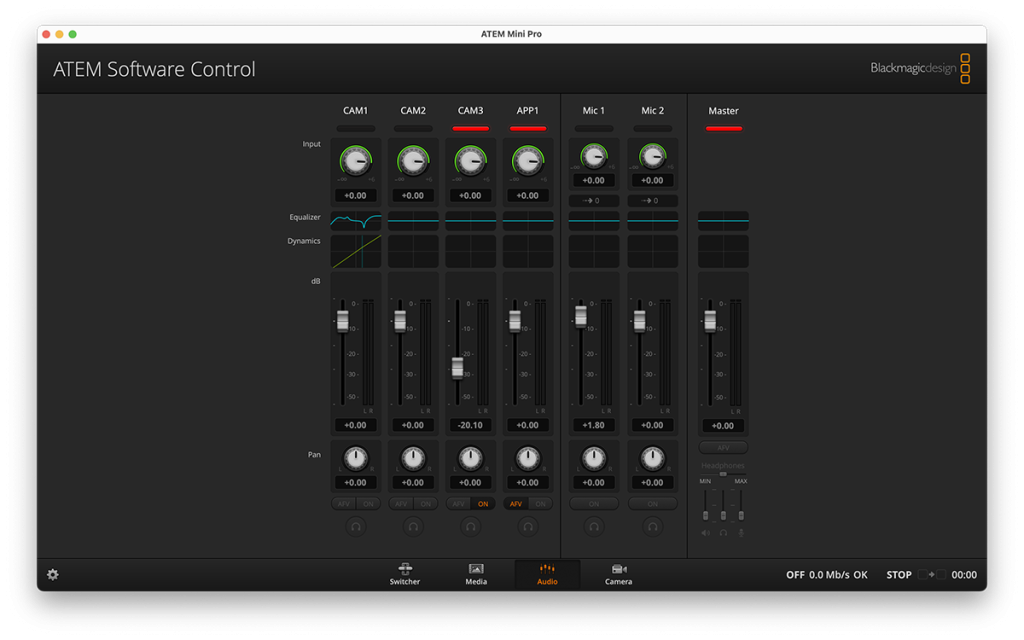
These audio controls are very basic. For more advanced control of your audio, use the ATEM Software Control application on a connected computer. This allows you to use EQ, advanced audio filters, and more.
Switching Modes: Cut Bus vs Program/Preview
By default, the ATEM Mini is set to use the “Cut Bus” switching mode. This allows you to change sources as soon as you press an input button. This is a fast and easy way to switch. However, for more advanced switching you should use the Program/Preview mode.
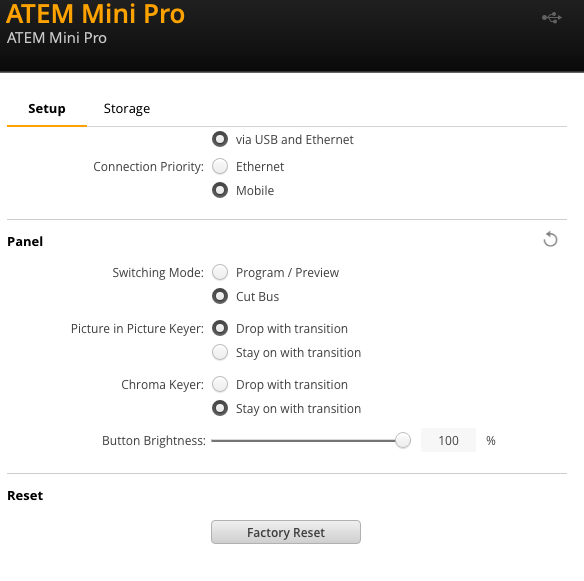
Use the ATEM Setup application to switch your ATEM Mini from CUT to Program/Preview. You may need to connect your ATEM Mini to your computer with a USB-C cable to use the ATEM Setup application.
Program/Preview Switching
Once you’ve changed your switching mode, press the input keys. Notice that the “Program” doesn’t immediately change as it did when you were in the Cut Bus mode. Now, the input key you press turns green, and the source that corresponds to that input shows up in the “Preview” section of the Multiview.
This allows you to see what your next shot will look like before you send it to out to the world. This is very useful if you are using picture in picture features, overlays, green screens, and the more advanced features of the ATEM Mini. You can set up your shot, check to make sure everything is perfect, and then make it live.
Once you have the shot you want in the Preview window, just push the “CUT” button to make it live immediately or use the AUTO button to use a nice transition.
Using Your ATEM Mini as a webcam
You can connect to Zoom, Skype, or any video conferencing software if it uses a webcam as a video source. When you connect your ATEM Mini to your computer it will automatically be available to be used as a webcam.
- Turn on your ATEM Mini and connect it to your computer using a USB-C Cable
- Launch your video conferencing software and navigate to the settings tab.
- Select “Blackmagic Design” from the list of webcams
- Select “Blackmagic Design” from the list of audio devices
Your First Live Stream
Now that you have everything connected, you’re ready to go live. It doesn’t matter if you’re using YouTube, Twitch, or another streaming platform; the steps are very similar and straightforward. Here are the basic steps:
- Log in to your streaming platform.
- Setup Your stream – add your thumbnail, description, etc.
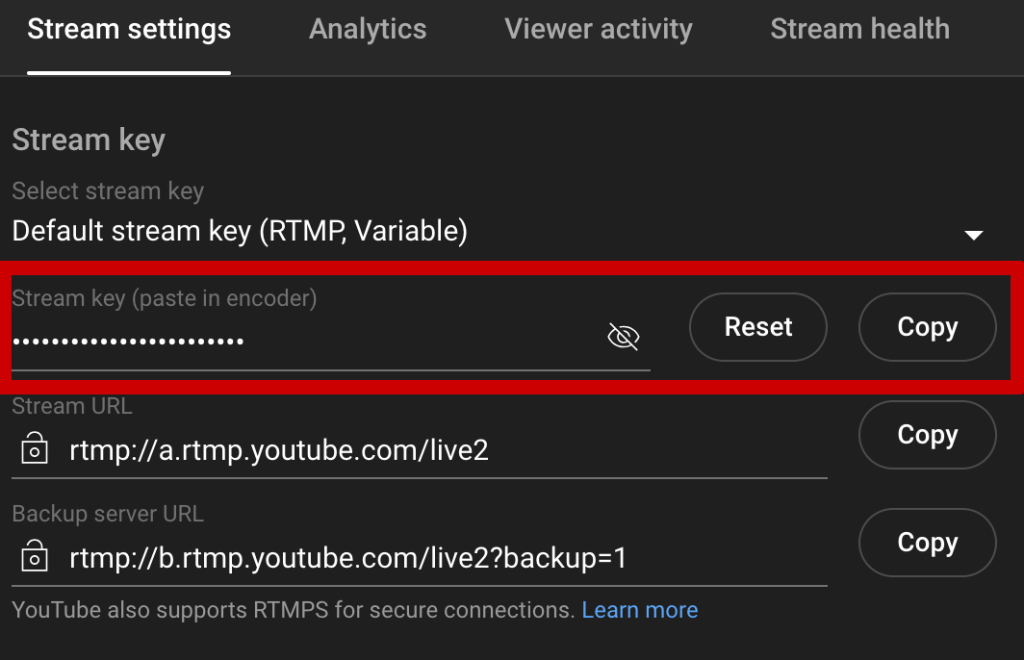
- Copy the Stream Key from your streaming platform.
- Open ATEM Software Control on your computer.
- Click on the “Output” tab on the switcher page.
- Choose your platform.
- Paste the Stream Key into the “key” field.
- Choose your “stream quality.”
Now, you are all set to go live. To send data to your streaming platform, choose “ON AIR” from the ATEM Software Control or use the “ON AIR” button on the ATEM Mini itself. Once your streaming platform begins receiving your video, you’ll be live and the show has begun.
Let’s take a closer look at these steps using YouTube as our example.
Getting your key from YouTube
Log in to YouTube and click the “Go live” button at the top of the screen.
You’ll be taken to YouTube Studio’s streaming setup page. Click “Edit” at the top of the screen, and add your stream description, thumbnail, and any details you’d like the public to see. This is similar to the steps you take when uploading a normal video.
Next, click “copy” to copy your stream key. Make sure the default stream key (RTMP, Variable) is selected, and then click “copy” next to your stream key. Now, the Key is on your clipboard.
Open ATEM Software Control on your computer. At the top of the screen, choose the “Output” button.
Choose YouTube RTMP from the list of options.
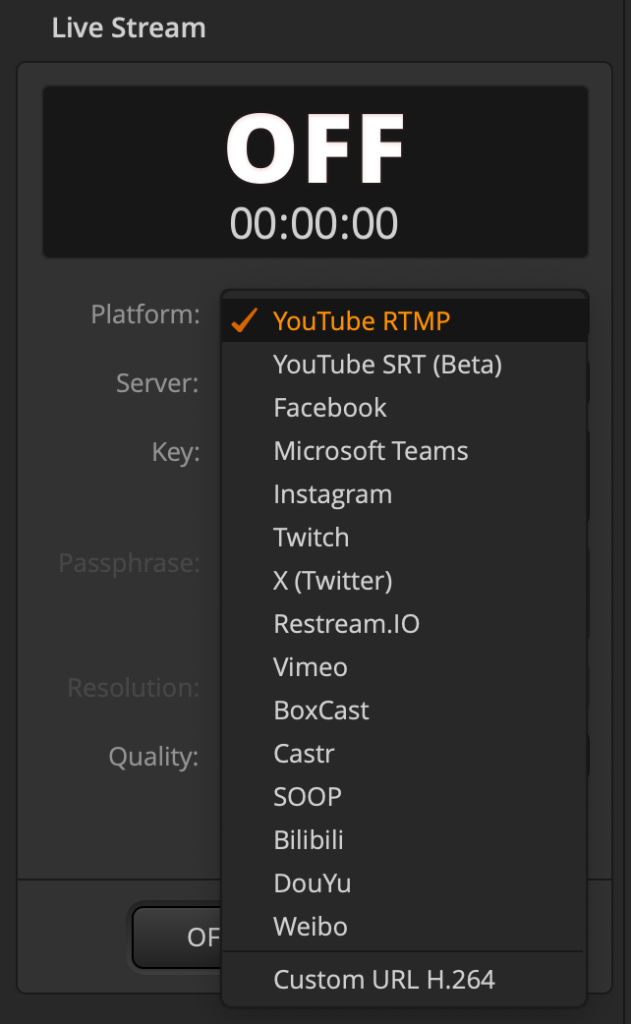
Next, paste the stream key into the “Key:” input box.
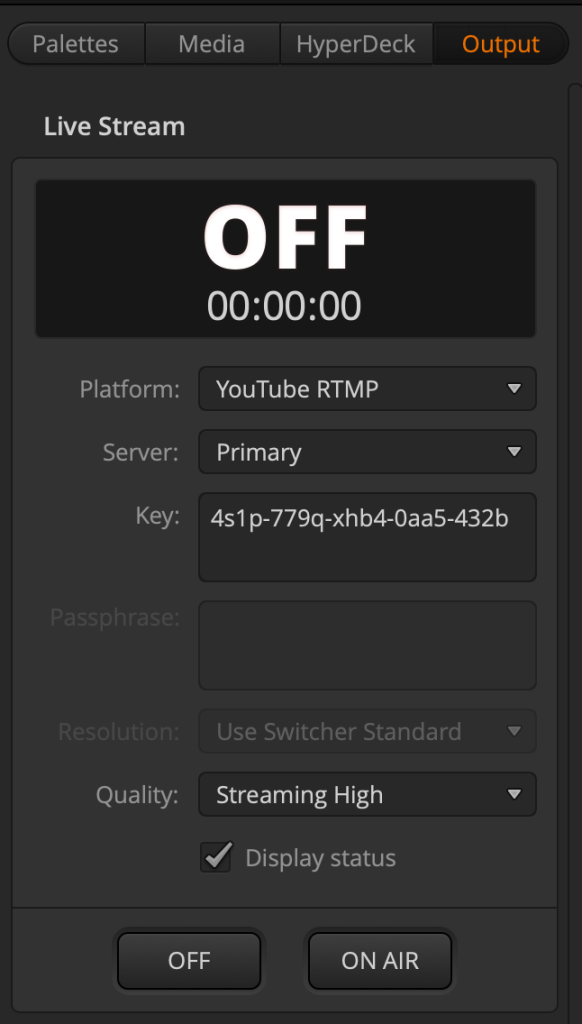
Choose the Quality based on your Internet connection speed. If you see delays or lagging in your live feed, try using a lower quality setting.
Click the “On Air” button on your ATEM Mini or the “On Air” button in the ATEM Software Control application. You’re now live and streaming to YouTube!
You can repeat these steps for every major streaming platform. They follow the same basic steps.
Most platforms allow you to schedule and promote live streams in advance. You can also create your own custom streaming keys for specific shows. Refer to your streaming platform for more information about their specific features.
Recommended Cameras
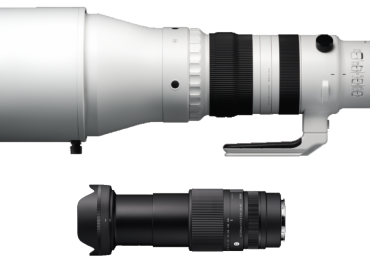
- Sony Alpha a7 IV Mirrorless Camera with Sony FE 24-70mm f/2.8 GM II Lens
- Sony Alpha ZV-E10 II Mirrorless Camera with E PZ 16-50mm f/3.5-5.6 OSS II Lens Black
- Canon EOS R5 Mirrorless Camera with RF 24-105mm f/4 L IS USM Lens
- Panasonic HC-VX870 4K Ultra HD Camcorder, 20x Optical / 50x Intelligent Zoom
- Blackmagic Design Pocket Cinema Camera 4K