Taking an image from a RAW file to an edited masterpiece is one of the many joys of being a photographer. Lightroom is one of the best tools for making this process easy. Lightroom has features that can transform your image in just a couple of clicks. These features include countless sliders that can adjust just about anything you want in your images. And while you can create a lot of magic with sliders that affect the image globally, the best editors know that the most powerful tools lie within the Lightroom Classic Masking tab. In this article, we’ll show you how to use masking to add impact to your images right out of Lightroom Classic.
Global vs. Local Adjustments in Photography
Before we proceed, it’s critical to understand the difference between global and local adjustments when editing images. A global adjustment is any edit applied to the whole image, such as the Exposure slider, Contrast slider, or adjustments to white balance. These changes affect the entire image rather than just an individual part of it. On the other hand, local adjustments are changes made to only one part of the image. For example, brightening only one specific part of the image or changing the hue of one particular color.
In Lightroom Classic, local adjustments are made from within the Masking tab. This tab provides access to various editing tools and allows you to “mask” the effects onto specific parts of the image rather than the whole thing.
How to Use Lightroom Classic Masking
While in the Develop Module, click on the gray circle with the dotted line around it (see above). If you haven’t made a mask yet on your image, this will bring up the choice to select what kind of mask you’d like to create. Let’s cover all the different types of masks you can choose from.
Lightroom Classic Masking: SUBJECT
Lightroom Classic will determine the subject of your image and mask it. This is ideal for portraits, wildlife, sports, or any other kind of photography with a strong subject.
Lightroom Classic Masking: Sky & Background
A sky mask will determine the sky in your image and make a selection based on that, while the background mask will try to resolve the background of your image. These options are ideal for landscape photography but can give mixed results regarding what they select in the image.
Lightroom Classic Masking: Objects
When you select Objects, you’re given a brush that you can use to paint over an object in your image. Lightroom will then determine the object you’re trying to select and create a refined selection of this object.
Lightroom Classic Masking: Brush
This masking option gives you a freehand brush to paint in your selection. This is ideal for painting in light or touching up a small part of the scene with a very subtle adjustment.
Lightroom Classic Masking: Linear & Radial Gradient
Gradients are excellent for all types of photography. They can be applied subtly to help bring attention to a subject or accentuate light in the scene. A linear gradient creates a mask that can be custom-feathered in a straight line. The radial gradient creates a circular selection that can be feathered from the circle’s center.
Lightroom Classic Masking: Range
The range masking option is divided into three parts: color range, luminance range, and depth range. These are more advanced masking tools but well worth learning once you understand the basics of the above masks. Color range creates a mask based on a selected color in the image, while luminance range creates a mask based on the brightness value of individual pixels in your scene. Depth range is only available for images with depth information, which we’ll skip for the sake of this brief article.
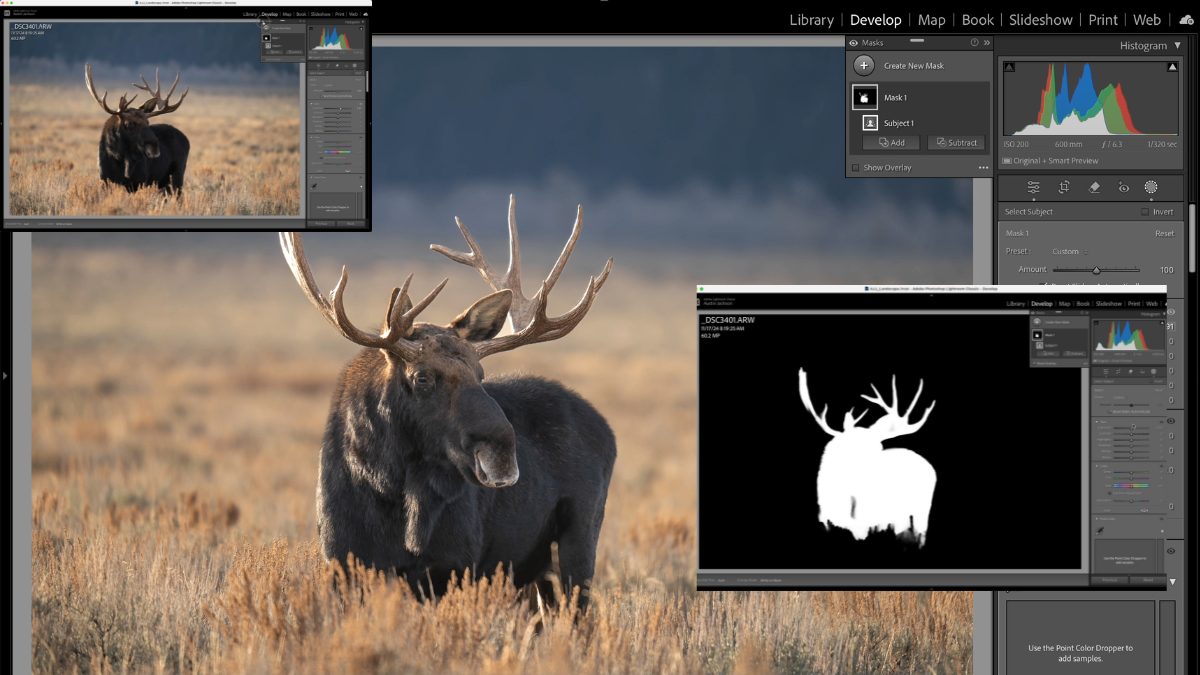
Once you’ve selected your mask, you’ll notice your image will turn to black and white. Anything white will show the effect you are about to apply, while anything black will hide the effect.
Now, you’ll gain access to many of the same sliders you’re used to using in Lightroom to apply whatever effect you’re after. In this example, we’ll increase the exposure to reveal the details of the dark moose. This is a very basic adjustment, but don’t be afraid to play with more sliders to adjust color, clarity, or any other adjustments.

Combining Masks
You aren’t just limited to a single mask on each adjustment. Masks can be added, subtracted, or even inverted to create the perfect selection. Let’s say you wanted to add light to your image to increase depth between the foreground and background, but the radial gradient you made to add in some light overlapped the subject of your image. You can hit the subtract button below your original mask to subtract another mask from your original selection. In this example, we’ll subtract subject (below). Notice how the light no longer bleeds over into the hoodoo in the foreground.
Masking Adjustments to Try
Darkening the Background of Portraits
Bringing the exposure down in the background of your portraits can make your subjects stand out. Rather than brightening your subject, you can drop the exposure of the surroundings so you don’t risk blowing out the skin tones of your model. In this example, I use an inverted subject mask to select everything except the subject and then decrease the exposure.

Adding Contrast in the Foreground
Adding foreground contrast to your landscapes can help make your images appear more in-depth. In this example, I used a linear gradient to select the foreground and then added contrast with a curves adjustment. I finished my local adjustment by slightly adjusting the whites and highlights to make my foreground pop.

Creating a Custom Vignette
Lightroom does have a vignette slider, but unfortunately, it is a one-size-fits-all tool for darkening (or lightening) the edges of your frame. Most images look better when you apply a custom vignette to help shape the light. In this example, I created a radial gradient, inverted the mask, and then dropped the exposure to darken the edges of the scene. Notice how I darkened the bottom of the image much more than the top. Since the light is coming from above in my image, darkening that part of the frame wouldn’t make sense.
Learning to use the masking tools in Lightroom Classic can seem like a lot, but once you understand how masking works, you can access a new world of capabilities. No matter what kind of photographer you are, your images can benefit from using local adjustments. Lightroom Classic’s Masking tab is a great place to start if you’re serious about taking your images to the next level!