I love to create panoramas. A great immersive panorama lets me express the size and scope of amazing scenery and places I visit. I’m not a professional photographer, but I can get truly amazing immersive panoramas using whatever camera I have with me, and some easy-to-use software and online hosting services.
By Nick Hawkins
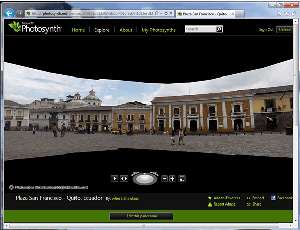
Check out this lovely 200 megapixel photo—an immersive panorama—which I shot with basic digital camera gear while visiting Quito, Ecuador.
Pretty cool eh? Well, maybe. At least my grandma loves it. That image itself is comprised of around 50 photos, seamlessly stitched together. The technology to make this happen exists, and is surprisingly easy to use. Even better: You don’t need a specialized camera—you can use whatever digital camera you have now.
Sure, I could have simply shot this with my wide-angle lens, but there’s something to be said about having a totally immersive photo that’s so large that it feels like it will swallow you whole. When I look at my panoramas, I want to feel that I’m back there.
As much as I want to haul a full load of camera gear around with me everywhere I go to try to get “the perfect shot,” laziness or airline carry-on restrictions get the best of me. So, instead of packing an ultra-wide angle lens, I’ll use my kit lens to take photos and stitch the images together later. I’ve made panoramas on everything from my Canon 5D Mark II to my various Canon Powershots. I’ve even created panoramas using my Blackberry smart phone’s camera. So don’t worry about your camera not being good enough, because it most certainly is!
Capturing a panorama image
 Capturing the images to stitch together for a panorama is pretty simple. Pick an excellent vantage point, just as you would when photographing a traditional landscape or scenic. As you shoot, pivot your camera about a nodal point—a fixed point just behind the front surface of the lens, in which you’ll be taking the shot. If you’re shooting from a tripod or monopod with a panorama nodal point head such as the Induro PHQ1 5-Way Panhead (right) you’re all set. In my case, I pivot upon my heel while keeping the same steady position with each shot while trying to take the photos as fast as I can. Why do I try to shoot as quickly as possible? Mainly to reduce the amount of “ghosts”—people moving, and other objects in motion such as cars. Just remember to breathe with each photo. That ensures you don’t have blur from the camera movement.
Some other shooting tips:
- If you’re shooting with a zoom lens, keep the focal length consistent. When I shoot with my kit lens, I zoom out to the maximum focal length and hold it there.
- Aim for about a third of the photo being an overlap from the previous one while you’re keeping shooting along a line.
- Start at the horizon. Shoot a sweep at the horizon level, then capture a rows of images below and above the horizon.
- Keep the exposure the consistent throughout. Use manual exposure mode to lock in exposure.
- The more photos you shoot the better. When you stitch them together, you don’t want gaps that would make your panorama unusable so shoot more than you need with ample overlap. I’ve learned this the hard way, but since I’m not a professional I’m totally ok with that.
A typical panorama that I create uses about 20-40 photos, depending on how big I want to make it and how much time I have to take it before my travel companions start making fun of me for taking so many photos.
This also works when things just won’t fit in your widest angle for your camera. I’m guilty of taking 4 photos of something and stitching them together. The photo below, for example, was shot inside of the Vatican. It worked out well and was something that I couldn’t capture at 24mm on a full-frame DSLR.
Software
For Windows users, the Microsoft Image Composite Editor is not only a great product, but it’s also free. There’s also Hugin, an open-source solution that is also free for all platforms. The best in class product is Autopano which, at around $135 and up, isn’t the cheapest thing around, but if you plan on trying to sell your photos, it might be worth the investment.
Before you import your photos into any of the panorama creators, do your post-processing on the images. In my case, I export them to high resolution JPGs from RAW. It saves a lot of time in stitching the images together.
Here’s my step-by-step process, using Microsoft ICE. Your process will likely be similar no matter which program you use.
Step one:
Create a new panorama and drop your images into Microsoft ICE.
Step two:
Let the panorama software crunch and render a panorama. Step out for a cup of coffee…this may take a while! From there, we can Export to Disk (as a JPG/TIFF, but JPGs have to be under 64000 pixels in each dimension) or we can Publish To Web and send it to Microsoft Photosynth.

If you click Publish to Web, you’ll be prompted for more information about your Synth.

Once you click OK, the Synth will upload and you’ll get a nice full-screen experience like this:

It really is that simple. I like Photosynth because it allows a nice degree of flexibility in viewing the image. Plus it allows you to build a 3D environment that lends itself to exploration. The interior of churches or museums—it will build a nice little immersive world.
There’s also a Photosynth app for the iPhone, which allows for more impromptu panorama creation. It does the stitching on the phone and will upload it for you.
Ok, Now What?
Unfortunately when we create large photos, we run up against the file hosting limits of our image hosting service. Flickr’s maximum file size is 20mb, SmugMug’s is 24mb. One option is your local web hosting, or Dropbox.
Using Microsoft’s Seadragon technology, you’re able to link to the image and it will allow you to zoom into the photo from the browser. I took this nearly 500 megapixel composite photo, above, of a sculpture on the Michigan Avenue bridge.
If you’re against Microsoft or don’t want to deal with Silverlight, there’s also Zoomify Express (free), which will break down the huge image into digestible chunks and give you a nice interface to explore your panorama.
There’s also GigaPan http://www.gigapan.org/. It’s a fun way to upload your large image, and then let the community explore with your photos. It’s a cool little scavenger hunt.
The key to panoramas and using technologies to make cool stuff is to have fun while doing it. So go out, take lots of photos and do fun things with them!

