Many digital cameras can now shoot video, and quite a few can do true high definition. But even if you don’t have video capability, you may be able to make time-lapse videos.
We have all seen old-technology time-lapse films (literally shot on film, with slow-speed movie cameras) of opening flowers, sunsets and the like. Now a number of digital time-lapse video clips are appearing on the Internet, many with very imaginative subjects and technology. On a basic level it isn’t difficult to do.
Hardware
You will need a camera with either a built-in intervalometer or a connection for a remote shutter release, called a remote control terminal. You’ll need to ensure it has an intervalometer function, which can be set it to fire the camera at a specified interval, among other things. The Canon version is the TC-80N3 Timer Remote Control. It works on many EOS digital cameras, from the old D30 on up through the professional 1D series. And of course it has the same functions as the basic remote shutter release. In the Nikon world, the device is an MC-36 Multi-Function Remote, compatible with the D1, D2, D3, D100, D200, D300 and D700. An internet search will turn up some other brands that are compatible with other cameras. The Promote Control is a new player in the smart control arena, offering abilities for Time-lapse, HDR bracketing, as well.
See Blog Article: Ultra-Affordable HD Time-Lapse DSLR.
Software
Good news! You don’t need expensive software to assemble the video. If you have Adobe Photoshop CS4 Extended, you already have the capability. If not, QuickTime Pro will do the job for $29.99. QuickTime is an Apple product but there is also a Windows version. The basic QuickTime 7 Player is where you need to start. It is a free download and once installed it can be upgraded to QuickTime Pro by purchasing a license online and entering the serial number you will get back by e-mail.
If you are using a Mac with the new Snow Leopard OS, you will have the new QuickTime 10, but the older QuickTime 7 is what you need to compile an image sequence video. If it was installed with your system, it will be in the Applications > Utilities folder. If not, you can install it from the OS disk. In addition, you will need software that will let you number the captured images sequentially. Adobe’s Bridge or Lightroom will do this, and also allow batch adjustments to the files. You may be able to number the images sequentially on import, but if you choose to delete any bad ones you have messed up the sequence. (It is better to edit these ‘hiccups’ out once the video clip is created in your video editing program).
What file format do I need?
You will need JPEG files to assemble the video. You can shoot directly in JPEG or, for more control, you can shoot raw files and convert them to JPEG after you have made batch adjustments. In Adobe Camera Raw or Lightroom you can make adjustments to one raw file and apply them automatically to all in the sequence.
What image size do I need?
When you assemble the video you will specify a playback rate. Common choices are 24, 30 or 60 frames per second, which means you will need a lot of frames. At 24 fps you will need 1440 exposures to play for a minute. A higher frame rate will give a smoother appearance, but it may not be significant, due to small movement between your shooting intervals. I usually choose the frame rate to adjust the playback speed or time.
With so many frames, file size and card size become issues. Shooting full-sized raw files with my 21 MP Canon 5D Mark II limits the interval I can shoot because of the time it takes to write to the card, and also limits the number of exposures I can shoot on a card. But the camera has two smaller raw file formats, and I use the smallest of those, S-RAW2, which gives me an image of 2784 x 1856 pixels. The Full HD format is 1920 x 1080 pixels, so I have more than I need. 720p HD video is 1280×720 Also see: How to crop to HD Video Tutorial I could also shoot high-quality Small-JPEGs. They are the same pixel dimensions as S-RAW2 but are about 10% the size, so they write to the card faster. That will be the best option if you are limited by a slow or small card, or want to do a very long time-lapse sequence involving thousands upon thousands of frames
What minimum interval can I shoot?
My S-RAW2 files average about 6-8 MB. (Raw files are compressed, but without any loss of quality, so their size varies with the complexity of the subject.) With a UDMA card I can shoot S-RAW2 files at 2-second intervals and the buffer never fills; shooting is continuous. But I can’t go to a shorter interval unless I shoot small JPEGs. In that case I can shoot at 1-second intervals, which is the minimum I can set on the remote switch. You will need to test your camera, file format and card. Every combination will have different limits.
I convinced myself to spring for a 32G UDMA card, which lets me shoot S-RAW2 for about 2-3 hours at 2 frames per second. I also got a Firewire 800 card reader, which gives me 5 times faster downloads than a USB2 card reader with the UDMA card. With the Firewire connection a full 32 G card takes half an hour to download at FW400 speeds. (My 32GB UDMA card via FW800 downloads in just over fifteen minutes).
What interval suits the action?
I was surprised at the shooting rate needed to give a smooth video for many subjects. For clouds moving at a just noticeable rate I found I wanted a frame every 2 seconds; for a sunset or sunrise without moving clouds, one every 4-6 seconds may be enough.
Computer power is also a consideration; a slower computer will take a lot longer to handle the files and compile the video, but all but the most ancient will probably work. For long sequences, this is one of those operations you will want to set up to run when you can step away from the computer for a while to just let the processor plug away.
Set-up
- Make sure your sensor is clean. Any spots will be obvious as they will be constant from frame to frame.
- Set the camera to the desired file format.
- Format the card so you have the full capacity available.
- Turn off image stabilization.
- Turn off long-exposure noise reduction if the exposure time could approach half the shooting interval, as the noise reduction adds another equivalent exposure time before the next image can be made.
- Put the camera on a tripod.
- Let the camera autofocus on an object at the correct distance and switch it to manual focus; it will hold that focus distance. You don’t want the focus searching with a changing subject.
- Decide whether you want manual or auto exposure and set it accordingly.
- If you are shooting JPEG you may want to preset a white balance. If you are on auto WB the camera may make different choices as the scene changes. If you are shooting RAW you will set the white balance in raw conversion.
- I set the LCD review time to Off to minimize battery drain and on the guess that it may speed up processing so I can shoot at the fastest frame rate.
- I shoot in aperture priority and set the aperture and ISO so that the shutter speed won’t approach the shooting interval. This may involve some guesswork if you are shooting a sunset or sunrise, where the light level will change significantly.
- Be careful if the sun will appear in the frame. It could damage the sensor and shutter curtain.
- Cover the eyepiece; without your head blocking it, stray light can get in and affect the exposure.
- Set the intervalometer to the desired interval.
- IF SHOOTING THROUGH A WINDOW, Make a hood out of black paper to eliminate interior reflections.
Preparing the images
When I download my card, I put the files in a sub-folder in a special folder for time-lapse videos. Organization here will make your life easier. You may accumulate quite a few video clips over some time, and for each you will have the original files from the camera, a renamed set (assembling the video requires sequentially numbered files) that may also have adjustments applied, and the video file itself.
In my normal workflow I import and adjust files with Lightroom, but I want a separate catalog for time-lapse frames so they won’t clutter up my “normal” images. But you can just as easily import the card using the Adobe Bridge downloader, or probably other alternatives. I’ll go through the steps using Bridge; users of other systems will be able to translate the steps. You don’t need the latest version of Bridge. If yours supports the steps shown here, you are fine.
If you are not using Bridge to download, you can easily set it up to do so. Open Bridge and in the menu bar go to Preferences (in the File menu on a PC and in the Adobe Bridge menu on a Mac). In the General tab check “When a Camera is Connected, Launch Adobe Photo Downloader.” Give Bridge time to build the previews for each frame and then you can scroll through them quickly to get a rough preview of the movie. Then you want to step through more slowly to eliminate any bad images or mark any for retouching, such as a fame of a sky scene in which a bird appears. If you shot JPEGs, you can rename them with Edit > Select All and then Tools > Batch Rename. Always make a temporary copy of the folder first in case anything goes wrong in renaming. You can also open JPEGs in Camera Raw and make some adjustments as shown next for Raw files, but you have so much more leeway and quality working with raw files.
If you shot raw files, go to the menu bar and do Edit > Select All and choose File > Open With > Adobe Photoshop, or File > Open in Camera Raw. You will get the Camera Raw screen with a stack of all your images on the left side.
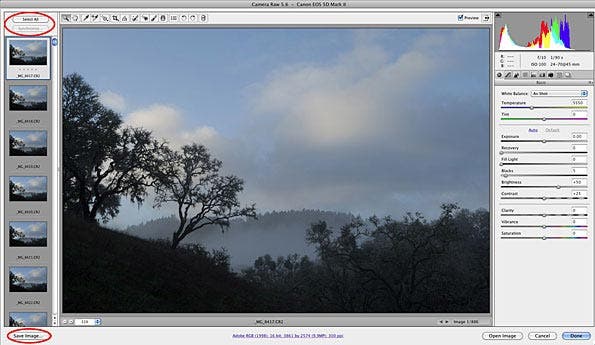
Use the tools in Camera Raw to make any desired adjustments to the first image, click Select All in the upper left, and click Synchronize, just below it. Make sure all the appropriate items are checked in the Synchronize dialog box. The pixel dimensions can be reduced and the aspect ratio adjusted either here or when the video is assembled. Although doing so here is non-destructive, you may find it simpler to do it when you create the video because you may want to create several at different resolutions or aspect ratios, for HD and for the web. But to do it here, click and hold for a second on the Crop tool in the upper left of the Camera Raw window. You will get a dropdown menu with the choices you need. Choose Custom and you can set a ratio or actual pixel dimensions. For Full HD you will want 16:9 or 1920 x 1080 pixels. This figure is a composite to show both steps:

You can also set a custom aspect ratio with Lightroom’s crop tool by clicking the dropdown next to the padlock icon, and you can specify pixel dimensions when you export the files to JPEGs.
Then click Save Image… in the lower left, and choose JPEG. You want to create a new folder for the JPEG files. You can specify sequentially numbered filenames as they are saved, as shown here.
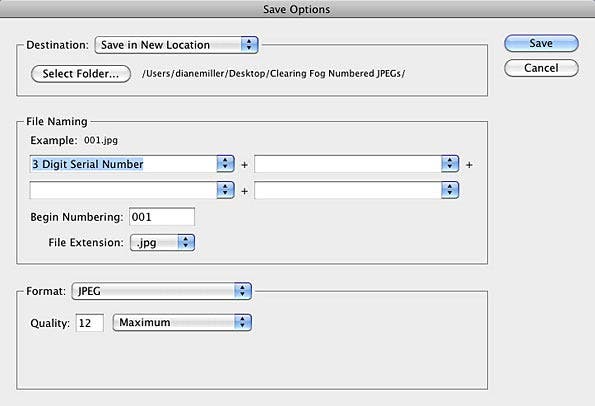
Also see: How to crop to HD Video Tutorial
Creating the video with QuickTime Pro
Now you are ready to make the video. We’ll start with QuickTime Pro. The steps using Photoshop CS4 Extended are in the next section. These steps are shown for a Mac; the steps are almost identical with a PC.
Start QuickTime Pro and from the menu bar choose File > Open Image Sequence. Navigate to the desired folder, open it, highlight the first file and click Open. You will get a dialog box where you will specify a frame rate. (This doesn’t happen with a PC but you have the same option later on either platform.) You may have to experiment to find the rate that gives you the desired playback time and smoothness. You can compile the same set of images into a video any number of times with different settings.
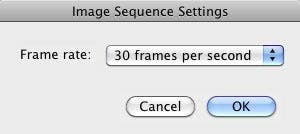
When you click OK you will then see the first file at 100%, which may more than fill your screen. If your computer isn’t up to the job, or your file is too big, such as a full-sized raw file, you may be stuck on a black screen here. In this case you may have success by downsizing the file on export from Camera Raw. Or Lightroom. From the top menu go to File > Export.
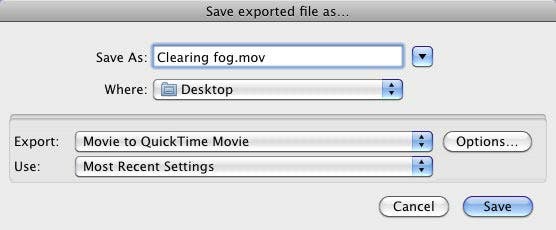
Name and choose Movie to QuickTime Movie then hit the Options button to get the Movie Settings dialog:
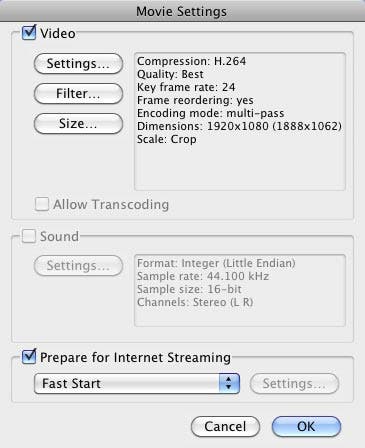
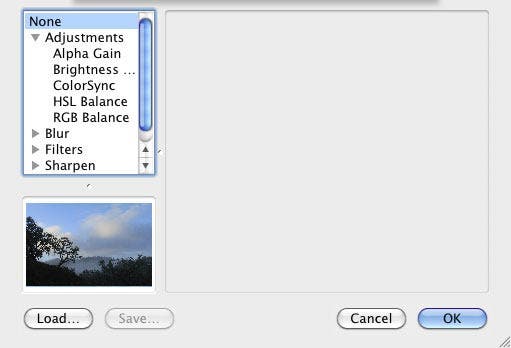
You will need to specify things under the Settings, Filter and Size buttons. The Settings button gives you the Video Compression Settings screen, shown below. H.264 compression gives the best quality to bandwidth ratio. Experiment with the Quality settings; lowering them can very noticeably degrade your images.
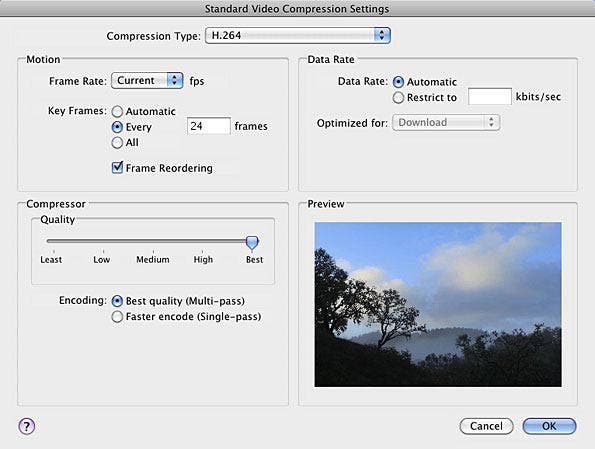
The Filter settings let you make some adjustments to the image but I much prefer the control I have in Camera Raw. You can also open and adjust JPEGs in Camera Raw, although you will be limited by the much smaller amount of information in a JPEG vs. a Raw file.
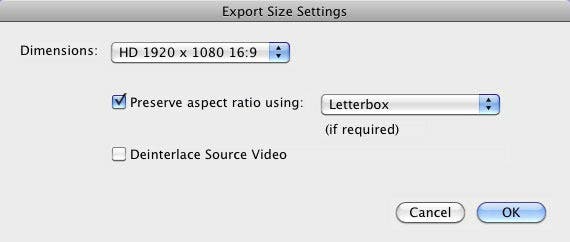
In the Size dialog you will choose HD or a smaller format for the web. You will also set the aspect ratio. HD video is 16:9, slightly more panoramic than your camera’s file. You can fill the screen, cropping your images top or bottom (or both) or choose not to crop and leave padded space on either side of the HD screen.
When you OK your way out and hit Save, the video will compile, which can take some time. Then you will need to close the screen displaying your large image. On the PC you can just hit the X button to quit. Hitting the red gumdrop ‘close’ button on a Mac will bring up a dialog box giving you a chance to “Save your changes.” This is the same as going to File > Save or File > Save as, on either platform. The options are to save a self-contained movie with the media included (so you no longer need your image files) or to save a reference movie that will need your files to play. But you don’t need these extra steps to use the video you have already made.
Creating the video with Photoshop CS4 Extended
You can do the same construction of a time-lapse video using Photoshop CS4 Extended. Go to File > Open, navigate to the folder of images and select first one. Check the Image Sequence checkbox in lower left, then click Open. You will get a dialog box where you will need to specify a frame rate.In the Layers Panel you will then see a Background layer showing the first frame. You can crop, resize and add adjustment layers just as you would for a regular image, even masked ones. It is not necessary to resize at this point, as the video rendering will do it if needed. If you do want to resize you will be asked to convert the Background layer to a smart object. Then click File > Export > Render Video. The resulting dialog contains the same settings shown above for QuickTime rendering.
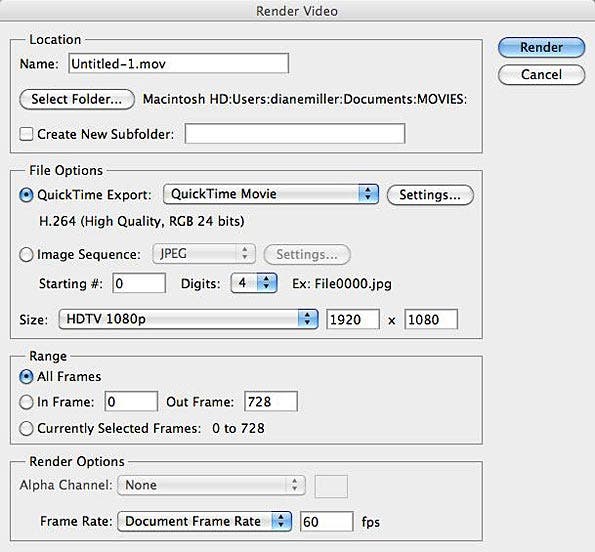
After specifying your desired parameters, click the Settings button to the right of the QuickTime Export dropdown, or choose Image Sequence instead. The settings are the equivalent of those shown above, or are self-explanatory.
When you hit Render a progress bar will appear. Rendering (exporting) can take quite a while.
And here’s the glorious result!
Clearing fog over Porter Creek Road Time Lapse. Click here to watch in HD on Vimeo
Cake icing
After rendering a video, you can do some very fancy footwork in video editing programs such as Adobe After Effects, Final Cut Pro and iMovie.
Also see “FOR ME, Time Lapse is where it’s at article, with tons of inspiring videos.”

