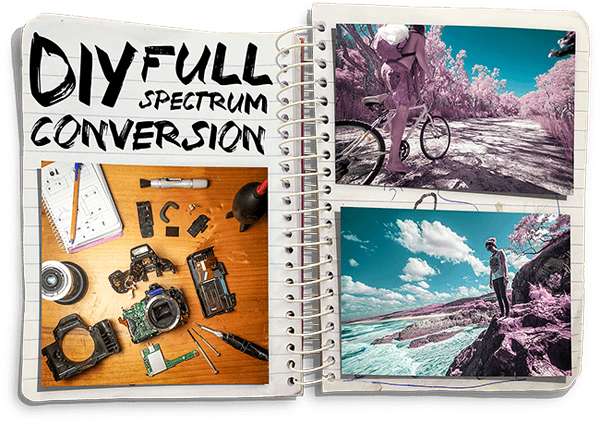
Photography helps us see the world in new ways by capturing scenes beyond what we see with the naked eye. While creating black and white images are one way to turn images into art, another option is converting our cameras to pick up more spectrums of light than you can see in person.
The world is filled with frequencies of light that most living creatures can’t access. The full spectrum of light includes infrared, visible, and near-ultraviolet light. Many of those are filtered out by our cameras with an internal IR filter. A converted full spectrum camera can capture the entire light spectrum, including these hidden light waves, to create images with pink trees, turquoise skies, and other amazing fantasy colors.
By accessing those secret spectrums of light, we can unlock a method of looking at the world in a whole new way. You may have heard of IR camera conversion before, and assumed it was something you would have to spend a lot of money to achieve. But DIY full spectrum conversion is an inexpensive method of expanding your current photography kit and unlocking your creativity.
What is a full spectrum camera?
A full spectrum camera means the camera is built to pick up more light than the normal camera, whether that’s infrared photos or UV images. It still takes normal, everyday images like, say a typical street scene or portrait. But the cameras are also designed to see light that our human eyes cannot see, often thanks to an internal IR filter. The full spectrum camera has access to these seemingly invisible light spectrums, and this sensitivity lets it create beautiful, vibrant images your camera otherwise wouldn’t generate. To achieve this, photographers rely on a full spectrum camera conversion.
What is a full spectrum modification?
Full spectrum camera conversion requires replacing the built-in IR filter with a clear filter. This change opens the camera up to a new world of color, enabling the camera to see, interpret, and capture lights and colors we see with our own eyes — as well as those we don’t. Some photographers opt for a professional to handle the full spectrum camera conversion given it requires taking apart the camera. But, you can also DIY an infrared converted camera — just make sure you read the directions, and feel comfortable, before you begin. (And cease your conversion operation at any point if you feel lost!)
How does full spectrum work?
A full spectrum camera, or an infrared converted camera, works via a replacement of the internal infrared-blocking filter. The photographer swaps this filter for a clear filter that gives the camera full capabilities to see the scene as it actually is—UV, infrared light, and all. The result? Vibrant images that show what’s visible to our eyes and what’s not. It could be fantastical sky colors or surreal astrophotography hues. The full spectrum camera is like a peek into the full-color world—and, as social media trends have shown, it’s a world that fans and followers are pining to see and learn about.
How to Convert Your DSLR to a Full Spectrum Camera
In most cases, it’s a good idea to use an older backup camera as your converted camera, that way you can still choose to shoot traditional shots with your primary camera. Also, camera conversion is not reversible. For this tutorial I’m using an old Canon EOS 1000D (called the Rebel XS in the US), but you can perform this same camera conversion on virtually any entry-level DSLR by Fujifilm, Sony, Nikon, Panasonic, and other camera manufacturers.
The final image quality will depend on the quality of your camera, but it’s a good idea to try this out on an older camera you won’t miss before attempting it on a brand-new, top-of-the-line model.
Before You Start Converting Your DSLR
Disclaimer: This is not an electronics class, a glass-cutting lesson or safety school. A basic understanding of circuit boards, how to connect/remove flexible flat cables and screwdriver operation is assumed. The risk of permanently destroying or damaging your camera is real, but the conversion is simple enough if you follow along carefully. That said, you should read through the full explanation before you begin.
If you feel like you’re in over your head at any point, seek help from someone more knowledgeable about the conversion process. It helps to perform the camera conversion in an area with a bright, positional light source. Take reference photos throughout the disassembly process so you can see how to reassemble the camera.
What You Need to Convert Your DSLR
- [Expensive Method] Full Spectrum Glass Filter (Such as this Astronomik MC glass filter ≈ $70)
- [Cheaper Method] UV Glass Filter ( Results in the loss of the UV spectrum – This is not actually that big of deal as I will explain later…)
- Screwdriver
- Needle
- Glass Cutter
- Sand Paper
- Glue
- Faith
Step 1: Take out screws to open the camera


- Remove 7 screws from the bottom of the camera.
- Remove 2 screws from the left-hand side (When held in shooting position) of the camera.
- Remove 2 screws from the right-hand side (When held in shooting position) of the camera.
- Remove 2 screws from the front of the camera (above the body cap).
- Remove 4 screws from behind the eye cup (Note: Top right screw comes off with diopter wheel).
- Remove 1 screw from the top left hand side (When held in shooting position) of the camera (Within the camera strap recess).
- Remove 1 screw from the top right-hand side (When held in shooting position) of the camera (Within the camera strap recess).
Step 2: Remove the back cover and side panel
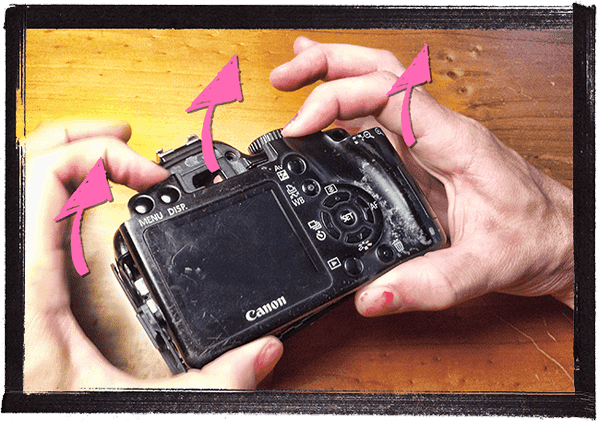
- Removed the back cover from the camera body with nothing more than a gentle force. It is attached to the camera body by a flexible flat cable (FFC) in the bottom right corner that connects the LCD and accompanying buttons.
- To unplug the cable, flip up the black locking latch found on the circuit board connector with a nimble implement (or just a fingernail) and it should slide out freely.
- Remove the panel (housing the shutter release, HDMI & USB (etc) connectors) from the left hand side of the camera.
Step 3: Remove the camera’s circuit board
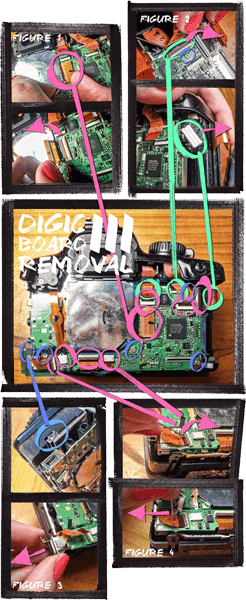
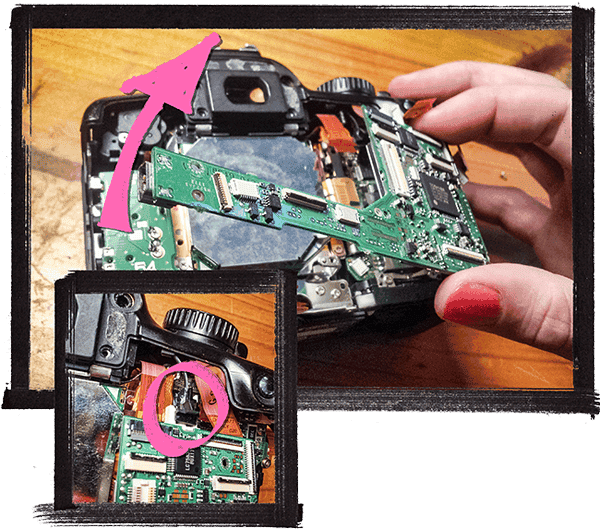
Behold the The Digic III board, i.e. the brains of the camera. Behind it lies our goal in today’s operation: The eye of the camera, AKA The 10.1 megapixel APS-C CMOS sensor, released in 2008. That might not sound like much on paper, but don’t be fooled: This indomitable digital eye before you has taken photos that have appeared on magazine covers. Alas, time is no friend to technology. Everyone knows it’s not about the megapixels, but 10 is pushing it in terms of resolution… And the max ISO doesn’t go higher than the year you were born.
In order to gain access to the sensor, we must first remove the Digic III board. Attached to the board are 11 flex cables and 5 screws that must be unplugged/removed (Circled in pink & green).
Most of the cables cannot simply be pulled out as they are locked in place. As seen in Figure 4., to unlock the flex cable, use a fingernail or nimble implement (like a needle) to flip up the latch. Insert the eye of the needle into the hole you see in the center of the flex cable. Use the needle to gently pull the cable from its connector as not to damage it from the force of your comparatively large fingertips.
Use extra caution when unplugging the sensor, as seen in Figure 1.
The green circles indicate a flex cable that is concealed beneath another flex cable which must first be removed before access is granted, as seen in Figure 2.
The top-rightmost screw is located beneath a ribbon cable that must first be removed before access.
As seen in Figure 3., the bottom-leftmost screw is located on the left hand side of the camera. Following successful extraction of the screw, remove the metal shielding it once held in place.
The board should lift out with ease if all cables/screws have been correctly removed. However, it still remains attached by a loosely connected fiber optic cable (Circled in pink) that must also be unplugged.
Step 4: Remove the remaining body panels to access the sensor


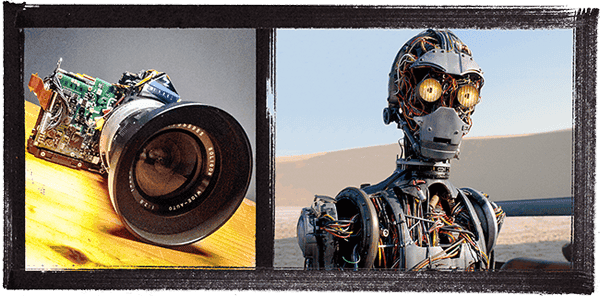
In order to get unrestricted access to the sensor, we must first remove the front and top plastic body panels. To do this, flip the camera over and unhook the pictured tab (Attached to the faceplate) from over the tripod socket. The faceplate should lift off.
When looking at the front of the camera, you will notice 2 connectors (x1 red & x1 yellow) just beneath the rim of the lens port on the circuit board. Carefully unplug these (Using tweezers or a pair of long-nose pliers) and the top panel will lift off.
If done correctly, the camera should begin to resemble C-3PO from Episode I.
Step 5: Remove the camera’s sensor

Remove the sensor. The sensor is held in place by 5 screws (Circled in pink) and connected by one flex cable (Circled in orange).
Step 6: Remove the internal IR-blocking filter and low pass filter from the sensor
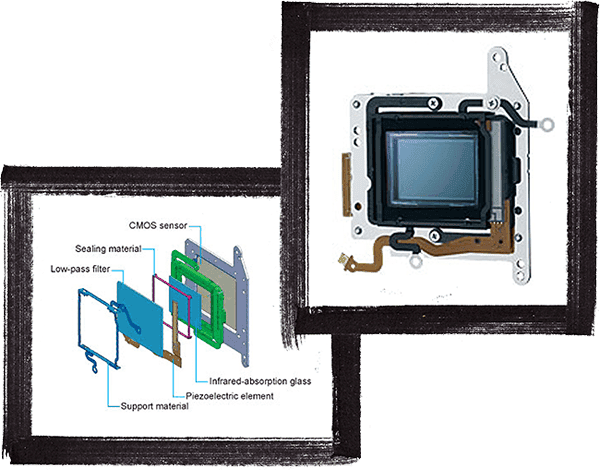


Disassemble the sensor. As seen in this digitally-rendered deconstruction of the sensor from Canon’s official documentation, it is comprised of many individual parts. This design is flawed for 2 reasons:
- The low-pass filter and infrared absorption glass (obviously) block the transmission of infrared light.
- Together, the low-pass filter and piezoelectric element (glued to each other) form the dust removal system, and I regret to inform you that if you wish to continue with this operation, you must permanently remove this extremely useful component from your camera.
Don’t worry, a true professional knows that dust won’t ruin a good picture… And if this is your first time DIYing, the amount of dust you’ll get on the ACTUAL sensor thanks to this conversion is probably much more than that piece of vibrating glass could ever shake off anyway…
(The following steps are shown from a 550D Disassembly. While the appearance of this sensor may vary with that of the 1000D, in essence it, and the process, remains the same.)
- Remove the 3 screws from the front of the sensor (Circle in purple).
- Using a thin flat-head screwdriver, unhook the support material from the black frame – It is held on by tension and some clips.
- The dust removal mechanism can be freely lifted from the sensor. The black plastic frame housing the infrared-absorption glass should follow.
- This piece of glass is held in place by thin strips of adhesive. Use a sharp blade to cut it free. Don’t worry if the glass breaks because it will no longer be needed in this camera ever again.
You should be left with only 3 of the original components like so:

Step 7: Create a replacement glass panel by modifying a clear lens filter
That’s it? Both the IR-absorption glass and low-pass filter have been removed, so the full spectrum conversion is done, right? Incorrect… Well semi-incorrect.
Because we have physically altered the distance of the focal plane, we must replace the gap with a filter of the exact same width if we wish the camera to autofocus correctly ever again. Now, if we are to go down the true ‘full spectrum’ route, then one must acquire/purchase a true ‘full spectrum’ glass filter like this. This disadvantage of this method is a considerable lack of availability and high costs.
If you, like me, often find myself in places far removed from civilisation where access to even the most rudimentary store is not an option (and the Lord knows eBay or Amazon won’t deliver there), then you’ll want to know how to do this with absolute minimal expense and using materials that you are either likely to already have or can easily acquire. Rich or poor, much of the world has access to camera technology nowadays. A successful DIY hack only requires a hint of resourcefulness and a dash of ingenuity.
Cue the UV filter. I’m using this for a few reasons:
- They are cheap and easily found, even in developing countries.
- Regular glass (the type used in your lens) filters out ultraviolet light by its very nature. In order to capture light in this high frequency spectrum, one needs a specialized lens made out of quartz glass, saffron, and white truffle. I can’t even afford to fix the stuck aperture on my current lens.
- My intention with this camera is to document a mix of visible & infrared light, commonly known as color-infrared, so the loss of the UV spectrum is inconsequential to me at this point in time.
- In other words, ‘ a perfect fit’.
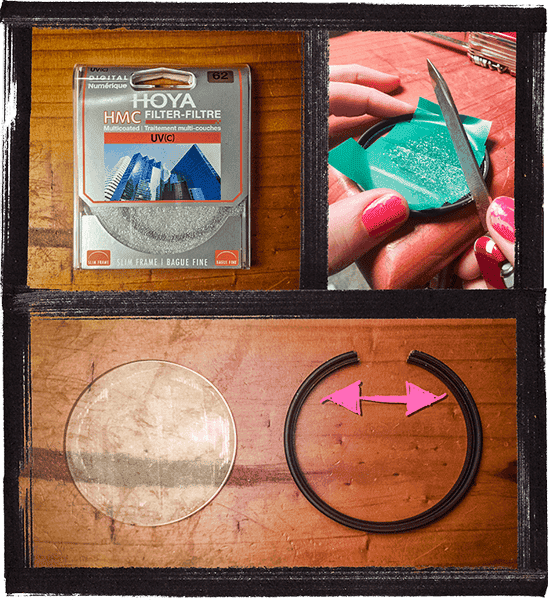
Unzip the bag, stick in your hand and pull out/peel open your clear filter of choice. If you are lucky, there will be an inner ring with 2 notches holding the circular piece of glass into the metal frame. Simply unscrew it using 2 flathead screwdrivers. If you are not lucky (which I never am), there will be no conceivable way to remove the glass without using destructive force on the filter.
Using a file, grind your way (very gently I might add) through the metal ring until you reach the glass. If you accidentally file the glass, you may shatter it. Once there is a clean cut all the way through the metal ring, bend it outwards and the circular piece of glass will drop out.
If you have never cut glass before, I recommend searching for a tutorial before this next step and/or your first attempt.
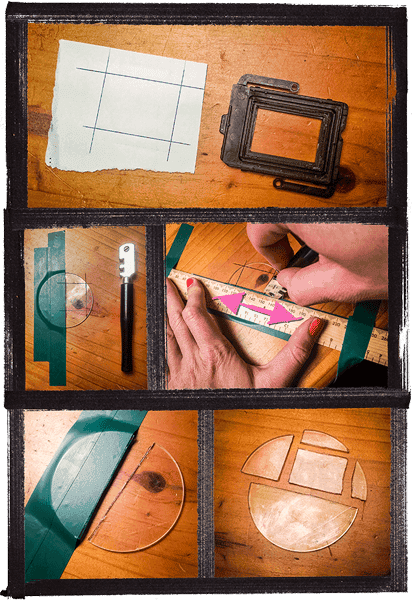
- Trace the shape of the original infrared absorption glass (or the inner part of its black plastic sensor mount) onto a piece of paper as a reference for cutting the new filter.
- Secure the circular glass onto a surface using tape.
- Transfer the cutting guide onto your new glass.
- Using a glass cutter, cut out your new rectangular filter from the glass. Refer to this animated GIF for an example of how to score & break the glass.
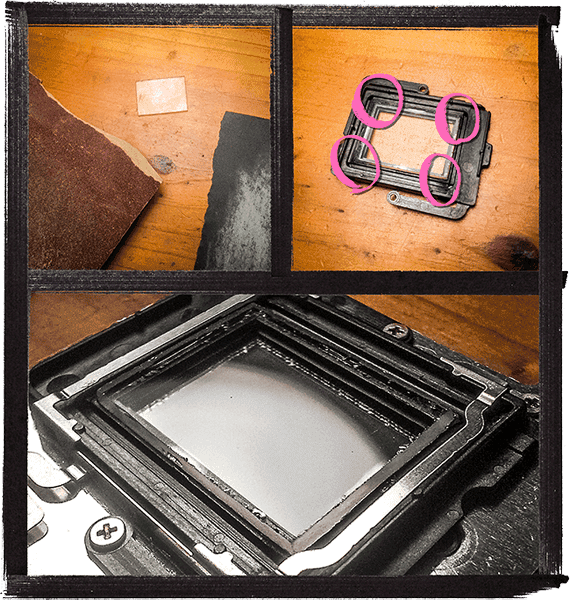
It is more than likely that your new filter is a far from perfect rectangle with razor sharp edges. Use a piece of sandpaper to whittle down the edges until it fits into the black plastic mount that once housed the original infrared-absorption glass.
Put a drop of superglue in each corner to hold the filter in place.
Nothing is more beautiful than the roughly chiseled edges of a home modification in contrast with the sleek, machined ridges of a technological marvel.
Step 8: Reassemble the converted camera
Follow this guide in reverse to reassemble your camera. Optional step: Close your eyes and pray during the moment that you turn it back on for the first time. Doesn’t turn on? Don’t worry, this happens to me all the time. Open the camera back up and ensure that every unplugged wire and flex cable is fully inserted and properly seated in its connector.
Prepare to immerse yourself in a realm of expanded perception.
Not only are the pictures a nostalgic throwback to the days of Aerochrome color-infrared film photography, but the ability to render reflected infrared light in shades of hot pink is one of the most striking visual discriminations possible.

That’s right. Leaves, grass, flowers, clothes, hair & even eyes will appear in shades of pink that Photoshop, Hubba Bubba, nor your girlfriend’s nail polish could ever hope to replicate.
Infrared photography was originally developed as an aerial surveillance tool due to the fact that vegetation reflects infrared light very brightly. As chlorophyll in plants only needs visible light to carry out the vital process of photosynthesis, leaves and flowers reflect nearly all infrared light that falls on them. This means the health of plant can be gauged by how brightly it glows in the IR spectrum. The color pink was chosen to represent reflected IR light in Aerochrome film due to the fact that it is one of the least common colors to see in the natural environment, and therefore the most eye-catching.

Cameras great for full spectrum conversion
The following models are fantastic choices for conversion into a full spectrum camera:
