A small wonder
| What’s a Guided Tour?
Welcome to the Guided Tour series, an Adorama exclusive. Let us take you on in-depth looks at today’s most popular cameras. Read this through to the end and follows the many tips and techniques that are included and you will be able to easily master this camera. You can read Guided Tours… …before you buy. The more you know about the abilities of a camera, the better equipped you are to make a buying decision. Read “Snapshot” for a 1-paragraph product overview, and the field report for our expert impressions. Our Guided Tours offer extensive information….after you buy. You’ve invested in the camera; now you want to learn everything there is to know about it so you can take advantage of all of its capabilities. How to read a Guided Tour: If you just want to turn on the camera and start shooting with the camera’s default modes, go to the “Using basic features” section. If you want to explore other features in depth, keep reading!
Snapshot The Canon G9, the flagship of Canon’s compact camera line, is the latest iteration of a line of cameras that aspire to offer DSLR users a compact tool that offers many DSLR-like controls including manual focus and exposure, spot metering, and more. A growing number of pros are using the G9 as a “proofing” camera to check exposure and composition before shooting with their pro rigs. The G9 is highly customizable, giving you the ability to fine-tune or override default settings on almost all of its 40-plus features and settings. For the amateur the camera allows room to grow, while the camera offers a wide variety of options to keep advanced users interested.
Field Report This camera has more buttons, knobs, and switches on its surface than most compact cameras, and requires a long learning curve but once you understand its many layers of functionality and customization you can pre-set it to your favorite combination of defaults and overrides using the C1 and C2 custom mode options, which will give you a combination of speed and flexibility tailored to your shooting habits. The knurled knobs atop the camera will feel familiar to photographers weaned on film cameras, while the on-screen control layout is offers much information.
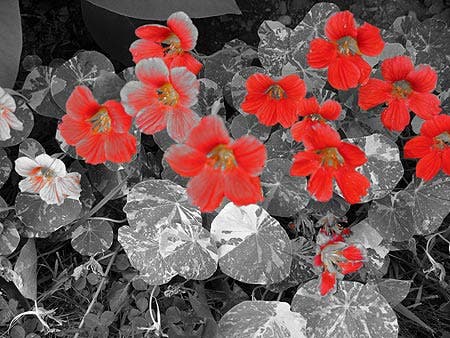
I like how when you turn the control knobs a drop-down enlarged digital version of the knob shows you where you’re at in the LCD monitor. If you’re watching a subject, this means you don’t have to take your eye off the screen. I also appreciate some of the camera’s funkier scene modes including selective color, which picks out 1 color in a scene and turns the rest of the image into black and white, and color switch, which changes the color of a selected item in the scene (it’s a bit tricky to master, though!).
Image quality at IS0 80 and 100 is very good and you should get nice enlargements especially if you use anti-shake or a tripod combined with a fast shutter speed. But, as with any compact camera with a small sensor, the higher the G9’s ISO the more noise you get in the image. By ISO 400, image quality was unacceptable, which limits this camera’s usefulness when photographing action or in low light.
TAKE THE TOUR Outside controls
Top Panel (left to right) Look on the top and you’ll see that the G9 delivers two–count ’em–knurled knobs, which should please traditionalists. Use the dial on the left to dial up your preferred ISO (80, 100, 200, 400, 800, 1600), leave it in the green “auto” setting, or risk ridiculous grain by choosing “Hi” (ISO 3200). “Hi” only works when the dial towards the right is on SCN mode. Next item is the hot shoe–a rarity on compact digital cameras but a welcome feature because it lets you mount an external flash. Why would you do this? A bigger flash throws a more powerful beam, lighting up scenes that would be way too dark using the G9’s wimpy onboard flash. You can use the Canon 220EX, 430EX, 580EXII. Attach the flash to the hot shoe and the flash and camera will communicate, coordinating exposure. Study the manual to learn the many flexible options available (including off-camera flash) or, if you don’t want to be bothered with the technical details, just turn the camera’s control dial to AUTO and go.
There’s one more setting on the control dial that deserves an in-depth look, and that’s SCN. This setting lets you access the camera’s 16 special shooting Scene modes. In each mode, the camera automatically chooses optimal combinations of shutter speed, aperture, color balance and overall image quality settings, flash settings, ISO and more based on the specific type of scene selected. The scenes are: Portrait, Landscape, Night Scene, Sports, Night Snapshot, Kids & Pets, Indoor, Foliage, Snow, Beach, Fireworks, Aquarium, Underwater, ISO 3200, Color Accent, and Color Swap. Go here to learn more about each of these scene modes. While most of these scene modes are fairly straightforward, two of them–Color Accent and Color Swap–deserve a closer look. Color Accent lets you search a scene, select the color of an object in the scene, and then capture the entire scene in black-and-white–except for your selected object. (See the sample in the field report.) Color Swap takes this a step further: select one color, then find a totally different color in the same scene, select that, and your first color is switched with the second one. This can be a lot of fun as you can transform everyday scenes into out-of-this world images! Moving on, the on/off switch is located behind the shutter release button, which in turn is encircled by a toggle switch that zooms the lens when the camera is in picture-taking mode, and zooms in on a picture when in preview mode. Back of camera (left to right)
Dominating the back of the camera is the LCD monitor, which measures 3 inches. The first of the back controls, above the LCD to the left, is the shortcut/print share button. This lets you print directly from the camera to a printer when the camera is attached via its USB cable to a Canon printer or transfer images from camera to computer; the “shortcut” button will bring you to a favorite, frequently-used function. You can assign this function to the shortcut button via the menu item “set shortcut button.”
Just to the left of the optical viewfinder is the diopter control. Turn this while looking through the viewfinder until you reach a setting that is comfortable and shows a sharp view. Keep in mind when using the viewfinder that some of the scene gets cut off; I find a little more is trimmed off the upper left than the lower right, but the scene is definitely cropped. According to Canon’s specs, the optical finder crops out about 20 percent of the image. The advantage of using the optical viewfinder is that when you hold the camera to your face you reduce the chance of camera shake. Even with anti-shake technology it’s important to do this. However, if you need to see the entire picture, use the LCD monitor. The next, longish button is the preview button. Use this to view photos on the LCD monitor.
Below the AF/FE lock/microphone button are two buttons, the Display/delete button on the left, and the Exposure/Jump button. Not to be confused with the Display button at the bottom, the Display/Delete button controls several features: The Exposure/Jump button controls exposure compensation. Press once, then turn the control ring immediately below to brighten or darken the exposure. In Image preview mode, use this button to sort or change information accompanying your images. You can also use it to jump 10 images or 100 images ahead. Tip: When using Exposure Compensation, don’t rely on the LCD image quality to judge exposure. Images that look just right may in fact be too dark, and images that are too dark may be properly exposed. Instead use the Histogram (click on the Display button until you see it). Learn more about how histograms work. Now we come to the heart of the camera’s exterior controls, the Function/Set button, which is surrounded by a 4-way toggle switch that controls focus, flash, self-timer, and macro; that toggle switch is, in turn, surrounded by the control dial. Together, this array controls the G9’s most frequently used functions. Function/Set: Hit this key once and you access all of the camera’s main picture-taking functions. Icons for each type of function appear on the left side of the screen. Press the top or bottom of the four-way toggle switch to move up or down among these, and the right to pick the variation, which appears across the bottom of the screen. Available options change, depending on how you set the control dial.
White Balance: Choose from AWB (the default setting), daylight, cloudy, incandescent, fluorescent, flash, underwater, or one of two custom settings Set custom white balance by pointing the camera at a white sheet of paper in the desired light and pressing the display button. My Colors lets you set the intensity or quality of the color capture: My Colors Off (default), vivid, neutral, sepia, B&W, positive film (emulates the look of film), lighter skin tone, darker skin tone, vivid blue, green, red, or custom color (more later).Bracketing lets you choose to have the camera automatically shoot three rapid sequence shots–a bit lighter, a bit darker, and the metered exposure–you choose the best one later. Control the degree of over-or underexposure by setting the bracket exposure compensation settings. Flash exposure compensation lets you control the strength of the camera’s flash, reducing or increasing its output up to 2 stops. This not only controls the camera’s built-in flash, but will also control any Canon external flash that’s turned on and attached via the hot shoe. Metering mode controls how the camera sets the exposure, using evaluative, center-weighted, or spot metering. Evaluative is the default and is a good choice for general photography, but center-weighted and spot metering are useful for more advanced shooters. ND filter is an actual built-in filter that is positioned in front of the sensor and reduces exposure by 3 f/stops. Use this when there is excessive light, or if you want to show movement. Tip: Use the ND filter to slow down the shutter speed when photographing waterfalls. The slower speed will give the flowing water a desirable soft, cottony look. Be sure to use a tripod in this mode! Compression settings let you control image size based on overall quality, but unless you have no intention to make prints, leave this one on the Superfine (default) setting. Recording pixels lets you choose image resolution. Many photographers will immediately switch this to RAW, which has many advantages but results in larger images that require more storage. In JPEG, the default is L (12 megapixels) but you can dial image size down as small as 640×430. The smaller size is ideal for shooting pictures that are only going to appear online, such as photos for an eBay auction. Tip: You can quickly toggle between favorite settings by setting SCN to the shooting mode of your choice, then switching to P and using the Function Set button to choose color, white balance, metering mode, etc. for other shooting situations. For example, you can set “P” for B&W with spot metering on and SCN can be set for Sports, so you can switch quickly between the two by simply turning the dial. Left side The left side of the camera has no controls, but it does have a small speaker for audio files and signals. Right side
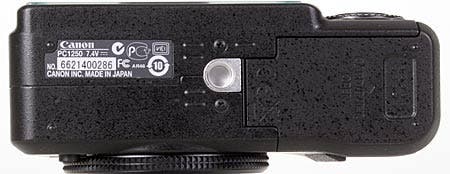
Bottom
In addition to a standard tripod screw mount socket, there is a door on the bottom plate that, when opened, reveals compartments for the battery and the SD or SDHC card. Front
Above the lens and to the left is a round window that is the source for the autofocus aid beam. In low light, it projects a green pattern so the lens can more easily focus. Almost directly above the lens is the window for the optical viewfinder; the flash is on the right.
Menus and modes The menu is divided into three major areas: Camera settings, tools, and custom settings. Camera Settings sets basic picture-taking settings, and accesses many default overrides, and takes you into deeper submenu-based controls over features controlled by exterior buttons and knobs.
Built-In Flash Settings accesses all possible flash settings at once. You can choose either Auto or Manual flash, and as you do your choices change accordingly.
Digital Zoom lets you turn on the digital zoom, which basically is live cropping of the full image, enlarging the pixels and digital noise. The default setting is off, and for good reason. I recommend avoiding the digital zoom altogether! Red-Eye is on by default, but can be overridden. Since the pre-flash that causes irises to contract and reduce red-eye can be really annoying–and most image editing software has a red-eye fix option–I would turn this feature off. Self-timer offers many options, including a delay time that can be manually set for anywhere from 1 sec to 30 seconds. The “Shots” option will take as many exposures as you choose–anywhere from 1-10–at the end of the self-timer delay. To use this Custom Self-Timer feature, press the bottom of the four-way control button and scroll down to the last menu choice. Spot AE point controls the location of the exposure spot meter target, tied in to the location of the autofocus target’s location. The default is the center of the shot, but it can be moved around by choosing “AF Point.” Auto ISO Shift automatically increases ISO in low light situations when camera shake due to long exposures is possible. Use the Shortcut/Share button to check and see which ISO you’re on. MF-Point Zoom, when turned on (the default setting is on) magnifies the center of the image when in manual focus mode. This makes it easier to focus. Safety MF is extremely useful because it combines the control of manual focus with the precision of autofocus. Focus manually as you would in standard manual focus using the magnified center area, but then when you press the shutter release halfway down, the camera’s autofocus takes over. The result is more precise focusing. AF Mode lets you switch between single-shot and continuous autofocus mode. In single shot mode, the camera focuses when you press the shutter release halfway down. In continuous, it constantly refocuses as long as the camera is turned on.Hint: Use continuous only when shooting active subjects and need focus tracking. Otherwise it uses battery power faster.
Review lets you control how long the image you just shot appears on screen. The default is 1 second, but you can turn this feature off entirely, or set it to display the image just shot for as long as 10 seconds. Review Info can be turned off, left on “Detailed” (the default setting) or set for Focus Check, which shows the entire image somewhat smaller, plus an enlarged center detail so you can be sure the image is in focus. Record lets you choose image file format and compression. For the most flexibility use RAW. JPEG takes us less memory space and can be compressed but we recommend shooting in L mode (and not M or S, which may generate compression artifacts) for the least compression and best overall image. Auto Category sets whether or not images are automatically categorized during shooting. I’m not sure why anyone would need this. IS Mode lets you control the type of image stabilization active in your camera. In Continuous (the camera’s default), image stabilization is always on, and you can see the effect in the LCD finder. Shoot Only activates stabilization when you press the shutter–and may save a bit of battery life, but not much. Panning stabilizes up-and-down motion, and when photographing races and other instances when you’re following a horizontally moving object with a slow shutter speed. Converter is used in conjunction with the optional wide-angle lens converter WC-DC58B or tele converter TC-DC58C. Select the appropriate mode only if a converter is attached.
Setup Mode
Volume controls loudness of the start-up signal, operation signal (every time you press a button the camera chirps), self-timer, shutter volume, and playback volume. Volume can be changed in five-stop increments.
LCD Brightness should be self-explanatory: It makes the LCD display lighter or darker. Power Saving controls the Auto Power Down feature, which automatically turns off after a period of inactivity that you set. The default is 1 minute, but can be set for anywhere from 10 sec to 3 min. Time Zone lets you set two times, one for home, and one for anywhere else in the world. This is a good feature for travellers. Date/Time should be self-explanatory. Clock Display lets you choose how long date and time are displayed on LCD screen after start-up. Format is used to reformat the memory card in the camera. Warning: Use Format only after you have backed up your SD card, because all information on the card will be lost when you reformat. File Numbering controls how the files are numbered. The default is continuous, so numbering picks up where the last image stopped. Auto Reset begins from 00001 every time you turn the camera on. Create Folder lets you create a new folder for every day of the week if you wish. This is useful if you are travelling and want to keep your pictures organized by date. Auto Rotate flips verticals so you can view them with the camera held horizontally. The disadvantage is that the images will appear smaller. I’d turn it off and just rotate the camera to view verticals. Distance Units lets you select distance readouts in feet/inches or meters/centimeters. The default for US cameras—big surprise—is feet/inches. Lens Retract lets you control how soon the lens retracts automatically after a period of inactivity. The default is 1 minute. The only other choice is no auto retraction. Language lets you change the menu into one of 25 languages. Norwegian, Portugese, Greek, Turkish, Hindi, Korean, Japanese, Russian, Arabic, and Chinese are among the choices. Video System lets you record in NTSC (U.S. standard) or PAL format. Print Method lets you choose between PictBridge and other methods of direct printing. Reset All gives you the option to reset all settings to their defaults. Preferences
Start-up Image controls what you see in the LCD when you turn on the camera. Choose from three images. Start-up Sound controls what you hear when you turn on the camera. You have four choices–including no sound.Operation Sound controls what you hear when you press any control button on the camera. You have four choices–including no sound.Selftimer Sound controls what you hear when you use the self-timer. One of the signals is a loud phone ringing! You have four choices–including no sound.Shutter Sound controls what you hear when you press the shutter release. Option 1 sounds the most like an old film camera–my favorite. You have three choices, including no sound but I recommend choosing a sound so you know you’ve taken the picture. © 2008 Adorama Camera, Inc. |
|||||||


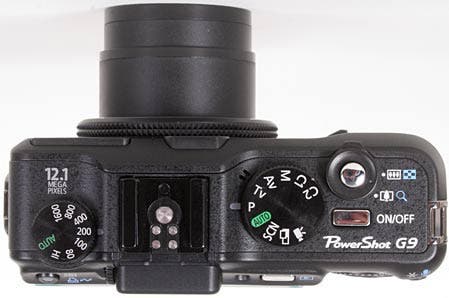
 To the right of the flash is the control dial; turn it to switch from AUTO to P (program), Tv (shutter priority, which lets you choose the shutter speed), Av (aperture priority, which lets you choose the aperture setting), M (manual, which lets you choose both aperture and shutter speed), two custom settings (more about setting those up in the Menu Functions section), multiple exposures, and video mode. As you move the control, a circular icon appears for a moment in the LCD monitor to tell you which mode you’ve chosen—a nice convenience.
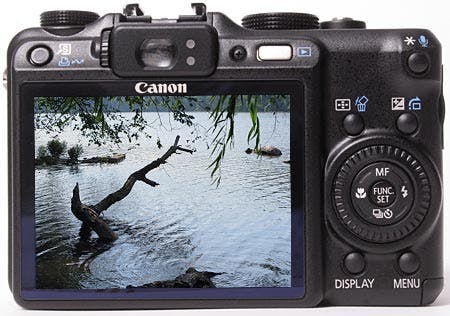
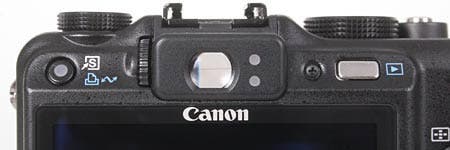
 The far right button on the top back is the extremely versatile AF/FE lock/Microphone button. You can lock exposure by pressing the shutter release halfway and then keep it locked by pressing this button. Now you can let go of the shutter release and the exposure is still locked. You can also use this button to toggle between aperture and shutter speed settings when in manual mode, set and lock flash exposure (FE), and record sound to attach to image files or just on its own.
 With this system you can control (in order of appearance):
 A flip-out door reveals two ports, one for an A/V connection to a TV or multimedia system, the other is the USB port, which lets you connect the camera to a computer for image transfers, or to a printer to make prints.
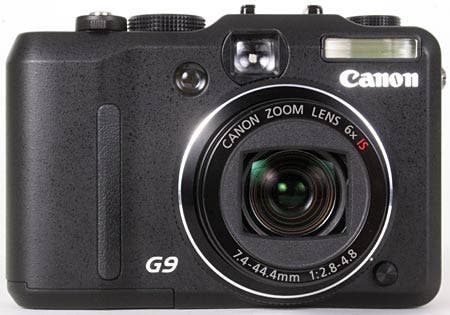
 Surrounding the lens is a ring which can be removed so you can attach the accessory tele extender and wide-angle adapters. A button on the lower right unlocks the ring and any accesory lenses you might add.
 AF Frame lets you choose between Face Detection (which lets the camera find and optimize focus on faces in a scene), AiAF (the camera divides the scene into 9 zones and chooses which zone to focus on, based on shooting conditions), center (focus is fixed on the center of the image), and FlexiZone (move focus target so camera will focus exactly where you want it).
 AF Assist Beam turns this feature on or off. Use AF Assist Beam, which is on by default, in low light situations.
 Custom Display lets you customize what data and compositional aids and formatting masks you see in the LCD monitor when shooting.
 Set Shortcut Button is a handy tool once you’ve established frequently used settings but you have to burrow through menus to find them. This feature assigns one of the following to the shortcut button: Light metering, ND filter, White Balance, Wide-angle or Tele-converter, AF Lock, Display off.
 Save Settings assigns all current camera settings to either C1 or C2 on the top-camera mode dial. If you want to have a customized alternative default series of settings (like, for example RAW capture in B&W with a Neutral Density filter and 2nd curtain flash), you can assign that to C1, and perhaps a second custom mode with Vivid color, spot AE, ISO 100, and Manual Focus on C2. You can then toggle between those two and whatever default settings you have. This is one of the most useful features on this camera!
 Mute turns off all sounds and warning signals.
 Audio sets sound sensitivity of the on-board microphone. The default is midway. A wind filter cancels out noise from blowing wind.
 Theme lets you choose from three visuals that show up as wallpaper on the LCD.