When we think about weddings and why they’re important, we typically focus on the newlyweds and the journey they’re beginning together. While that milestone in itself certainly qualifies as “momentous,” perhaps nearly as significant is the fact that weddings represent one of the few times such a large number of friends and family gather together in one place at the same time. In addition, everyone in attendance usually dresses their best and comes prepared to pose for pictures. As a result, wedding photographers have a great opportunity to flex their mastery of group photo poses for group portraits, which happen to be some of the most shared images to come out of an entire wedding day. Because of that, it is important to execute group photos well.
Handling and photographing groups can prove challenging, and it requires photographers to master a variety of skill sets, from communication and posing to lighting and problem solving. To help, we’ve compiled 10 group photo poses and ideas for family and wedding photography.
Let’s get started!
10 Group Photo Poses and Ideas For Family and Wedding Photography
- Choose a Posing Style
- Consider the Location
- Create and Follow a Game Plan
- Start with the Couple
- Bring in the Group
- Become a Director
- Light Accordingly
- Prioritize Aperture
- Move In Close for Candids
- Add Action to the Scene
Tip 1: Choose a Style for Group Photo Poses
When it comes to formal group photo poses, we have two basic styles to choose from: standard symmetrical (classic or traditional) group photo poses and editorial group photo poses. How we build the pose and light it, specifically, will determine its style. Naturally, each style carries with it a number of pros and cons.
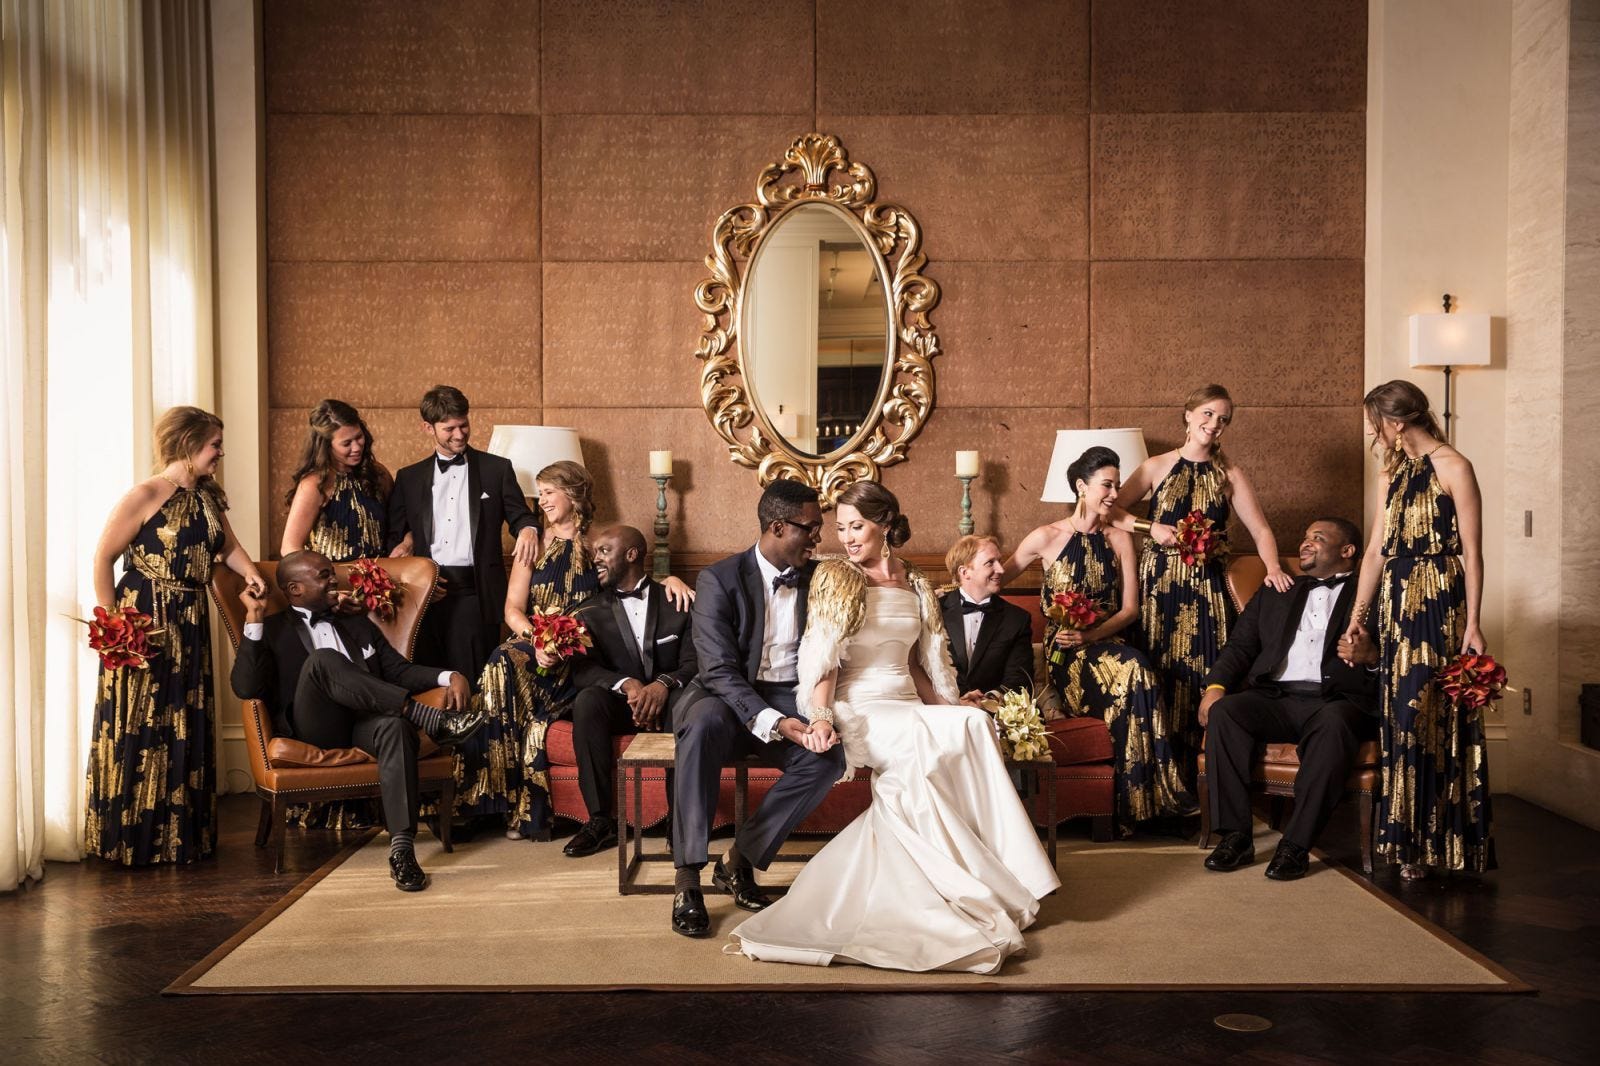
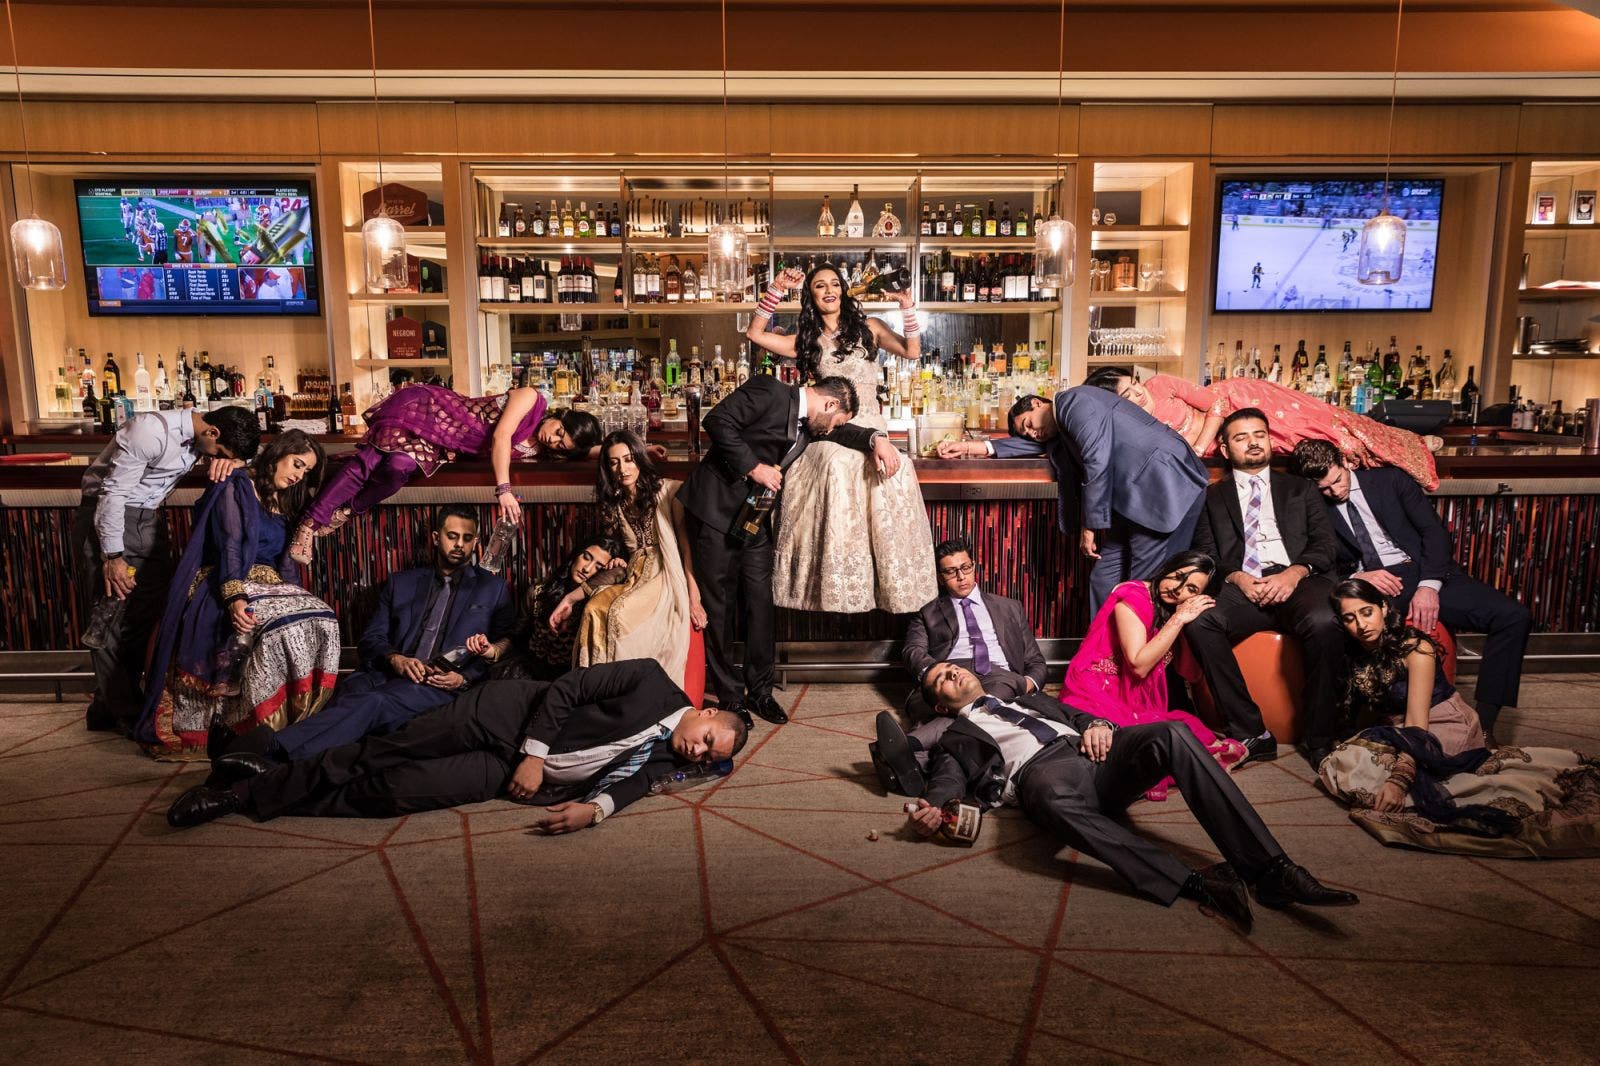
Editorial Group Photo Poses
You’ll typically find this style of posing used on the covers and across spreads in fashion magazines like Vogue. It often incorporates more dramatic lighting and dynamic posing. Balance across the frame still matters, but each subject will likely strike a unique pose and their expressions will fall more on the serious side.
Because of the added complexity in terms of lighting and posing individuals within the group, fitting editorial shots into the timeline can tack on an additional 30-40 minutes, though this can be reduced depending on the group and situation.
Pros
- Production value
- Visual interest
- Portfolio worthy
- Impressions
- Great assets for album/wall-art
- More marketing/social media potential
Cons
- Challenging
- Require more time to execute
- More pressure/stress
Mindset over Matter
I would also like to point out that our mindset can affect whether or not we’re successful when using this style of posing. If you do not enjoy it or feel that it’s too difficult or not worth the effort, then you’ll likely have a harder time capturing editorial group portraits. Instead, I recommend taking a step back and recognizing this as a unique opportunity. Our subjects are dressed their best and the location is likely amazing, assuming that you’re photographing a wedding or similar event in a formal setting. Make the most of the situation and try to create images with great visual interest and production value. Think of the effort required if you were to try and set up this type of shot on your own.
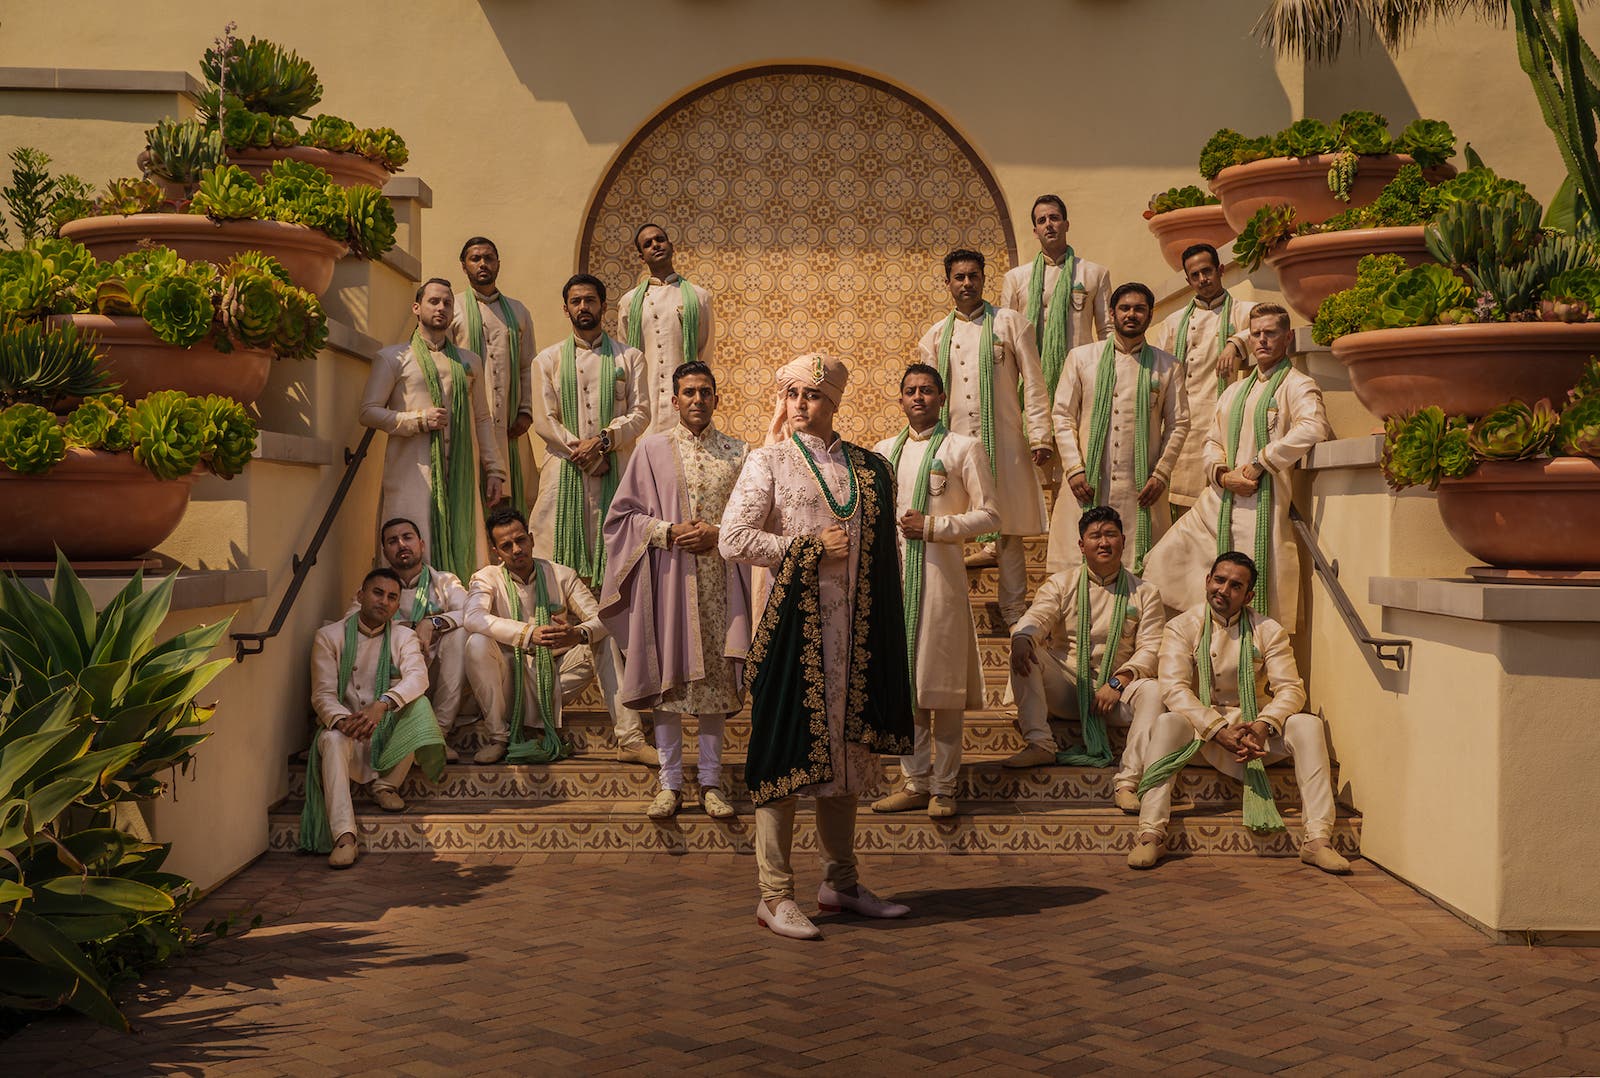
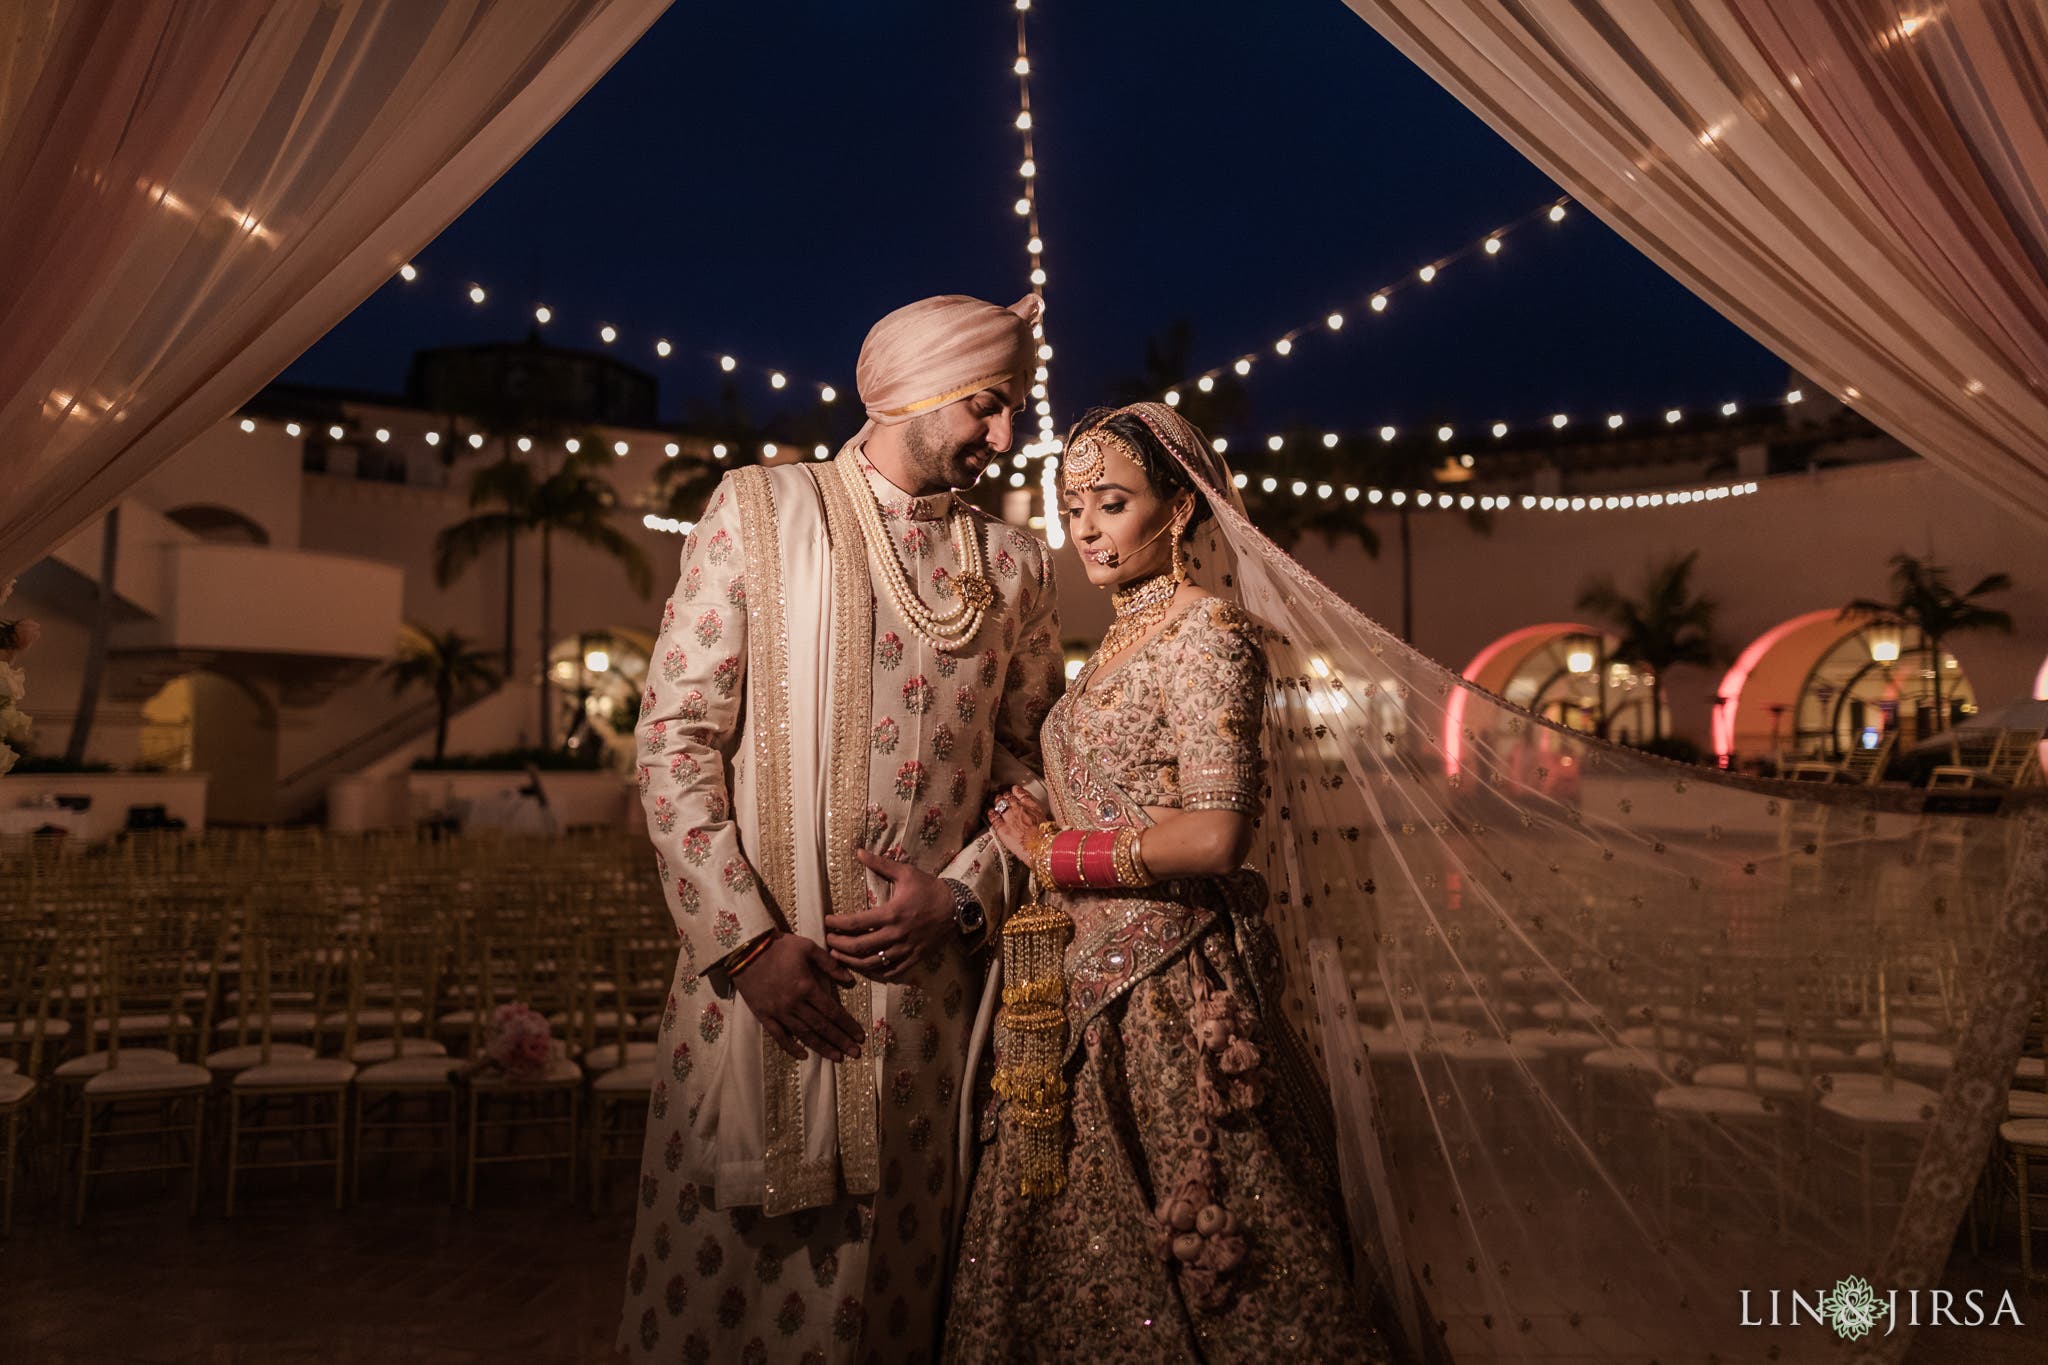
Symmetrical Group Photo Poses
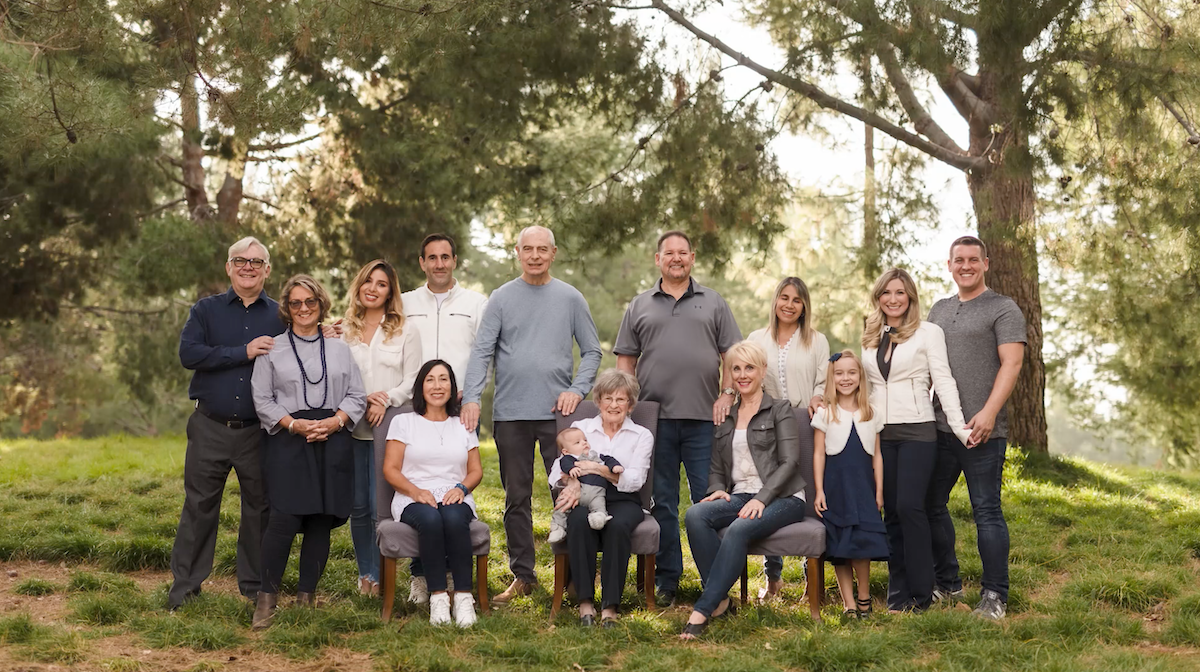
Of the two group photo posing styles, symmetrical poses are the easiest to execute. As a result, you will see photographers go with this style of posing for group portraits on a more regular basis, especially when shooting in a more bright & airy style. While the word symmetrical suggests that the subjects in the group will mirror one another exactly on either side of the centerpiece when posing this way, the reality is that we’re looking more for balance than symmetry, especially in terms of numbers. The same is also true for editorial posing.
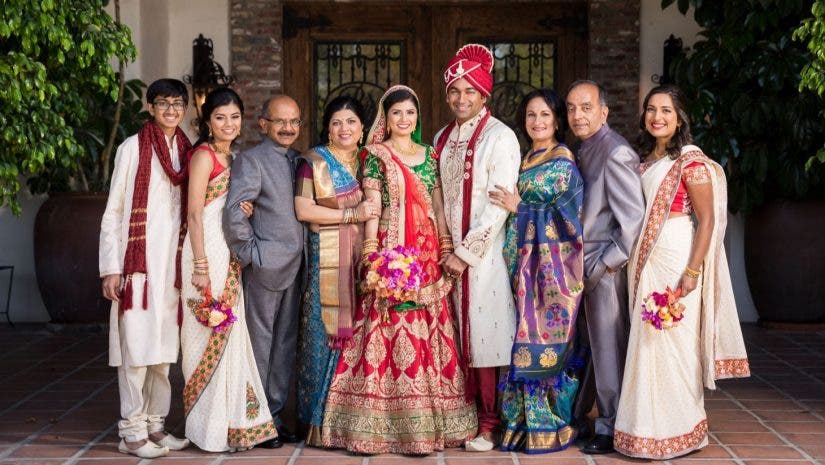
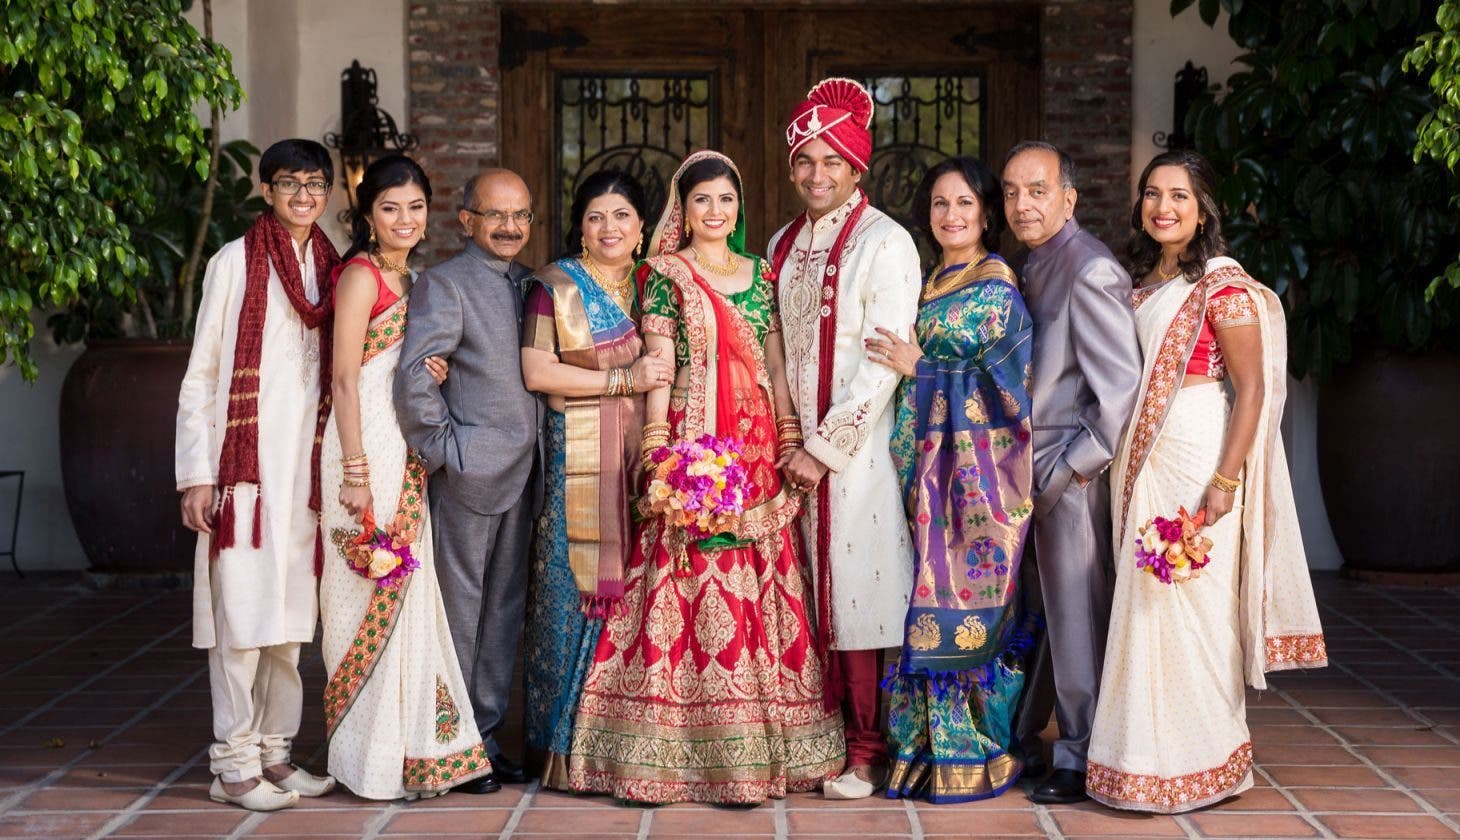
For a standard symmetrical group photo pose, place the couple in the center in the v-up pose (hinged in the center and slightly facing one another) and have the remaining subjects on either side point their toes and bodies toward the bride and groom. You’ll want to watch for height and symmetry across the group.
Pros
- Easy to set up
- Does not require much time
- Minimal challenges
- Works well with small groups (6 or fewer) and large groups (20+)
Cons
- Not as visually interesting as editorial group photo poses
- Less likely to get shared on social media
Tip 2: Consider the Location
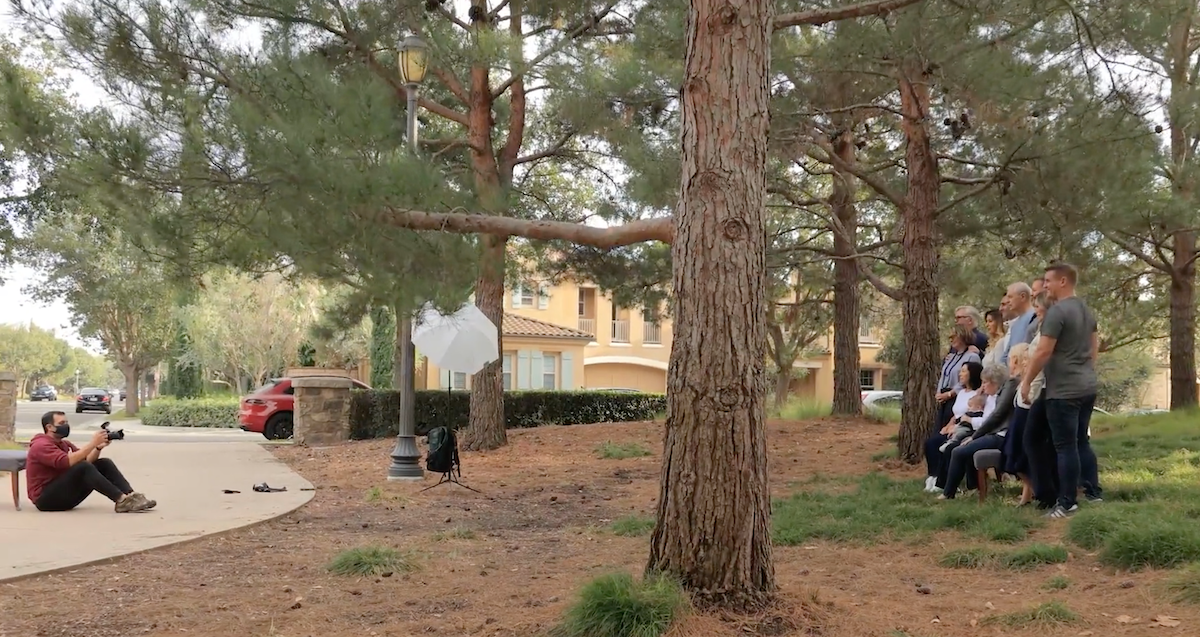
I mention location scouting after deciding on a style for your group photo poses because it’s important to scout for a location that aligns with your client’s vision for the group portraits. That said, I want to stress the importance of scouting before the shoot, whether you’re shooting a wedding, a family portrait session, or whatever. I consider scouting or pre-scouting an absolute must, even if you only have a few minutes just before the shoot.

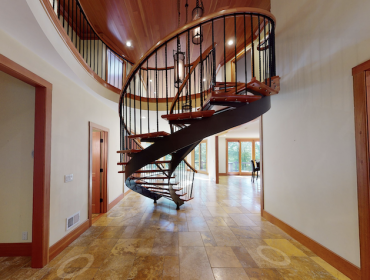
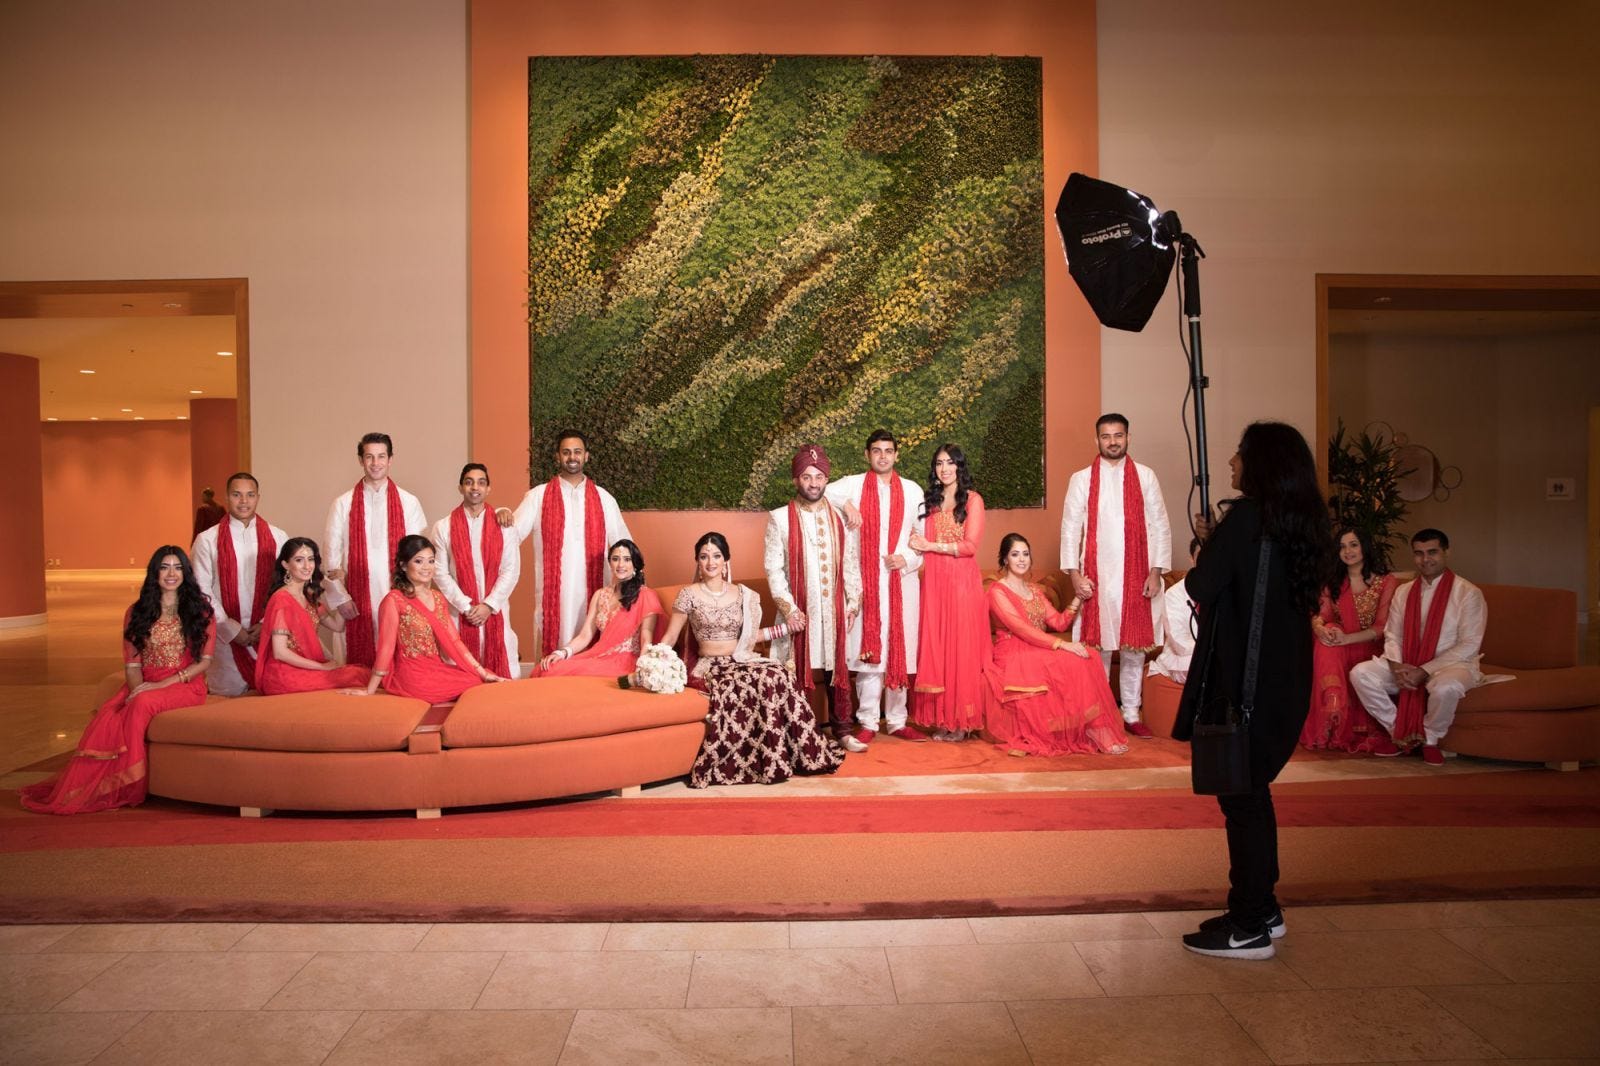
When scouting for locations, specifically for group portraits during a wedding, you should look for a space close to the ceremony site that can accommodate a large group of people. There are some instances, especially during culturally specific weddings, in which the shooting space will already be decided based on traditional norms. For example, families at Indian weddings typically prefer to shoot on the mandap while the Chuppah is often used for Jewish weddings. Always communicate with your clients beforehand to know if they have any preferences.
Tip 3: Create and Follow a Game Plan for Group Photo Poses
Depending on the situation, such as when you’re trying to put together group photo poses during a wedding, time may not be on your side. I recommend working with your client ahead of time, especially for weddings, to determine which groupings of people you want to put together. Creating a game plan in advance can also help you avoid awkward moments of trying to place people together who might not get along very well. It happens. To be clear, you don’t need to create a physical list (although it helps). We just want to avoid getting hung up in the moment, and figuring out groupings in advance can help.
Tip 4: Start with the Couple
Don’t try to imagine where to place everybody at once. When posing a large group during a wedding for a formal family portrait, start at the center. For weddings, you will typically begin with the bride and groom as your centerpiece and then build the pose outward. Similarly, for non-wedding family portraits, start with the parents or the grandparents, depending on the family’s preference, and then bring in additional family members.
As for how to pose the people in the center, I recommend the v-up, which is one of five Foundation Poses. Although I mentioned it above, the v-up involves hinging your couple on one side (like a door) and having them slightly face one another in a v-formation. You might not use a v-up pose for editorial style group poses.
Tip 5: Bring in the Group
The number of people in your group can vary dramatically, but the group size, whether large or small, shouldn’t really alter your approach. When bringing in additional subjects, just remember that the same general posing rules apply for individuals, couples, or entire groups. The only real difference between photographing couples or groups is the added dynamic of adding several people to the frame. Here are some tips and things to keep in mind when bringing in the group as you start to design your pose.
Just Get Started
Start with a rough layout and position group members on each side of your centerpiece. You really just want to move people into an approximate position while you put together the pose. Taking this approach helps keep things moving towards the final pose. If you’ve decided to go with a symmetrical pose, this process will move very quickly as you can pretty much try to add an even amount of people on either side of the centerpiece and then ask them to point their toes and bodies toward the center.
It’s important to note that relationships between group members can also play a role in determining who will stand or sit where, so keep this in mind when moving everyone into position for your group photo poses.
Balance the Frame
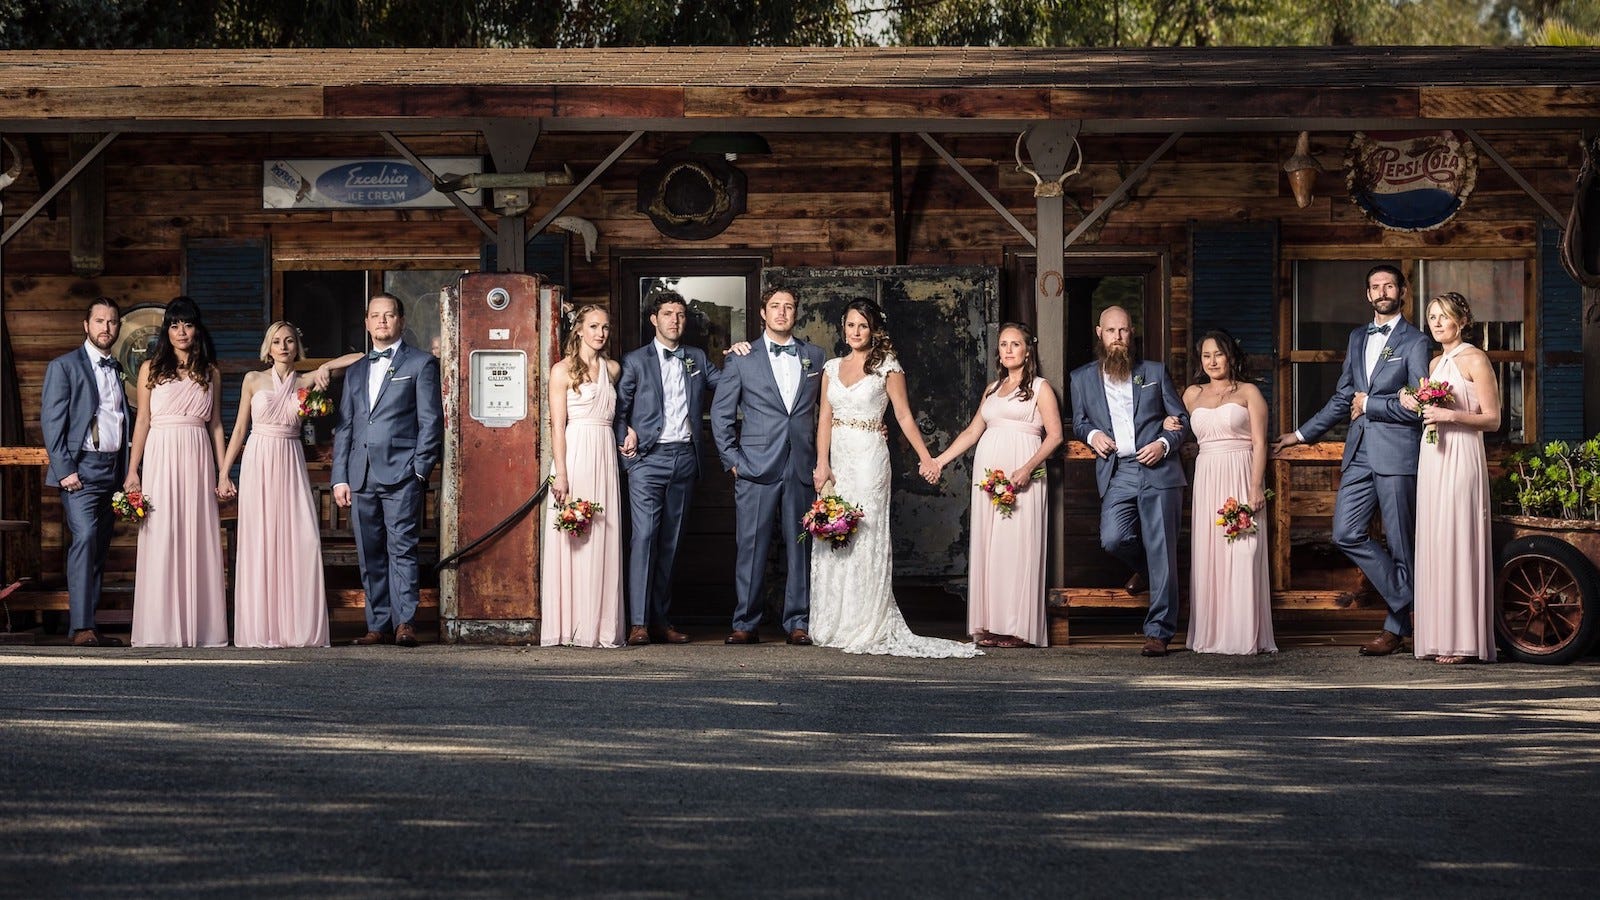
Rather than focus on creating perfect symmetry, try to create a sense of balance. Some key factors that will affect the balance of your group portrait include the height of your subjects, the number of people on each side of your centerpiece (the number does not need to be equal), and the colors your subjects are wearing.
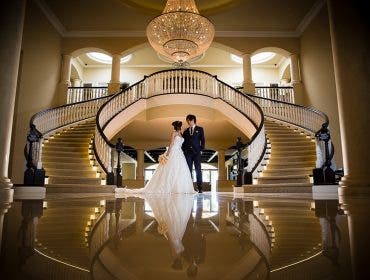
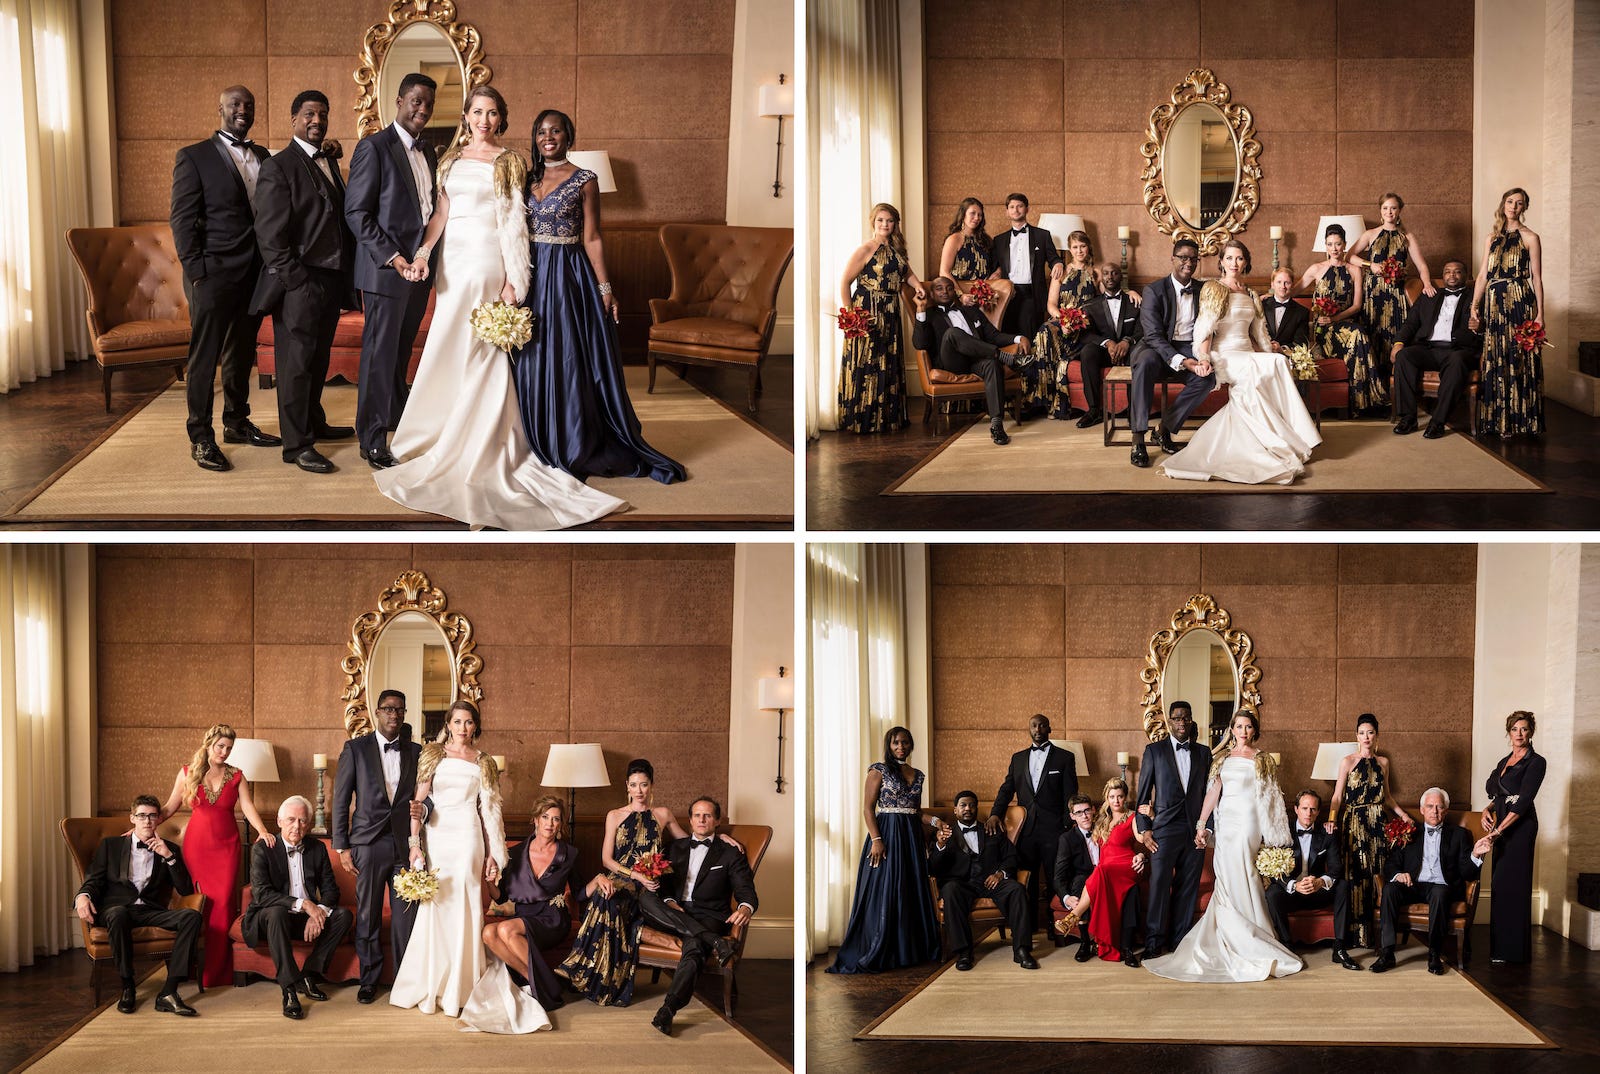
While most aspects of creating balance seem pretty straightforward, the one photographers regularly struggle with involves working with uneven numbers in groups. If you have a married couple with five groomsmen and five bridesmaids, you can simply place the couple in the center with five people on each side. What happens, however, when the numbers don’t lend themselves to such simple balancing? That’s when we must use positioning and pose variation to make the image appear balanced, even if it isn’t symmetrical. See the image above for an example.
Build Layers
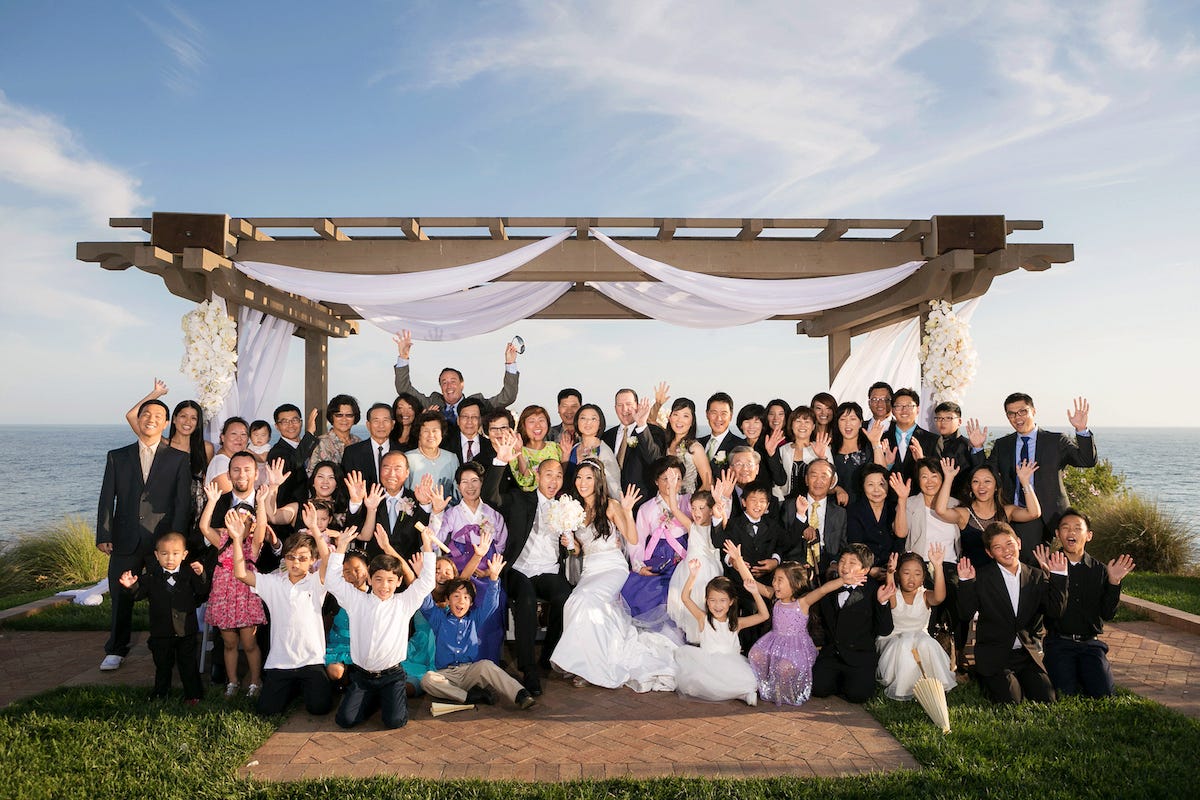
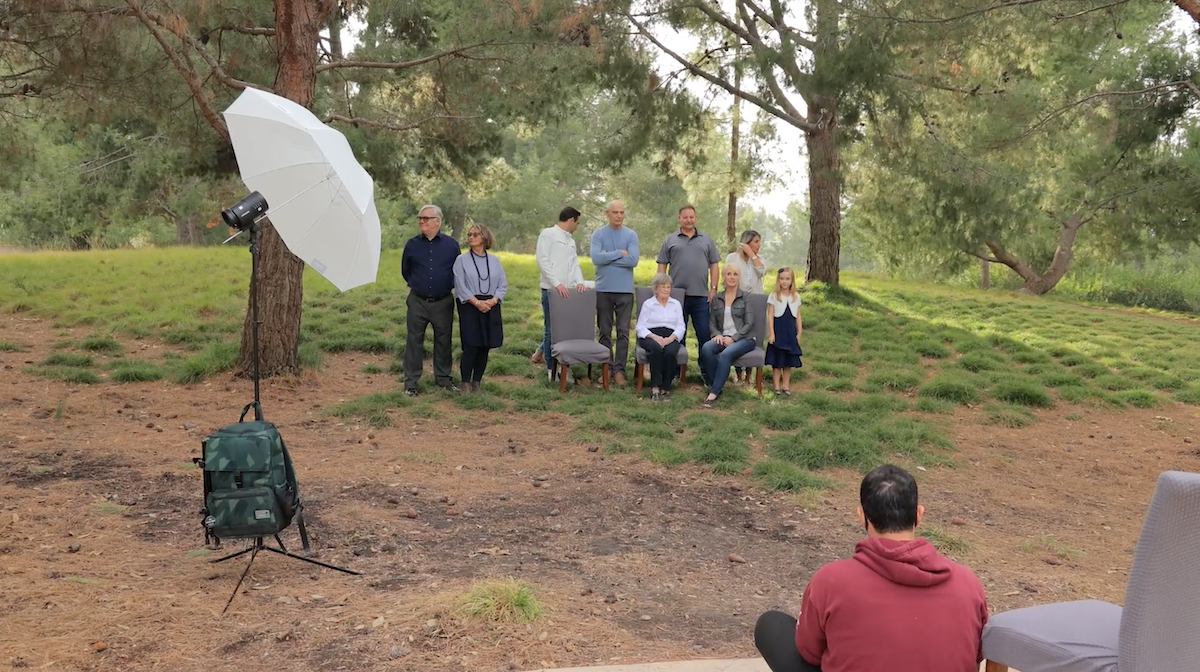
When photographing larger groups, we can use props, like chairs or stairs or whatever’s available, to create rows and limit the depth of the group. This will allow us to quickly create several rows, including a floor-seating row (usually for children), a second row for sitting on chairs, and additional standing rows with the tallest people in the back.
Create Connection and Flow for Group Photo Poses
Regardless of the posing style we use, we generally want to create connections between our group members and set up the pose so that the viewer’s eyes will move back and forth across the group without being led out of the frame. One way we can create a sense of connection involves placing hands on shoulders or weaving them through arms. This also helps convey a sense of familiarity and establishes relationships between the people in the image. The more touchpoints we use between subjects, the more intimate they appear.
Another way to create connection is to position our subjects so that they slightly overlap one another. For most large group portraits, each person in the group should only slightly overlap the person next to him or her, covering no more than 20-30% of the person’s body.
Tip 6: Become a Director
It would be difficult to overstate the importance of clear communication when directing group photo poses. No matter how stressful the situation or how short we are on time, we need to “keep calm and pose on.” This is often easier said than done.
Put Down the Camera
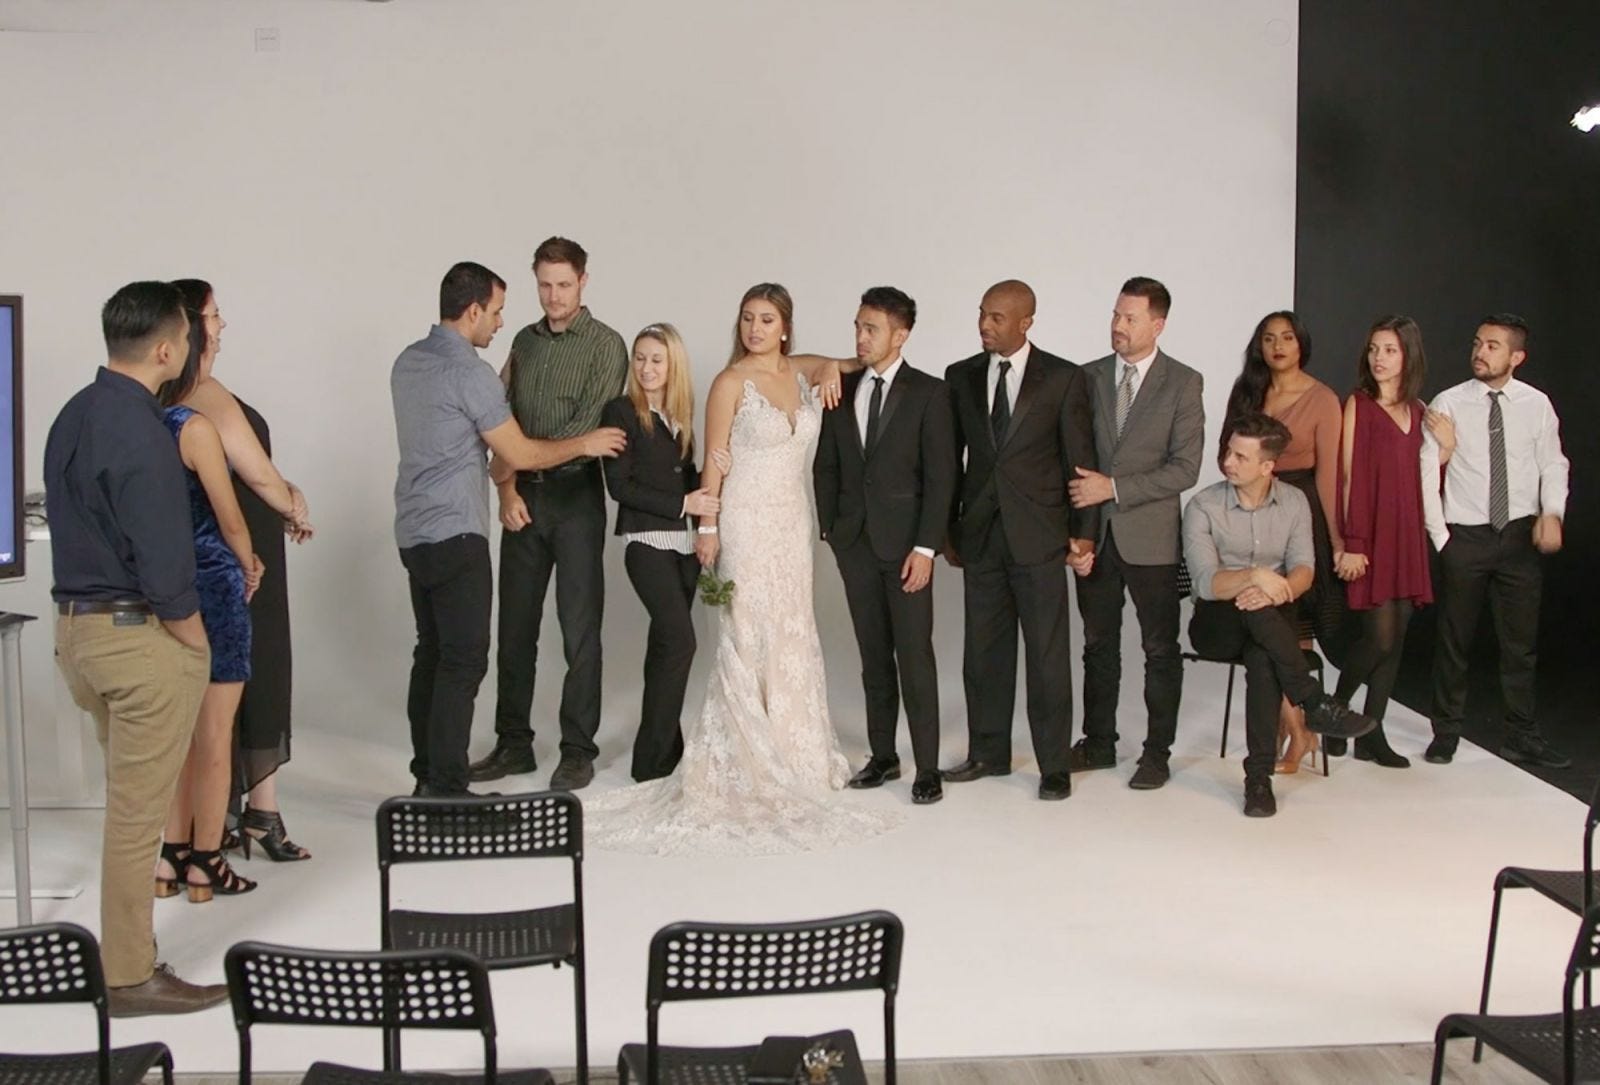
In reality, handling large groups while taking group portraits closely resembles public speaking. We must entertain the group and convey our message (in this case, getting them into a pose), all at the same time. Doing this well requires focus and a bit of finesse. For this reason, I recommend putting down the camera and taking on the role of a director when posing a group. You should engage each subject while placing them, and do what you can to create a positive experience.
Direct for Expressions
It’s important to get not only a flattering expression from your subjects but also one that matches the style of the portrait you’re capturing. For example, if you’ve placed your group into an editorial group photo pose, you’ll more often ask your subjects to make a serious facial expression to match the vibe of the pose (think Zoolander’s “Blue Steel,” but eased back a bit). Symmetrical (or more traditional) group photo poses work well with bigger grins.
Either way, be sure to direct your subjects into a number of different expressions so that you can add variety to the images you’re capturing. An easy way to break this down would be asking your subjects to look at the camera, then look at each other, and so on.
Before you call it a day, zoom in to ensure everyone is looking where they’re supposed to be looking and that nobody blinked. Doing this in the moment can save you from having to swap heads during post.
Bonus: After capturing the first couple frames, I like to show the images to my clients. This accomplishes a couple of things. First, we can make sure we’re on the same page and that they’re satisfied with the direction of the shoot. Assuming we are on the same page, then showing the images up front also builds trust and gives my clients confidence for the rest of the session.
Tip 7: Light Accordingly for Group Photo Poses
When it comes to lighting group photos, simplicity and efficiency is key. After all, whether you’re trying to avoid a meltdown from kids in a family portrait setting or your chasing a rushed timeline during a wedding, time is of the essence. If your clients prefer a bright & airy look and natural lighting will get the job done with incredible results, then don’t feel compelled to add light. Look for open shade if possible and set up your pose. When the occasion does call for added light, have a system in place to quickly analyze the scene and set up your lighting. Here are some tips on lighting your group portraits accordingly.
Lighting Gear
Depending on the portrait style, or even the location, you may need to add light to a scene. Here’s a quick list of go-to lighting tools, modifiers, and stands that will allow you to create dynamic group portraits. You’ll find several options listed that cover a range for various budgets and styles.
Lighting
- Canon Speedlite 600EX II-RT
- Yongnuo YN600EX-RTII Speedlite Flash for Canon Cameras
- Profoto B2 250Ws Off Camera Flash (OCF) Head
- Flashpoint XPLOR 600 HSS Battery-Powered Monolight
CTO Gels
Remote Trigger
- Canon ST-E3-RT Speedlite Transmitter, Version 2
- Yongnuo Wireless Speedlite Transmitter for Canon Cameras
Light Stand
Diffusion
- Westcott 43″ Optical White Satin Collapsible Umbrella
- Profoto OCF 24″ Beauty Dish with Deflector Plate, White
- Profoto OCF 24″ Beauty Dish with Deflector Plate, Silver
Lighting for Editorial Group Photo Poses
I’ve already mentioned that editorial group poses call for more dramatic lighting. In other words, the light tends to be more directional and less soft. In fact, if I want more specular highlights for editorial style lighting, I’ll use a silver surface, like a Profoto Deep Medium Umbrella in Silver, to help create that type of light.
Also, for a more dramatic look, I’ll go with a darker ambient light exposure and use the added light to chisel out my subjects. The balance of ambient to added light will vary based on personal preference, which means there are no standard camera settings to use. For this reason, I recommend experimenting with different settings in various scenes to get the look you’re after.
If I really want to control the lighting for these shots, I’ll plan for a composite shot. Shooting for composites can prove challenging, and it requires more time in post, but it also tends to get the biggest (and best) response from my clients. To shoot a composite, have an assistant light small portions of the group at a time and then combine (or composite) the collection of shots together in Photoshop for the final, fully lit group photo. Remember to take a plate shot without the subjects to make it easier to edit out unwanted details or distracting items from the shot.
Lighting for Symmetrical or Standard Group Photo Poses
Although lighting for symmetrical or standard group poses tends to fall on the flatter side with a more bright & airy look, we can still add fill light and get natural looking results.
To do this, I suggest placing your group in open shade and then adding a light on one side of the group, at least 10 feet or so from the closest subject. Angle the camera flash slightly up with an umbrella and aim it toward the far side of the group for softer lighting, even outdoors (see example above).
Lighting Tip: Watch for Shadows
Be on the lookout for shadows falling across your group’s faces or bodies. If you find your subjects (or at least some of them) falling into shadows, simply reposition the lights rather than move the group. Also, raise your flashes so that the light hits the group from a higher angle. This will help minimize the shadows.
Lighting Tip: Match Existing Light Direction
If you find you need to add light to the scene, pay attention to the existing light direction. If the existing light source is coming from a window on the left hand side of the group, place your lights on that side as well for more natural results.
Lighting Tip: Match the Color Temperature
To control the color temperature when using flash, pay attention to the existing light in the room and decide whether or not you should use CTO Gels (color temperature orange). If you’ve posed your group under Tungsten lights, for example, you’ll want to modify your white balance in-camera (to somewhere around 3200K) and add a CTO gel to the flash to compensate for the color of the ambient lighting.
Lighting Tip: Don’t Go Overboard with the Flash Power
Use your camera settings and ambient light exposure to help determine the strength of your flash power. With a higher ISO (such as ISO 3200), there is no need to go full 1/1 power. As a good starting point, begin at 1/8th power and increase or decrease from there to yield better results in terms of even light spread with exposure compensation.
Tip 8: Prioritize Aperture
Aperture controls our depth of field, and that is likely the most important element in the exposure triangle when it comes to group portraits. When photographing groups, we generally use a narrower aperture (anywhere from f/2.8 to f/8) for a wider plane of focus, which will allow us to cover more rows of people. I say generally because this is not always the case, especially if you know your gear and you’re shooting in a controlled environment. Still, I recommend using wider apertures only if you’re very comfortable shooting at shallow depths of field. If you decide to go this route, you can follow a couple pointers to help ensure everyone is in focus.
Line Up on the Same Plane of Focus
Try to line everyone up on the same plane of focus, and let them know why. I usually explain that I’m shooting with a shallow depth of field, which means those in front of or behind the focus point in the group may fall out of focus. Ask those who are standing farther back to lean slightly forward. Don’t be afraid to walk around to the side of the group to ensure they’re standing in a straight line, or as close as they can to it.
Understand Your Lens
If you know your lens, then you should know how wide your depth of field will be with certain apertures in relation to the distance between your camera and your subjects. For example, with a 50mm f/1.2 lens, I know that I will have 1-2 feet of sharpness at f/2 when I’m 20 feet or so away from my subjects. I won’t get the same results with a 35mm or 85mm lens at the same distance.
Tip 9: Move in Close for Candid Group Photo Poses

We start out with the mission of capturing a larger group photo, but we can also move in close to photograph smaller groups within. I will typically direct the group to interact with one another while I work my way through the group and capture different angles of these candid interactions. By doing this, we’re adding to the overall story of the day and highlighting in more detail the people who matter most to your clients.
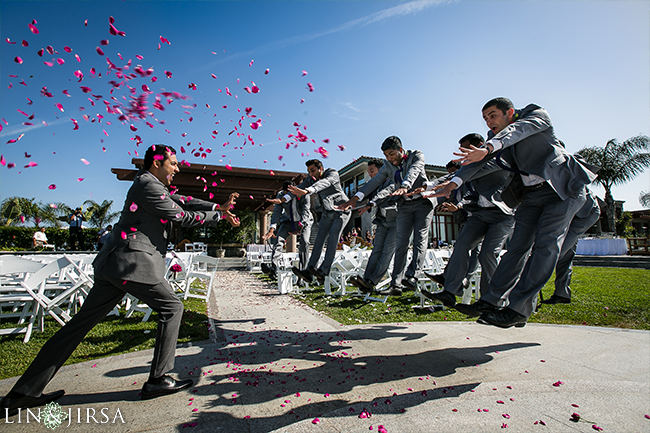
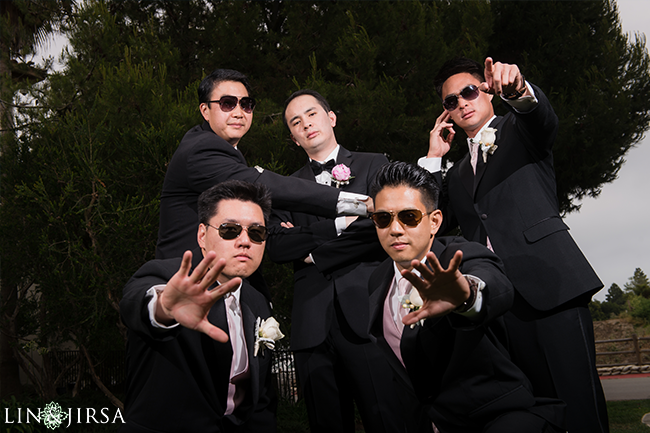
Tip 10: Add Action to the Scene
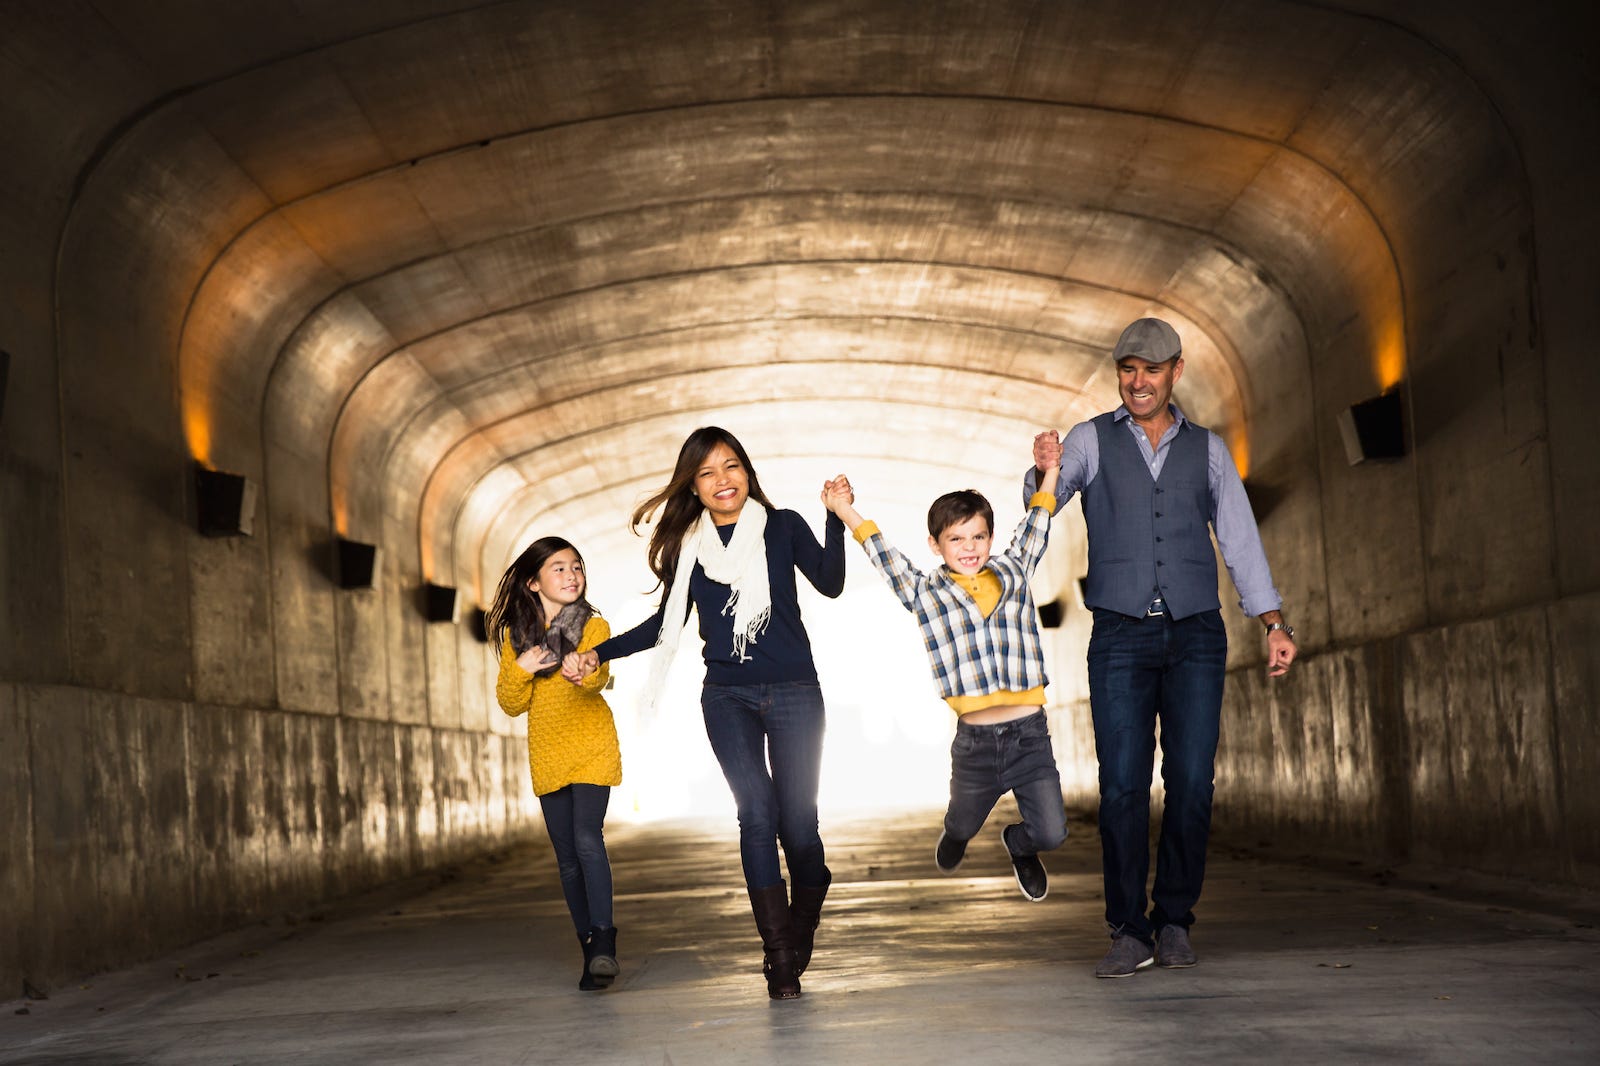
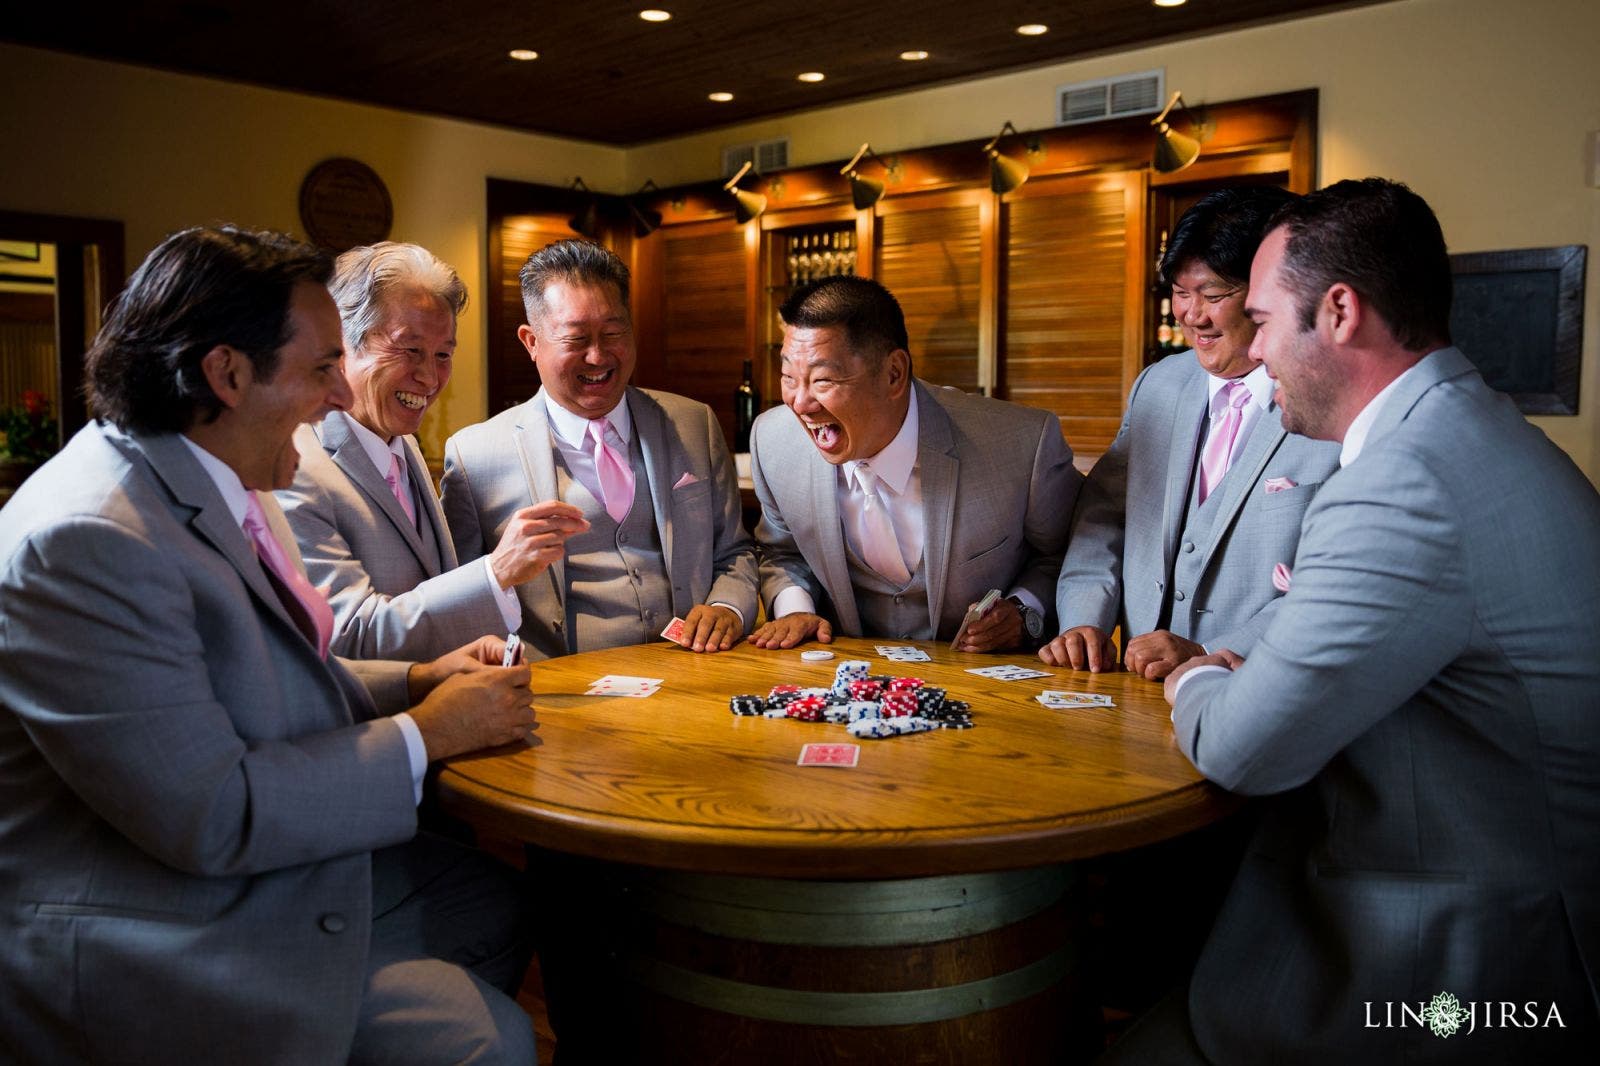
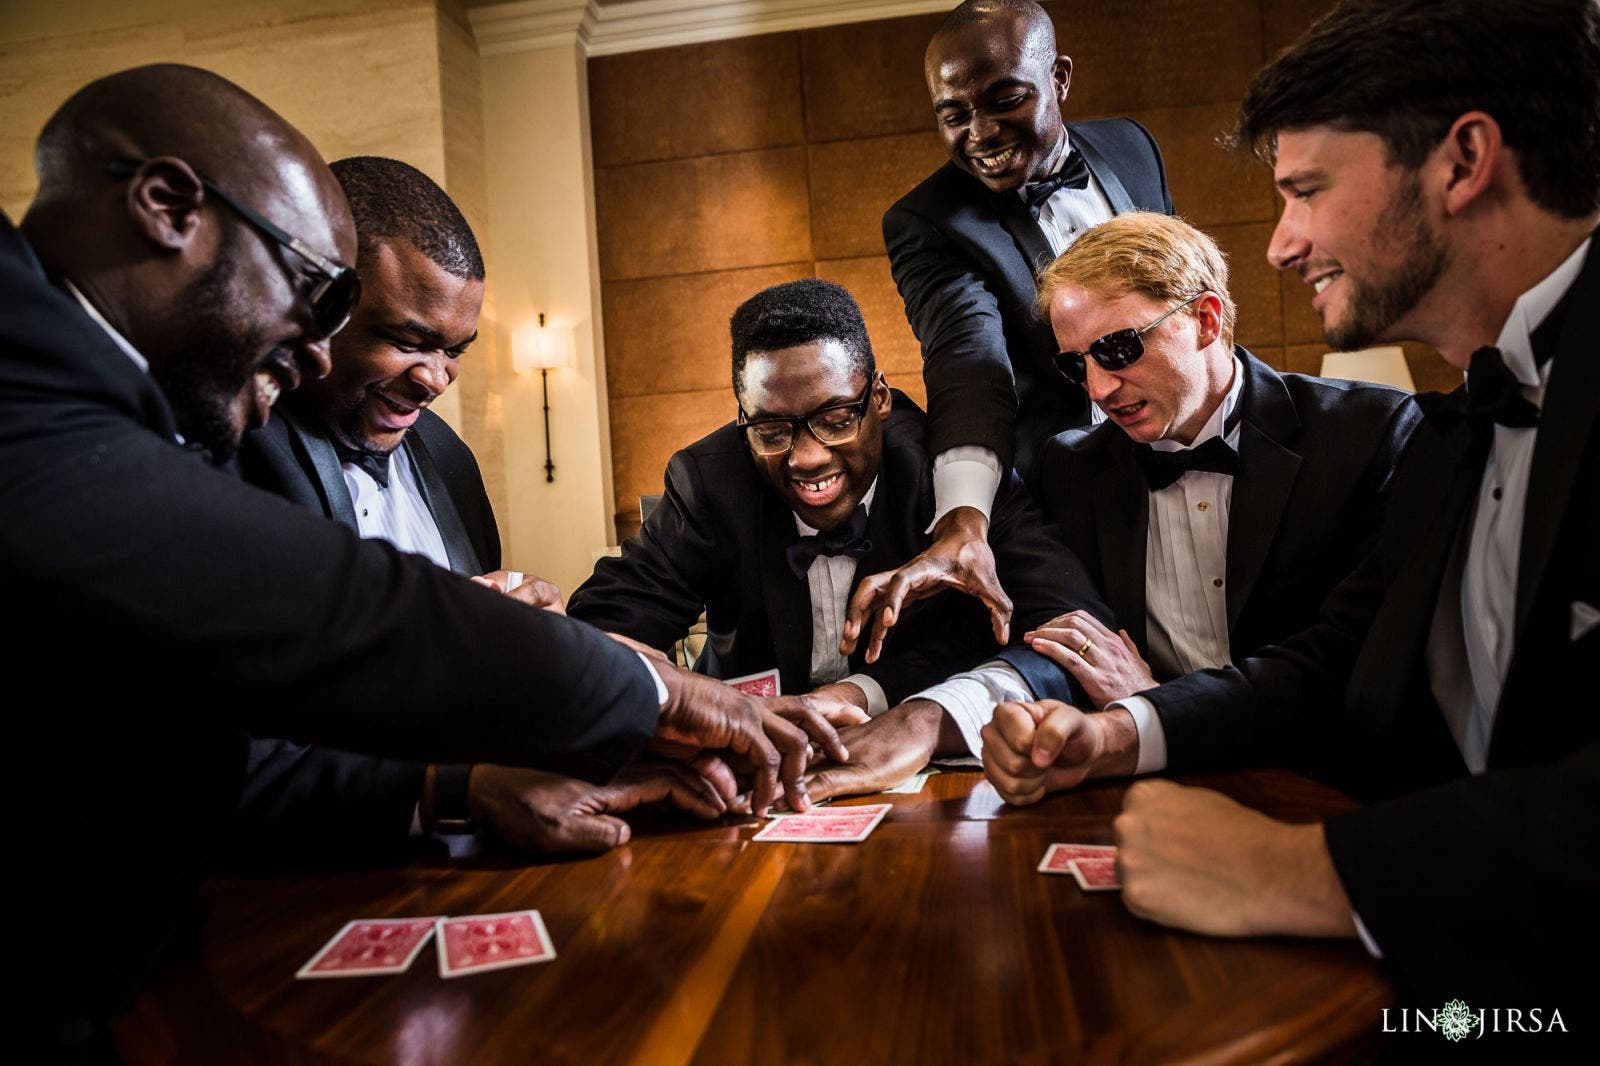
We’ve focused mainly on two basic styles of group photo poses, but we can also go another direction and introduce action into the scene. This might include capturing something as simple as walking in a line, like the iconic scene in Quentin Tarantino’s “Reservoir Dogs,” or involve a more elaborate or imaginative set up, like cueing a group of groomsmen to go all in on a heated poker game. Adding action to the scene works especially well for wedding party portraits.
Additional Examples
Conclusion
Whether you photograph weddings, family sessions, or some other genre, opportunities abound for photographing groups. The group photo poses and ideas we’ve shared here also translate for working with businesses and sports teams, or in any other instance that requires you to photograph several people at once. It is my hope that you can now walk into your next group photo session with confidence and ideas for capturing consistently great group portraits. Remember that communication is key, especially when photographing groups, and make sure you understand your client’s needs and direct the session to get photos that will exceed your client’s expectations.