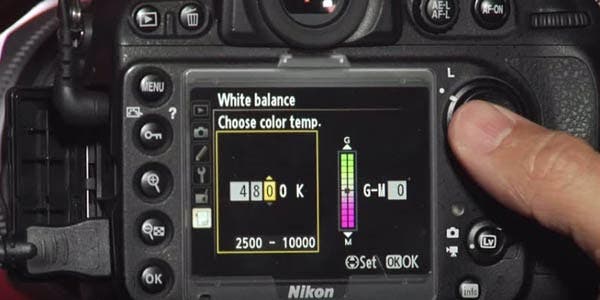
As a photographer or filmmaker becomes more comfortable with their gear, the time to “take it off auto” is near. Usually a shooter will start by experimenting with exposure modes, switching from Full-Auto to Program, or Aperture Priority, then eventually Full Manual. The next step in this switching to manual progression should be your white balance.
White balance is a term most photographers and videographers will eventually encounter in their shooting. In this article, I will explain what white balance is, why it is important to image-makers and how to control it in your work. White balance is a term used to describe the way in which your camera (film/sensor) records the color of light. Having correct white balance will allow you to reproduce colors accurately, while most cameras offer an Auto White Balance functionality, setting your white balance manually will allow for a greater level of control and often times a more accurate color representation.
The first step towards controlling your white balance is to use the preset white balance modes of your camera. Most cameras come with the following options:
- Auto
- Daylight/Outdoor
- Cloudy
- Shade
- Indoor/Tungsten/Incandescent
- Fluorescent
- Custom (discussed below)
- Color Temp/Kelvin
Simply set you camera to the white balance setting appropriate to the light in your photo. If you are outside at beach, use Daylight / Outdoor, indoors at a party choose Indoor/Tungsten/Incandescent and so on. While the Auto setting may work fine in these situations, taking control of this part of the image making process will help you understand how your camera makes it’s decisions and once you have a strong understanding, you can purposefully set the white balance “wrong” to create images that have a specific flavor.
For instance, if you are making photos of your friends and family under the warm glow of the setting sun and leave the camera in auto white balance, the camera will remove the warm feel as it is looking to neutralize all the color in the shot. By leaving the camera set to Daylight, the warmth of the sun will be recorded as the camera will continue to record images based on the color temperature of daylight and not the warmer color temp of the setting sun.
When discussing white balance it is important to talk about color temperature. Color temperature is the measurement (on the Kelvin Scale) of where the light source falls. The Kelvin scale is used for many things in science, but for our situation we are only going to use it as a reference for color temp.
Let’s take a look again at those presets, You’ll notice that each camera preset has a rating in K (degrees Kelvin).
- Auto – Preset Range based on your camera usually 3000-7000K
- Daylight / Outdoor – 5200K
- Cloudy – 6000K
- Shade – 7000K
- Indoor/Tungsten/Incandescent 3200K
- Fluorescent 4000K
- Custom (discussed below)
- Color Temp/ Kelvin 2500-10000K
With this knowledge, check out this chart (below) and see where each color temp. falls on the scale. If you tell the camera that you are shooting in tungsten and are actually shooting in the shade, your images will appear very cool with a bluish cast. And the opposite is true, shooting indoors under incandescent light but set your camera for daylight and you will have a warm, orange cast to your images. This can have a great affect on the feel of your images, shouldn’t a shot lit by a desk lamp have a warm feel?

Image courtesy of Lowel Lighting
For even more control, set your camera to the color temp/Kelvin setting and you can place your color temp wherever you want. Maybe you are shooting in daylight and want a little warmth? Set your Kelvin around 5800K. The options are virtually endless.
Here are some examples of varying white balance on the same image. This portrait was shot with daylight coming through the windows on a Fuji X-Pro1 camera.
 Tungsten 2850 + 0 |
 Flash 5500 + 0 |
 Cloudy 6500 + 10 |
 Shade 7500 + 0 |
 Flourescent 3800 + 10 |
 Custom 5950 + 9 |
 Daylight 5500 + 2 |
While it is fun to experiment with white balance, there are times you will want very accurate color. Let’s say you are working commercially, or reproducing artwork, in these cases you need your color to be correct.
If you want to set your Kelvin value more accurately, or are using multiple light sources and need to match their color, a tool like the Sekonic C-700R is very useful. This tool allows you to read the color temperature of your light sources and use color correction gels to match them if necessary.
Beyond that, setting a custom white balance will not only give you the correct Kelvin, but will also compensate for any green/magenta shifts your light source may have. Most DSLR, mirrorless, and some compact cameras allow for a custom white balance. This technique requires you to photograph a white balance card and tell the camera “this is neutral” the camera will then create a white balance profile based on this target. It is important to note that you must achieve proper exposure before setting your white balance as that balance could shift if you later need to make adjustments in exposure. Also, if you change your lighting or move, the process must be repeated. My favorite tool for this is PhotoVision Target.
Here is a quick breakdown of steps for a few brands of cameras. Steps will vary depending on models.
NIKON:
1: Select Preset manual in the white balance menu
2: Highlight Measure and press the multi selector right, highlight Yes and press OK.
3: A flashing PRE will appear in the viewfinder and information display, frame the neutral target and press the shutter-release button all the way down.
4: If successful, a message will be displayed and “Gd” will flash in the viewfinder, If “no Gd” appears in the viewfinder, try again.
CANON:
1: Take a properly exposed picture of the neutral target, trying to fill as much of the frame as possible.
2: In the camera menu, navigate to the “Custom White Balance”, Make sure that the White Balance test image, which is most likely the last image taken, is selected and visible on the LCD monitor.
3: Press “SET” again, and then “OK.”
SONY:
1: In white balance menu, choose the custom set icon
2: Press center button to enter capture mode
3: Move selection point onto the neutral target
4: Press Center Button
5: Assign new White Balance to available register
With this basic understanding, you can now take control of the color of your images for artistic expression and more accurate reproductions. As a final tip, whenever possible, shoot RAW. RAW files allow you to adjust the white balance in post processing with no loss of image quality.


