Embraced by pros worldwide, the exceptional Fujifilm X-Pro 1 is a flexible, fast, compact digital cameras with many features below the surface that will help you with your photography. We take a deep dive.
This is going to be a different kind of Guided Tour, because the Fujifilm X-Pro 1 is an unusual kind of camera, and it’s been around for two years. It has a huge fan club, but most of its rightfully proud owners aren’t aware of some of its most powerful features and how it is customizable.
The Fujifilm X-Pro 1 combines the revolutionary dual digital/optical viewfinder that was introduced by the original Fujifilm X100 with a growing and impressive array of interchangeable lenses from both Fujifilm and independent manufacturers. Fujifilm is continuing to support the camera, and expand its ecosystem. Significant firmware updates are still being introduced; these have led to improved performance and functionality.

Since its introduction in 2012, the X-Pro 1 has been embraced by photojournalists, street photographers, portrait photographers, and even candid wedding photographers as a lower-cost alternative to the Leica M-series camera. Indeed, at its price of $999, it is a significant savings over the least expensive M, and for $200, you can buy an M-mount adapter that will let you use any M-mount lens with the X-Pro 1. (Just remember to factor in the smaller APS-sized sensor on the Fuji; that 28mm Leica lens will only have the angle of view of a 38mm on it).

While Adorama’s testing partner, DxOMark Labs, still has not devised a way to test the X-Pro 1’s sensor due to its semi-randomized pixel array design, anecdotal and other less formal tests show its 16MP sensor delivers image quality rivals the M9 and the Sony Alpha A6000. So, if you’ve already bought the Fujifilm X-Pro 1 and you’ve read this so far, you’re probably feeling pretty good right about this camera, and rightly so. The goal of this Guided Tour is to take a deep dive into this camera’s features an operation. Hopefully in this process, you’ll discover new features or more efficient ways to operate this camera.
Basic Info You Should Know
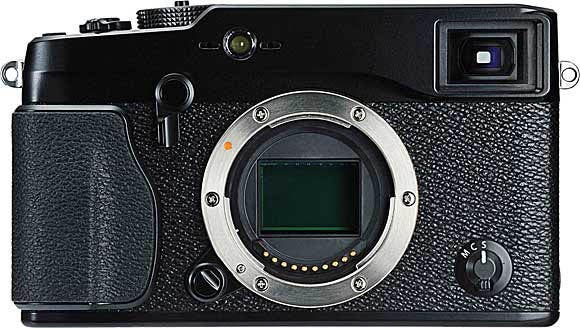
Let’s start with the hybrid Multi-Viewfinder (design shown at right). By default, it’s set as an optical display with heads-up brightline indicator that shows the image’s border. Viewfinder readouts include focusing distance (when shooting in Manual focus mode), as well as exposure indicators.
Push the switch located to the left of the lens mount (as you face the camera) towards the lens to toggle between optical viewfinder and a full-fledged, high-resolution EVF. There are advantages to each viewing mode, which we’ll get into more deeply later. But if you’re used to EVF-only cameras, such as the Fujifilm X-T1, this will give you the same experience.
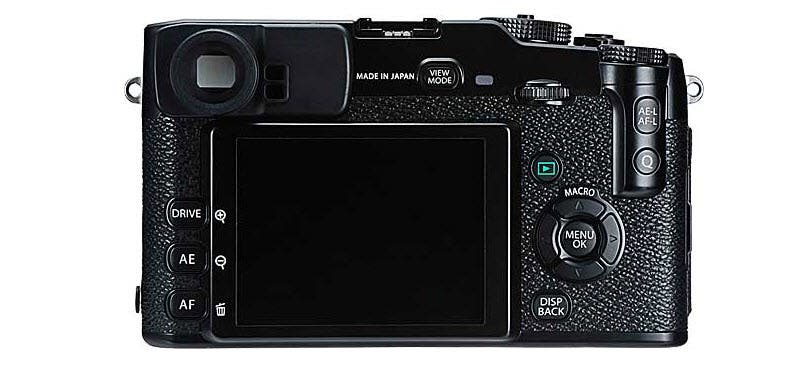
If you know your exposure basics, X-Pro 1 is one of the easiest currently-available cameras that you can adjust manually. Change aperture using the aperture ring on any compatible lens, and the shutter speed via the shutter speed dial. ISO adjustment requires pressing the “Q” button to access the menu, then using the four-way control buttons to navigate and change ISO.
A word about batteries: Get a bunch, and stick with the pricier original Fujifilm NP-W126. The X-Pro 1 uses up batteries fairly quickly and if you expect to be out shooting all day, it’s good to have extras because you’re probably going to go through at least one. After using both Fujifilm and off-brand batteries I can tell you the Fujifilm batteries last at least 2-3 times as long as the others, so their lower cost is a false economy. (Side note: Leicas are also notorious battery eaters, but their batteries cost 2-3 times as much!)
One way that you can stretch battery life is to use the optical finder. Constant use of the EVF (and even more so, the LCD) will use up the battery even faster.
Focusing: Keep in mind that if you are focusing manually, the depth-of-field indicator is conservative and the actual depth of field is a bit deeper that what is indicated. By default, the camera will display focusing scale in meters. To change this to feet, go to the third Set-Up menu and choose Focusing Units. You can then switch units of measurements.
5 Hacks to Make the X-Pro 1 Your Own…Plus 2 Bonus Hacks!
The Q Button: This button, located on the camera back right corner, gives you quick access to the camera’s key features, such as ISO, Dynamic Range, White Balance, Noise Reduction, Image Quality, off-camera flash operation, Film emulation and more.
Manual focus with Focus Peaking: This feature was added in Firmware Update 2.0, and vastly improved the camera’s usability in manual focus. To activate this feature switch the camera to Manual focus mode (switch in front of camera to the right of the lensmount as you are looking at the camera). In the last Shooting Menu at the bottom, select MF Assist then Focus Peak > High or Low. This will display either light or dark outlines of areas of the photo that are in focus. Note: This only works with the viewfinder in its EVF setting. If you don’t see focus peaking as a feature, you need to…
Get the latest firmware: As of this writing (Nov. 21, 2014), that’s Version 3.30, with V3.40 expected next month; the most recent update includes compatibility with all Fujifilm and Zeiss lenses that are currently available for the X-Pro 1. Autofocus accuracy has been fine-tuned, Focus Peaking was added as a feature (I told you so, above), and the accuracy of the bright frame display in the optical viewfinder has been improved. Visit the Fujifilm X-Pro 1 Support Site for firmware updates and installation instructions.
Reassign the Fn button: You have a choice of 9 possible controls you can assign to the Fn button , located on the top right of the camera just to the right of the shutter release. Go to the third window of the Shooting menu, and choose the last item, Function (Fn) Setting. You can assign the Fn button to adjust dynamic range, film simulation, movie mode, AF mode, RAW or JPEG, among others. If you expect you’ll need to change any of these settings often, you can make this your one button to press.
7 Programmable Custom Settings: You can create 7 custom settings that quickly recall preset combinations of preferences at a single click. Go to the third shooting menu and select Edit/Save Custom Setting. Choose a setting (1-7) and choose any combination from 9 options, including shadow tone, highlight tone, noise reduction intensity, ISO, Dynamic range, film simulation, white balance, and color. For instance, you can choose black and white with increased shadow and highlight tone and noise reduction at ISO 400. Hit the Back button and you’re set. To call up a custom setting, go to the third shooting menu screen and choose Select Custom Menu Setting. Even faster: Press the “Q” button and choose the upper right box, then use the thumb dial to switch to the desired custom menu. Other Q menu items will change to your assigned settings.
Bonus Hack #1: Use your Leica M-mount (or other camera mount lenses) on the Fujifilm X-Pro 1. Many companies have released sophisticated adapters that allow you to use lenses designed for other cameras on the X-Pro 1. Fujifilm offers an adapter IFJXP1MA that lets you use almost any current M-mount lens from Leica, Voigtlander and Zeiss. Keep in mind, though, that there’s a roughly 1.5x 35mm equivalent factor, so you’d need a 21mm lens to get roughly a 28mm angle of view.
Bonus Hack #2: Social Media. Well, not really a hack, but there are several supportive social media communities that are run by and for Fuji X-system camera owners. The Fuji X Photography group on Facebook https://www.facebook.com/groups/267232206714895/ is a great place to ask questions and share your photos.
Did You Know…
You can convert RAW files in-camera? Shoot in RAW (or RAW + JPG) mode. In Preview mode, select the image and select the Menu OK button. The first item is RAW Conversion. Select that and you’ll be presented with a menu of changes, including Push/Pull Processing, Film Simulation, WB Shift, Noise Reduction and more—a total of 12 possible changes. Once you’ve made your selections, hit the Q button to process the image.
You can imitate any one of 10 Fuji film emulsions? Remember those classic Fuji slide films, like Provia, Velvia, and Astia? You can emulate the qualities of these films—as well as several black-and-white options (including B&W with a Yellow Filter, for example) and color negative film—by going into the Film Simulation menu, which you can quickly via the Q button.
You can shoot multiple exposures? In the 4th Shooting Menu screen, choose the first item—Multiple Exposure. Compose and shoot your first image. You’ll be prompted to either retry or shoot the next frame. Viola! A double exposure!
You can control what information appears in your display? There are 15 items and they’re all checked so they will all be visible. But you can clean up your display by unchecking as many items as you want. This can give you an uncluttered view whether you’re using the EVF or OVF—and you can individually control what information you want to see in the EVF or the OVF.
You can shoot very discretely? The Fujifilm X-Pro 1 is designed for street and candid photography, so it makes a lot of sense that you can reduce its operational sounds. First, there’s the shutter release. In the first Set-Up screen, turn on Silent Mode. This will dampen the sound of the shutter release oh-so-slightly, but it will also disable all operational beeps and sounds.


