Learn how Trevor Sherwin used Photoflex location lighting gear to catch the action in a hot Canadian forest.
In this lesson, Canadian photographer Trevor Sherwin demonstrates some straightforward techniques in capturing stunning action photography on location. Trevor discusses the merits of the Photoflex TritonFlash Kit, which is available at Adorama for $1,275.95-$1,429.95, depending on configuration, and why it’s important to have a strobe system with a short flash duration, with ample power and with the ability to power additional speed lights.
Lighting Equipment used in this assignment, available from Adorama
- Photoflex TritonFlash Battery Powered Strobe
- Photoflex OctoDome: medium
- Photoflex LiteDome: medium
- Photoflex RockSteady Bag

Here he explains in his own words:
My name is Trevor Sherwin and I photograph people. My main areas of interest are documentary photography and portraiture. I also teach photography workshops. For this shoot, I collaborated with The PhotoNews, which is a photography publication in Canada, and for a Facebook contest they were running. The contest focused on winning a Photoflex TritonFlash kit, so I had to think up a way to make this product cooler than it already is.
The first thing that came to mind was the portability, but I felt there was more to the TritonFlash story. Then a friend of mine, Mike Last, who is an avid mountain biker and photographer himself, suggested that we do a downhill mountain bike shoot. I thought that would be a great idea, as it would allow us to show how you can take an entire studio in one bag. Then I started thinking about the ultra-short flash duration the TritonFlash offers and this really was the prefect tool for this assignment, since I would be photographing a fast-moving subject.

Getting There
The most appealing feature of the TritonFlash for me as a photographer is what it offers me in the form of portability. You can pack a couple TritonFlashes in the same bag as your camera. I could pack everything into one Photoflex TransPac Rolling Case and still had space left over. We shot at the Don Valley Trails in Toronto, Ontario. We had to walk down the trail roughly the length of three football fields while lugging all that gear in 95-degree heat—lots of fun. I guess it could have been worse; with other equipment I would have had to bring 20 pounds of batteries or generators.
Flash Duration & The Challenges
For this shoot, my main objective was to show off the TritonFlash’s incredibly short flash duration. Now that sounds simple to do and it would be if I could shoot in a studio with no ambient light. In this case, though, I was on location and I had to incorporate the ambient light. I love working with the combination of flash and ambient light because if done properly, the results can be very visually arresting. The primary limitation with this shoot was that I could only sync my camera at 1/200th of a second and that is nowhere near fast enough to “freeze” the spinning wheels on the bike or the rider.
The TritonFlash’s flash duration is 1/3200 of a second at full power, which is sufficient to stop the motion, but I had to eliminate enough ambient light so that it didn’t quite literally blur my flash duration results. If I wasn’t careful, the light would have continued to expose even after the quick flash popped from the TritonFlash and would have left a blur in a very similar way as if you take a picture with a shoe mount flash with a 1 second exposure in a place with other ambient light.
Flash Duration Defined: In simplified terms, flash duration is the amount of time the light from the flash exceeds 10% of its maximum output. This is commonly referred to as (T.1). The amount of time above the 10% is then expressed as a time like a shutter speed. The smaller the number, the shorter the duration which leads to better action stopping capabilities.
I shot in an area that had tree canopy cover so that I could reduce the ambient light for this shot. I took a meter reading in the shade of the tree canopy. I finally settled on F11, 1/60th of a second at ISO 200. Now, all I had to do was make sure that my lights were about 1-1.5 stops brighter than the ambient light. For the final shots I still shot at F11 but increased my shutter speed to 1/200th of a second, which effectively set my ambient back 1.5 stops.
The Setup
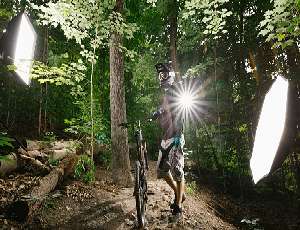
The positioning of the lights was very important. I didn’t want too much frontal light. I wanted the broad side of the rider lit, but only a little light on the front of him. I also needed a rim light for the other side to make sure there was separation from the biker and the background and also to cast a little light on the tree that he was riding past. I decided to include a speedlite in the background clamped to a tree shot right back into the camera lens. This would emulate sunlight shining through the trees and give the shot a little more drama.
The main and rim light were lit with Photoflex TritonFlash heads. The main light had a Photoflex 5’ Medium OctoDome attached and the rim had a Photoflex Medium LiteDome attached. The speedlight had its head zoomed to 105mm and was plugged into the Photoflex TritonFlash Power Pack. Both Photoflex TritonFlashes were firing at about 1/8 power so that also helped with the flash duration, as when you shoot at lower power settings, the flash duration gets shorter.

Helpful Note: I always bring empty RockSteady weight bags with me because soft boxes tend to act like giant sails and blow over—make sure you’re weighed down. I bring them empty, as I don’t like to lug any more weight than I have to. In this case we also needed to stay hydrated, so why not use the drinks as weight? It seems these RockSteady weight bags were designed to hold 4-6 water bottles so it’s also a good practice of mine to bring empty water bottles if I know I have a water source nearby.
At this point I really should point out that I could not do what I did exclusively with speedlites for two reasons. Firstly, speedlite flash durations at full power are not that impressive, so they would not have stopped the action. Secondly you can’t modify a speedlite as well as you can a TritonFlash. The TritonFlash is designed to be modified with soft boxes and it fills those modifiers properly. Speedlites are always a struggle to get them to work with a softbox and you usually need to gang a few together to get anywhere near enough power to do anything impressive. Speedlite/softbox assemblies are also quite limited in size and how much weight they can take. The TritonFlash can take any size modifier because of its swivel. I really wish all photographers that primarily use speedlites had a chance to try out a TritonFlash system. They would find their creative capabilities would increase exponentially.

Shooting The Scene
First off, I need to send out a big thanks to Mike Last, who must have done 25-30 runs down the hill for us to get these shots. Here’s a shot of Mike taking a quick break, while I make sure that all three lights are firing:

Here’s one of my favorites results from the shoot:

A Few Additional Notes
There are a few little-known features of the Photoflex TritonFlash battery that really make it a versatile tool. First off, when you plug in two Photoflex TritonFlash heads, the power output (300w/s) to each head remains the same. With virtually all other battery-operated systems I’ve tried, there is an output compromise whereby the pack itself has a maximum of, say, 400w/s but that 400w/s has to be divided by both heads. Not with the Photoflex TritonFlash. Each head can still be operated at full power and the recycle time remains the same. Pretty good if you want to pack lightly and only take one battery.
The other feature I find very useful is that you can power a speedlite with a high-voltage port from the TritonFlash battery and it reduces the recycle time to about 1.5 seconds at full power. I’ve used this a number of times shooting the odd event where I needed the TTL of a speedlite on camera but couldn’t wait four seconds for my flash to recycle. Be aware, though, that you can eventually burn out your speedlite if you run it too fast for too long, so be careful.
The TritonFlash also comes with 10’ extension cables for each head, so for this shoot I took advantage of that to power my speedlite. The speedlite was linked to the 5’ OctoDomes’s battery by two extension cables. I’ve been told that any more than 3 extension cables and the resistance becomes too high and affects performance. For me, that’s fine. 25 feet is a very acceptable distance to work with (10’ extension + 10’ extension + 5’ power lead).
Final Thoughts on Flash Duration
Have a look at the final image below with the enlarged view of the tire on the bike. This is actually what I was going for in the shoot. Yes, I had to capture a cool shot of Mike blasting down the hill, but more importantly I needed to show the benefits of a short flash duration. If you look at the text on the tires you can still read it clearly. If you think about it, the tire is the fastest moving element in this image and the TritonFlash stopped it, no problem.
_D9A0368-Edit
If you photograph anything that has movement, like sports, dance or even simple things like hair blowing in the wind, flash duration is a very important feature you need to look for. I’ve used lights in the past that obviously had a relatively poor flash duration and my images never seemed as sharp as they could have been when movement was involved. So when you’re buying a lighting kit make sure you look for the T.1 flash duration of the light.
Written and photographed by guest contributor Trevor Sherwin. To see more of Trevor’s work, visit www.phototrevor.ca. The above article

