Blackmagic Design is responsible for some of the most talked-about products in the industry. They have extensive knowledge of both high-end software and hardware. Fairlight is one of the more popular and well-known audio suites located inside Davinci Resolve. When we last spoke, we went over an overview of the Fairlight audio suite. This time, we’ll go over some of the fundamentals, such as how to get started and common features to use. Now, let’s talk about the basics of Fairlight!
Fairlight Popular Functions:
- Bussing
- External Audio Editor Processing
- Timeline based audio editing
- Clip gain adjustment
- Multi-track mixing
- Compressor, reverb, EQ, noise reduction
- Channel strip mixer
- Sound FX library
- Voice over and ADR
- Hundreds of professional tools and more
Starting Up
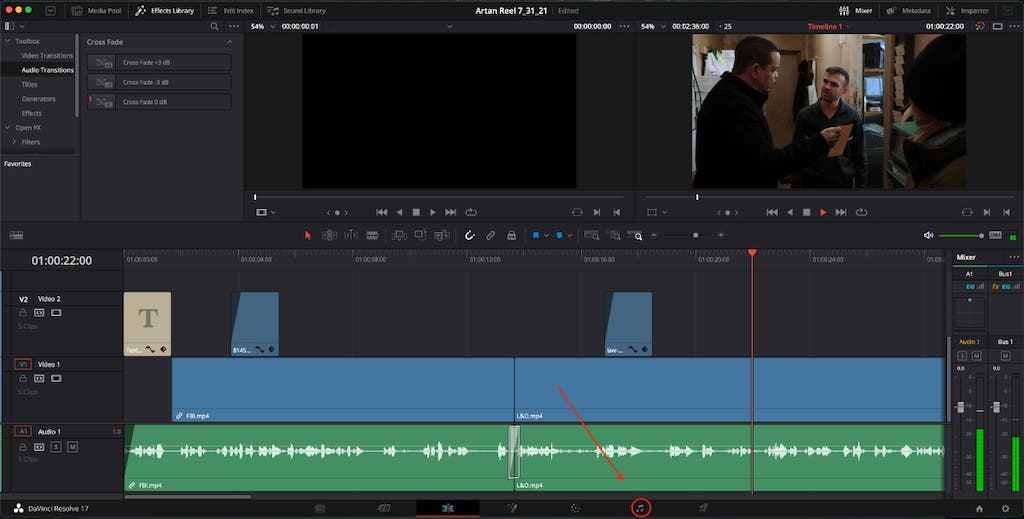
Once you’ve gotten picture lock on your video — whether it’s short or long form — you can begin making some basic audio changes in the Edit panel to balance off the audio. When you’re ready to go deeper into post-production and mastering, simply click the music icon in the bottom panel to launch Fairlight.
Now that you’re in the Fairlight panel, you can access all of the mixing and effects found in a typical DAW. It’s a faster and more efficient way of working with audio because you have access to all of the faders.
Right away, you’ll notice that all of your audio tracks are shown. They take up the most of the screen’s real estate. Your video is still visible in the upper right corner of the window. However, the emphasis here is on audio.
Even if you’re new to Fairlight, or post-production audio in general, the overall layout is quite easy. The portions circled in red are some of the most important sections to understand and where you will be mostly working. While there are numerous features, we will concentrate on the most useful ones.
Mixing and Sizing
The Mixer panel is located in the upper right corner. You can use the Mixer to balance audio levels, apply FX, EQ, Compressors, Limiters, Panning, and much more. There’s also an Order option to choose how you want your processing to be done whether it’s dialogue, ambience, SFX tracks, etc.
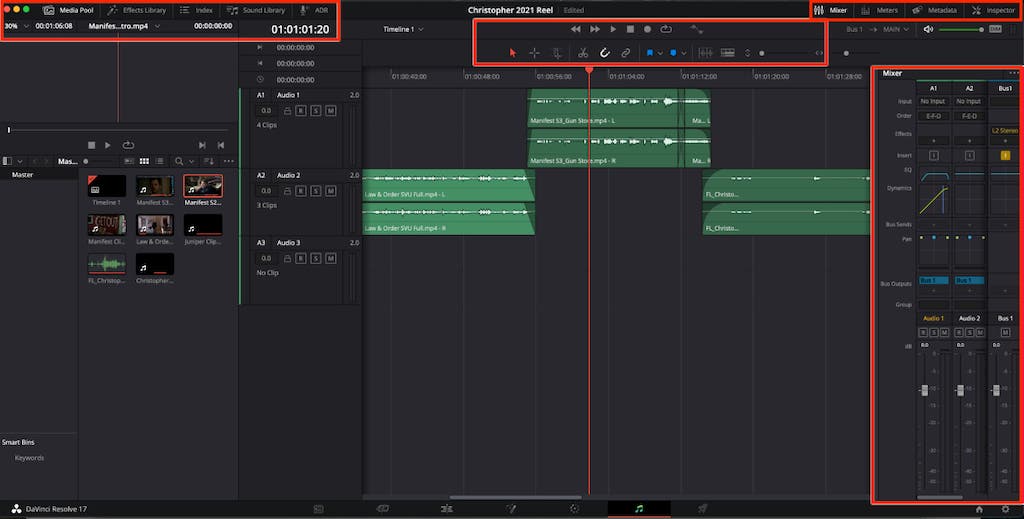
You’ll also discover your Meters here, where you can keep track of your levels and LUFs values for anything on your timeline. The Metadata section displays all of the information associated with each audio file in your project. The inspector panel provides rapid access to several of the most frequently used effects and tools.
There are two slider options directly below the video window. One control adjusts the height of your audio tracks, while the other controls the zoom of your audio tracks. These are both useful solutions to use when you need to focus your attention on the smallest details. You’ll eventually want to learn or assign hotkeys for these so you don’t have to do it with a mouse click. Learning your hotkeys will save you valuable time!
Organizational Tools
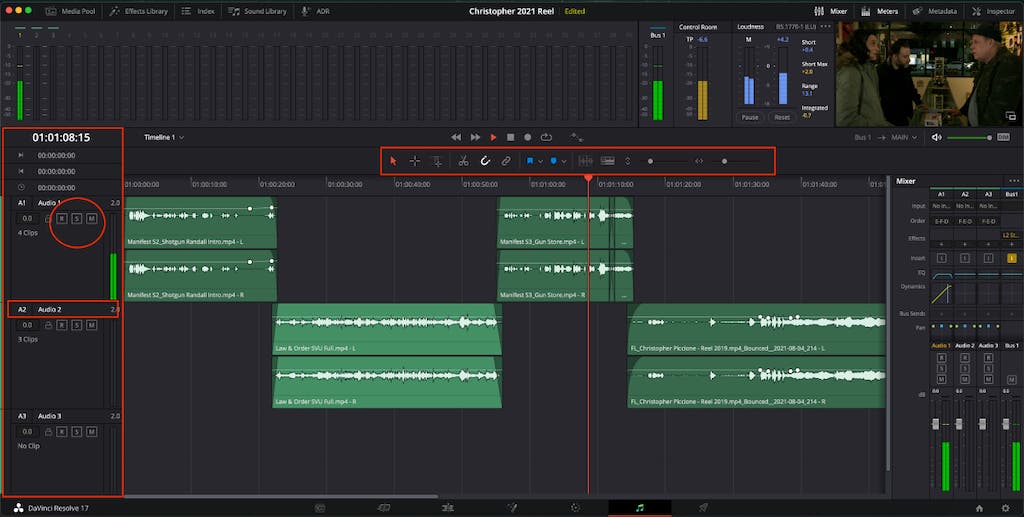
To the left of these controls, you’ll notice several other tools. One is a Timeline view option to decide how you want your timeline laid out. There are other icons such as the Selection tool and the Range Selection tool which allows you to select a certain portion of your clip. You will also have the Razor tool to cut your clip and the Snap tool to match up audio on other tracks. You will also find Markers for tagging and labeling areas that need work. They’ll help keep you more organized and efficient on bigger timelines.
The first thing you should do is label your tracks accordingly. Your tracks will be marked as Audio 1, Audio 2, and so on. By double clicking on the title and right clicking on the track to change the color, you may edit the name and color code of each track. In general, you should group your track types by color for easier browsing and group them by category.
Working with the Audio
Each track has a number of letter icons listed beneath the track title. R is an abbreviation for recording. If you need to record a voice over, click R on a new track and make sure the input is set to whatever mic is connected to your interface or a USB mic connected to your computer. The letter S stands for soloing on that particular track. You won’t hear anything else but what’s on there. M is the most obvious of all — muting that individual track(s.)
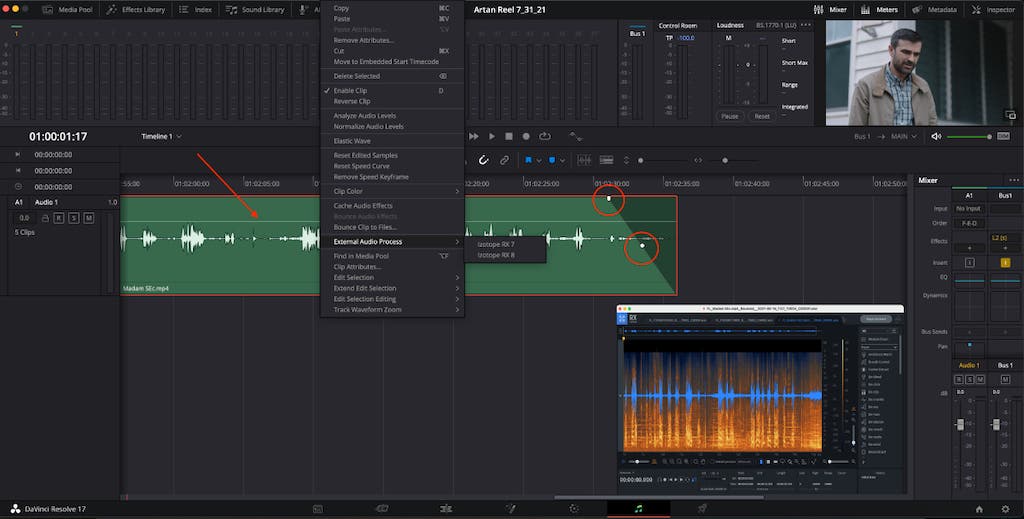
When you’re ready to begin trimming your audio, hover your cursor over the end of a clip and drag it in/out to find where you want it. You can also cut it where the playhead is and delete the piece you don’t need by clicking the Scissor icon in the center of the page. Each audio clip has a small downward pointing symbol on the side. This is where you’ll adjust your fades. By moving the tiny circle in the deeper shade, you may determine how much and how far you want to fade in/out your audio, as well as the angle of the fade. There is also a tiny white line running horizontally across each audio channel. This is used to change the clip gain, but it also allows you to keyframe your audio levels for more detailed fades, levels, and so on.
If you need to get even deeper into audio cleanup or restoration, you can connect an external editor, such as Izotope RX, to Fairlight and use it by right-clicking on a track and selecting it. The same is true for any external VST or AU plugins you may already own. When you connect them, you’ll be able to use them alongside Fairlight’s built-in plugin suite.
How to Do Common Functions
Get ready to dive into audio mastery with Fairlight in Davinci Resolve 18 as we walk you through some common functions, sharing easy-to-follow steps.
Sync Audio with Video Clips
There are two ways to sync audio to video when using Fairlight: Manually or Auto Sync.
Once you’ve organized your footage and sound files in the Media Pool, choose the appropriate corresponding files then right click > Auto Sync Audio > Based on Waveform. To confirm sync, right click on the video file > Clip Attributes and look under the audio tab. You should see the appropriate metadata names instead of “Embedded Audio.”
To Manually Sync, select the video and matching audio file. Place a marker by pressing M, wherever your hand clap or clapboard mark is. Highlight both clips, right click, and then create a new clip. Everything should be properly synced.
If syncing via Timecode, select the corresponding clips when using Auto Sync, and then select, “Use Timecode” instead of “Based on Waveform.”
Layer Audio
Audio Track Layers allow you to have a variety of clips stacked within a single audio track. This is so that you can fade between them, toggle between multiple options for a sound effect, or audition different takes of recorded audio. When dealing with complex sounds or multiple options for a sound, audio track layers are extremely useful.
This feature in Fairlight is hidden, but easy to enable. First, click on the “View” menu at the top of the screen, followed by selecting the “Show Audio Track Layers” option. Next, click on the “Timeline” menu at the top of the panel and enable “Layered Audio Editing”.
Add Sound Effects
Fairlight has their own built-in Sound Library that you can access via the menu at the top left of the panel. If it’s your first time using this section, you will have to download and install the library. This library has plenty of the most commonly used, royalty-free sound effects you can incorporate into your podcasts, YouTube videos, or short films.
Type in the search bar the sound you’re looking for, audition the available clips, mark your in and out points, and then drag and drop the clip directly onto your timeline. You can also use this same process on the Edit page if you’re more comfortable there than in Fairlight.
Of course, if the built-in sound effects library isn’t enough, you can connect an external library like SoundQ, Soundly, and more via the External Audio Process. To do this, choose Preferences > Audio Plugins > Setup External Audio Process. These programs usually have a drag and drop option to drag the sound directly onto the Fairlight track.
Repair or Clean Up Audio
Fairlight has plenty of restoration tools including the most recently introduced — Voice Isolation and Dialogue Leveler. Voice Isolation is similar to other programs that offer dialogue de-noise features. It cleans up background noise in the recording, leaving the voice alone for improved clarity. Dialogue Leveler helps level out peaks while simultaneously lifting quiet parts of the voice.
Dialing in these settings can save valuable time lost by manually using clip gain and keyframes. To utilize these tools, select the dialogue track followed by the plus sign. Then choose Channel > Fairlight FX > the plugin of your choice. Remember to keep your settings light handed to avoid artifacts and voice distortion.
Run ADR
Sometimes, it doesn’t always work when trying to record clean dialogue. That’s why countless productions rely on ADR. Fairlight has a built-in ADR function that’s easy to set up.
First, create a new mono track for the ADR and solo that along with the line(s) of dialogue that need to be re-recorded. Next, click on the ADR tab at the top of the Fairlight page. Dial in the pre and post roll time to around 3 seconds to give you and or the talent enough time to lead in and out of recording. In the following drop down menus, choose the microphone and record tracks as well as the production dialogue guide track.
Now you’ll have to patch everything through. Head to the top menu panel > Fairlight > Patch input/output, choose System Generator from the Source pulldown menu and select Beeps. Next, select Audio Outputs from the Destination pulldown menu and choose the appropriate outputs before clicking “Patch” at the bottom right of the menu.
Finally, under the “List” section of the ADR panel, you’ll need to enter character names, dialogue, and timecode for the appropriate replacement. Once yourself or the talent is ready to record, you can use the rehearse button to cycle through for practice. When ready, press record and Fairlight will run through the entire cue from pre-roll to post-roll.
Final Thoughts
That’s just a quick rundown of some of Fairlight’s features. You have a plethora of tools at your disposal to perform just about anything with your audio. We may return in the future to do a deeper dig into this fantastic tool and its limitless features, as this was only a brief review. If you’re currently using Resolve for video editing and color, or if you’re a standalone creative, just stay in one program and take advantage of everything Fairlight has to offer.
While the program is free to download, the complete Studio version, which includes a few extra features, requires a one-time payment of $299. You can learn more about Fairlight and Fairlight consoles by visiting the official Blackmagic site.
*At the time of this article, the most recent version of Fairlight was 18.1.4 with an available 18.5 Public Beta 2 for download*
