Take your portraits to the next level by harnessing natural light, as described in this simple guide.
Featuring the affordable Extra Small Wireless Kit, this lesson demonstrates some basic strategies for getting your young, restless subject to interact naturally with the camera. We’ll also cover some techniques for getting more natural lighting from your Shoe Mount flash.
The following snapshot was taken with a point-and-shoot digital camera with the built-in flash enabled. Although this picture captures my subject in between dizzying spins on his kitchen floor, it mainly reveals drawbacks that professional photographers tend to avoid.

First, the composition is fairly uninteresting. When taking a portrait, it is important to consider every element of the frame—the background, the foreground, the distance from the subject, the balance and feel of the entire image—not just the person being photographed.
Second, this type of overhead perspective creates unnecessary distance from your subject, as you are literally looking down at them.
And of course, third, the unnatural quality of the built-in flash lighting makes the scene look dimensionally flat and uninteresting.
Let’s do it right: The evolution from snapshot to great shot
Anyone who’s spent even a little bit of time with a three-year-old knows that it’s almost impossible to keep them still in one spot for very long. I find that some of the best opportunities for photographing children are when they’re able to stay in one spot. In this case, my energetic subject was confined to limited quarters of his high chair.
For this photo shoot, I decided to shoot in an east-facing room where the morning sunlight would come streaming in, providing a nice backlight for our subject.

Camera Angle
The first thing I decided to do was alter the camera angle. Here, we used an SLR camera that had a flip-out LCD, which allowed us to shoot from a low angle without having to crouch down low—perfect for child portraiture. Using a camera without this feature would require you to get down low with your subject.
Here, I came in tight on our subject and oriented the camera so that the wall fell directly behind him. Once the overall frame looked good, I took another shot.


Bouncing Sunlight
While the result was somewhat too dark in the facial areas, I liked the rim light effect of the sun with the dark wall behind him. It’s time to add light to his face.

To resolve the dark tone of the face, I decided to bounce some of the sunlight into the shadow areas with the Soft Gold side of a 32-inch Photoflex® MultiDisc®. I attached the MultiDisc to a Photoflex® LiteDisc® Holder and then attached the LiteDisc Holder to a Photoflex® LiteStand and positioned it to the left of our subject.
At this point, my subject was getting a little restless in his chair and, as you can see from the next shot, I captured him in mid-squirm.
One of the downsides to shooting indoors with available light is that you are often limited to a relatively slow shutter speed. Any fast or sudden motion will most likely cause motion blur, as is evident here. Note, however, that our contrast ratios have improved dramatically with the MultiDisc® in place.

Here is a method I often use to relax portrait subjects of every age, not just children. It’s easy for people to get tense or self-aware, particularly when a camera has been trained on them for several minutes, and it can greatly affect their facial expressions and movements.
When you sense that your subject is tensing up or uncomfortable, ask them to simply close their eyes and relax their face. Tell them that you’re going to wait a few moments and then ask them to open their eyes. And that when they do, to just look straight into the camera lens. You’ll likely be amazed with the results. The majority of the time, you’ll capture these fresh, relaxed expressions, as though you’ve just come upon them that very moment.
And with respect to the lighting, notice how well the MultiDisc® fills in the shadows of our subject’s face with soft, warm light. With just a simple reflector, I was able to create a nicely back-lit portrait in just a few minutes.
ShoeMount Flash Lighting
As I illustrated earlier, the main limitation to shooting with natural light indoors is that you are confined to a relatively slow shutter speed.
For the next series of shots, I removed the MultiDisc® setup and attached a Photoflex® StarFire™ to the camera. Once it was powered up, I adjusted the power level to properly expose my subject.

Before taking more shots of, I knew I had to occupy him with an enjoyable distraction if I hoped to keep him in his chair any longer. I set up a laptop and put in one of his favorite DVDs for him to watch. Again, this is another method you can use to distract your young subject from the boring process of setting up lights and configuring your camera.
Once the movie was going and the flash was powered up, I took another shot at the same camera settings, but didn’t really worry about his facial expressions, as I knew that it would take me a little time to develop the lighting setup.


As you can see, the result is typical for this type of lighting arrangement. Because the light from the flash is traveling in approximately the same direction as the lens, it tends to flatten out the elements of the shot and it is difficult to get an accurate sense of shape or dimension. The reflections in the eyes are tiny and unnaturally centered, something you would never find in natural lighting conditions, and the shadow cast from the chin is sharp and equally unnatural-looking. Unfortunately, this type of result is unavoidable with this type of lighting.
Modifying Your Flash For Natural-Looking Results
With the Extra Small Wireless Kit and any ShoeMount Flash, you can modify the light of your flash to create much more natural results. Here, I took the camera, the Extra Small Wireless Kit, and a Photoflex® StarFire,™ mounting it all to a flash bracket.

Fortunately, by the time I configured the camera with the flash and SoftBox, my subject was still content watching his movie, which allowed me to take just a few more shots in this same spot. I moved in close with the SoftBox, waited for a moment in the movie that made him smile, and then took a shot.


After reviewing the image, I was very happy with the overall lighting. There was a nice rim light around his hair, the light illuminating his face was both soft and directional, and the eyes were much brighter than in the previous strobe shots. I also liked that the room was illuminated a little more than with the MultiDisc® fill.
However, now I wanted him to look into the lens and not gazing at the laptop. You really only have a small window before the excitement in the eyes of a child watching a movie turns into a glossy stare.
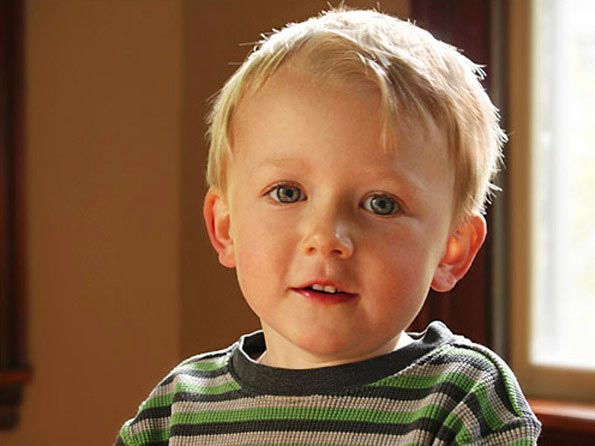
I shut the laptop, talked about some funny parts of the movie, and took a moment to smooth out his rumpled hair a little bit. Then I asked him to close his eyes and think about a scene he had just watched in the movie. I moved in a little tighter, and when he opened his eyes, I took my final shot.

If you’re planning on doing a child portrait in the near future, remember to consider your location and time of day, get comfortable with your camera and lighting gear, keep an ongoing rapport with your subject while you are shooting, and most of all, have fun!
Related Products:
- Photoflex LiteDome Extra Small Wireless StarFire and FlashFire Kit, with XS LiteDome, Connector, Shoe Mount Accessory, FlashFire Wireless Trigger/Receiver
- Photoflex Location Kit, Extra Small LiteDome, Connector, FlashFire Wireless Trigger/Receiver, StarFire ShoeMount Digital Flash, LiteReach Kit
- Photoflex StarFlash 650 Mercury LiteDome Kit with One StarFlash 650ws Monolight, Medium LiteDome, Connector, 8’2″ LiteStand & a Large Case with Wheels
- Photoflex StarFlash 650 OctoDome Kit with One StarFlash 650ws Monolight, 3′ OctoDome3, LiteStand Flasfire Kit & Large Case with Wheels
Learn more at the Adorama Learning Center:
- Flash Sync Speed — AdoramaTV
- Small Studio Flash Tips—AdoramaTV
- Single-light portraits
- 16 flash terms you should know