Learn how to properly use flash when doing flower photography and discover unlimited creative potential. Plus: Learn about botanical gardens and aboretums where you can shoot beautiful flower photos!
Flower photography under natural light can be good, but electronic flash can make it much, much better. Flash units are invaluable aids when you need to add light to your flower photography. But did you know that they are also great tools for creativity? Whether you’re taking close-ups in a conservatory, portraits of flowers in a garden, or shots of wildflowers in the field, your photos will shine by using flash. In this exclusive Adorama Learning Center article, we will look at adding flash to improve your flower photography.
Note: Adorama carries all major brands of electronic flash in our Shoemount Flash and Macro/Ring Flash departments.
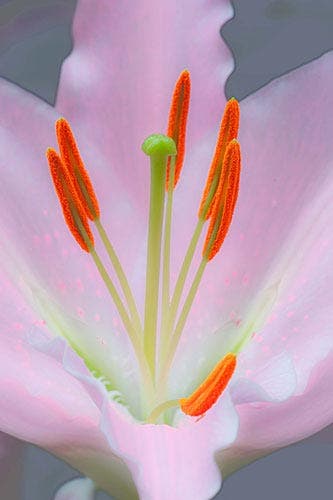
This image was taken at “Lilytopia,” a lily extravaganza in the conservatory at Longwood Gardens each May. I wanted to focus on the amazing anthers and pistil inside this lily. At such close range, I was working with a shallow depth of field and wanted to maximize sharpness to show the pollen grains. Using my flash set at -1 gave me the added illumination I needed to keep the interior structures sharp even though the lily petals remain out of focus. Gear: Nikon D700 with105mm Nikkor macro lens, available at Adorama + Nikon SB 800 Speedlight.
Here are some techniques that will get you thinking about new ways to use your flash. What gear do you need to help you get it done? I’ll tell all in the next article; look for it here next week!
Do it in daylight
Let’s start by realizing that your flash is not something to turn to only when it’s dark. In fact, flower photographers use flash almost exclusively in broad daylight. I don’t do much studio shooting, but I employ my flash unit all the time to supplement, improve, and customize the natural light I’m given.
Flash Your Way to Creative Flower Photos
Now let’s look at some specific ways to get creative with your flash unit:
Get a sharper image. Your floral subject may seem to be well-illuminated, but with flowers moving in the breeze you won’t get the extra sharpness you want—especially when shooting super-close-ups—unless you can use a small aperture and a fast shutter speed. Adding fill or full flash allows you to use a small f/stop—at least f/11—and a shutter speed of 1/250 of a second or faster. That will make your image crisp and clear.
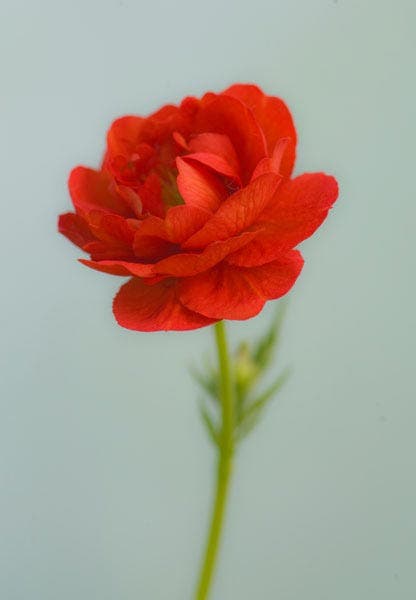
I shot this rose in a greenhouse at the Bernheim Arboretum in Kentucky. It was in a shaded area with a very bright background and fans were causing the rose to move. Using my flash unit set at -1 power I was able to add enough light to stop the movement, brighten the rose, tone down the background and get a sharper image by maximizing the shutter speed and using a small f/stop. Gear: Nikon D700 with 105mm Nikkor macro lens, available at Adorama + Nikon SB 800 Speedlight, which you can find in the Adorama Used dept.
Darken the background. Have you had the experience of finding a lovely floral specimen that’s set against a confusing or unappealing background? Or maybe the background is roughly the same color and tonality as your flower? You can make your flower stand out by obscuring or adding contrast to the background with your flash. This is based on the scientific fact that there is a fall-off in intensity as the burst of light travels over a distance. Therefore, the light that strikes a foreground flower is stronger than when it reaches the background that is a few feet away. This differential registers as a darkened background and – voila! – your floral star is in a dramatic spotlight.
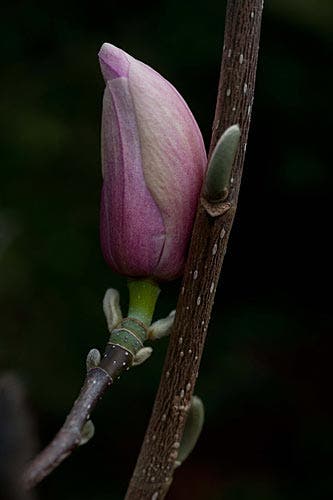
This magnolia bud, shot at the San Francisco Botanical Garden, was in a shaded spot but the background was a tangle of branches. By adding a burst of flash with my unit set at -1 I was able to increase the contrast so the distracting background is obscured and the bud stands out. Gear: Nikon D700 with 105mm Nikkor macro lens, available at Adorama + Nikon SB 800 Speedlight, which you can find in the Adorama Used dept.
Lighten the background. Another way to set your floral subject off is by brightening the background. This can be either dramatic or natural, depending on how bright you make the background. I’ve used this technique often when I’m shooting a bouquet of flowers or individual specimens against a plain wall. In this case, I bounce the flash off the wall, which lightens the background and also gives me the bonus of some backlight on my subject. But even in outdoor settings, you can take your flash unit off your camera and direct the light toward the foliage behind your subject to get a lovely, softened effect.
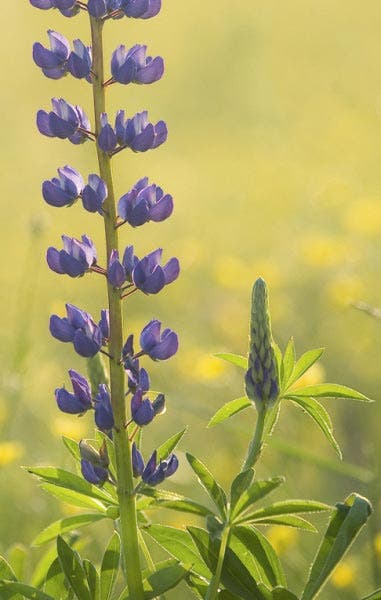
This Maine lupine was shot in the field near Rockport. It was a lovely specimen and was beautifully set against a background that was flooded with the strong light of sunrise. I wanted to keep the background but avoid turning the lupine into a silhouette. My flash unit set at -1 allowed me to add enough illumination to the lupine to counterbalance the strong backlight. Gear: Nikon D700 with 105mm Nikkor macro lens, available at Adorama + Nikon SB 800 Speedlight, which you can find in the Adorama Used dept.
Direct the light. We all love the beautiful effect of low light in the natural world. Some of us are willing to get up before dawn to capture that light on flowers (just ask the students in my workshops!). But you can achieve results similar to those of low backlight and sidelight anytime if you enlist the help of your removable flash unit. Just think about the direction you would like the light to come from and position your flash accordingly. Sidelight will give your subject a wonderful glow, as if the sun were rising or setting on the horizon. For a backlit effect, you’ll definitely need your camera on a tripod and a long power cord (PC) so you can position it behind the flower. This works especially well for close-ups, where the light passing through the petals gives the flower a transluscent look.
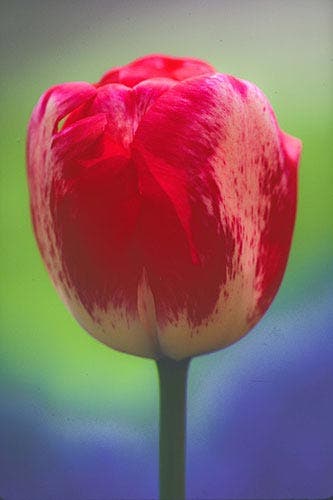
There were loads of fabulous tulips at the Keukenhof Gardens in Holland but this one stood against a bed with interesting colors that I wanted to include in the background. The problem: it was a dull, cloudy day and I needed to brighten the background to make it work visually. So I set my camera on a tripod low to the ground and used a wide open f/stop to keep the depth of field shallow. Then I aimed my flash at the background and set it at -1 to add just enough illumination to bring out the colors but not so much that details would become visible. Nikon D700 with 105mm Nikkor macro lens, available at Adorama + Nikon SB 800 Speedlight, which you can find in the Adorama Used dept.
Balance the light. Once you see how a flash unit can help you fine tune your lighting conditions, there’s no end of interesting and creative possibilities. I often use my flash to balance the light, almost the way a portrait studio photographer uses several light sources to get the effect just right. Even with just one flash unit, you can counterbalance strong natural light that may be too overpowering for your floral subject. For example, if you find very strong light in the background, your flower may look like a silhouette. Add some fill flash and you’ve corrected that imbalance quickly and simply. For close-ups, I sometimes use two flash units to create the light balance I want. I will set one in front to give me plenty of light on my subject, especially when I want to show tiny interior structures. Then I set a second flash behind my subject to simulate backlight. This softens what might otherwise be too strong front light and adds a nice glow to the flower’s interior.
This super close-up was taken at the annual “Orchids Galore!” festival Lewis Ginter Botanical Garden in Richmond, Virginia. To get this shot, I had to use two flashes: one in front to illuminate the interior structures (I used the pop-up flash on my camera set at -2 for this), and one in back (a hand-held flash unit set at -1 to simulate backlight). This balanced the light so I could capture the flower’s interior and still keep the entire flower reasonably bright. Nikon D700with 105mm Nikkor macro lens, available at Adorama + Nikon SB 800 Speedlight, which you can find in the Adorama Used dept.
Play with movement. Finally, a flash unit lets you control the effect of movement in your floral images. Unless you are indoors or in a conservatory, chances are your floral subjects are moving. You can opt to freeze their movement by adding light and working with a faster shutter speed – 1/1000 of a second can stop movement even a strong wind. Or, if you want to capture the graceful tracings of those flowers dancing in the breeze, try something called “rear curtain sync.” The technique involves using a slow shutter speed – generally between 1 second and 1/15 of a second – and setting your camera to synchronize your flash so the burst of light comes at end of your exposure. The effect is to record the flower’s movement during the long exposure but also have a vivid image in the mix.
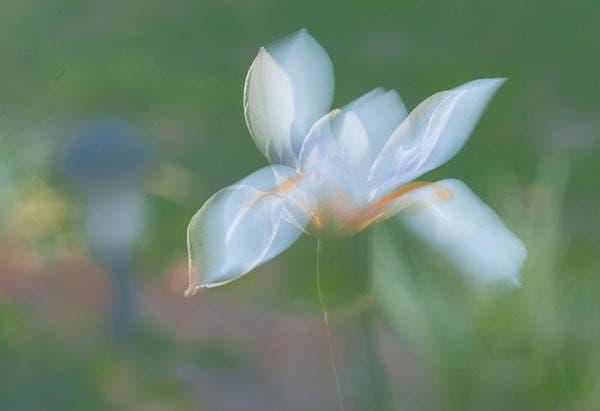
This iris was dancing around in my front yard and I decided to experiment with the technique called “rear curtain sync” to capture its movement. I moved around the iris until I found a dark background for the color contrast I wanted. With the camera on a tripod set at the level of the flower, I positioned my hand-held flash to the left and slightly behind the iris. I took a series of shots at various shutter speeds – from 1/15 to a full second – slow enough to register movement before the flash goes off. The best result was taken at 1/3 of a second. Nikon D700 with 105mm Nikkor macro lens,available at Adorama + Nikon SB 800 Speedlight, which you can find in the Adorama Used dept.
I hope this has given you some new ideas for how to use your flash unit.
