Polaroid photography brings with it a ton of nostalgia, but also an opportunity to try new things. This article is for the beginner to Polaroid or instant photography, and will take you through some of the advantages and possibilities of instant photography.
The History of Polaroid Photography
The invention of Polaroid photography began in 1948 with scientist Edwin Land after his daughter asked why she couldn’t immediately see a photo he took of her. This led him to develop the first Polaroid camera. Polaroid led the way for decades, innovating and making better film and cameras. Although, the 80’s were not kind to the business. Declining sales and a weak interest in their product led Polaroid to announce that they would no longer be producing film. Fast forward to 2008, Impossible Project helped spark renewed love in analogue photography by producing Polaroid-compatible film using their own formulation and Polaroid machinery. Impossible Project eventually purchased Polaroid and took on their name, working to create new formats and cameras under the Polaroid name.
Leading Instant Camera Brands
Since Polaroid is the original in instant photography, they have produced loads of cameras over the decades. You can find many different cameras at garage sales or flea markets. For modern versions of the instant camera, there are a few more players. The main producer of instant cameras and film outside of Polaroid is Fujifilm, who has an entire line of Instax cameras and film. For example, one of the most popular modern cameras is the Fujifilm Instax Mini 11.
Another notable new player in instant photography is MiNT who is also producing attachments and accessories for instant cameras. The company is also making instant cameras designed to let the photographer take more control of their shots — such as the Instantkon RF70.
If you’re looking to upgrade your instant camera, check out these Best Accessories for Your Polaroid Photography.
Understanding Instant Cameras
These cameras work by exposing the light sensitive area of the film to whatever is in front of the lens, then the camera ejects the exposed film. As it is ejected, the film passes through rollers, which are spaced tight enough to release the developing reagent stored underneath the white part of the film. In about 90 seconds or so, you have your image.
Given this process is instant, there are definitely some tradeoffs. The exposure is usually controlled by a light meter that measures the light from the location of the camera. This can be the same as the light hitting your subject. Although, you can also be standing in the shade and your subject can be in bright daylight and your camera will think the scene is much darker than it really is. The way to combat this is to decrease the exposure adjustment dial or change the setting to allow less light to hit the film. This will vary depending on which camera you have. If the opposite is true — meaning, you are in a brightly lit area and your subject is much darker — you would then do the opposite and increase the exposure adjustment.
What You Can Expect
Details of your pictures will not be nearly as sharp as digital cameras or analog roll film. This is a decidedly lo-fi picture system, which is the beauty of it. If you are looking for sharp pictures that are properly exposed with every shot you take, you will be sorely disappointed. However, if you are willing to deal with the inconsistencies of instant film for the magic that happens when it comes out right, this may be something you truly enjoy.
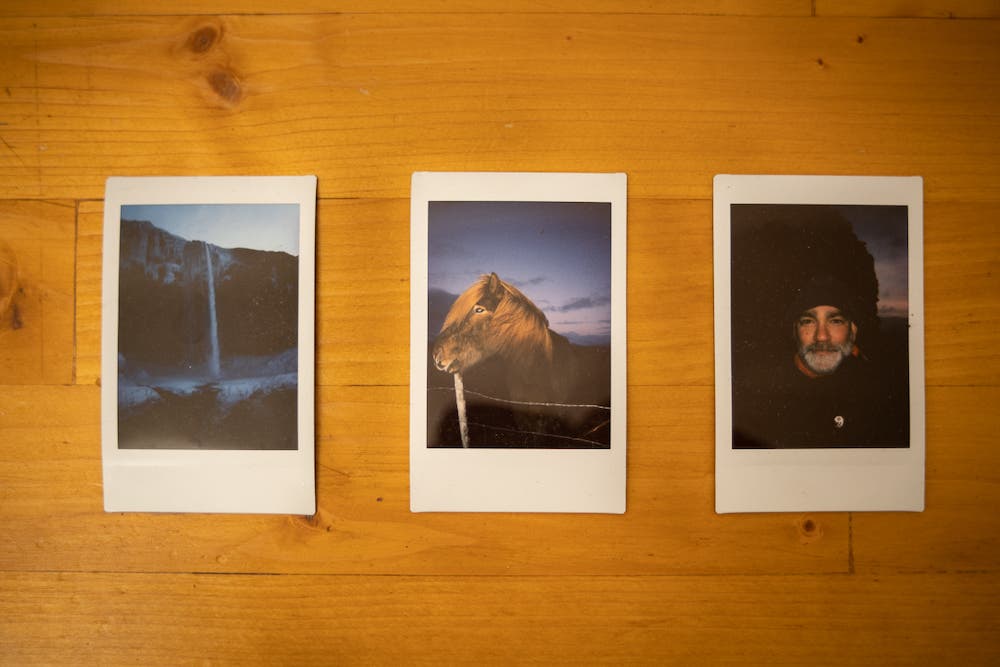
Below are a few examples of some Instax film I shot while in Iceland. When shooting in very cold or very hot conditions, you need to be careful to make sure the film develops correctly. In the pictures below, I made sure to keep the camera hidden from the harsh cold as much as possible. And once the film ejected I quickly buried it deep into my clothing to allow it to develop in a consistent temperature. While FujiFilm’s Instax cameras handle the cold and hot temperatures decently, you should still be careful.
What Affects Exposure?
ISO
Regarding exposure, there are three factors that affect if your picture will come out the way you intend. This is called the exposure triangle as it has three points. ISO is not changeable on insta cameras, the film is rated at a specific ISO when it is manufactured. The ISO for Polaroid film is 100 for the SX-70 film and 640 for all their other formats. The ISO of FujiFilm Instax film is 800. Like standard analog roll film, the ISO is fixed. However, unlike rolls of films, you can’t get a wide variety of different speeds of film.
Shutter Speed
The next aspect of the exposure triangle is shutter speed. With Instax cameras, the shutter speed is fixed at 1/60th of a second. This means to do any exposure changes the camera must change only the aperture. Other cameras will have some ability to adjust how long the light hits the film, but it isn’t a very precise system. You often get the choice of indoors, which lets more light onto the film; cloudy, which closes the shutter faster than indoors; and bright, which is the fastest shutter speed. There are also a few new cameras that give you more fine-tuned control over the shutter speed.
Aperture
The last point of the exposure triangle is aperture. The aperture on most of the instant cameras usually starts with a high number like f/8, meaning that there is a lot of the frame in focus. This also means that the camera requires a lot of light for a proper exposure. It is also very hard to get that shallow depth of field with such a small starting aperture. You usually can’t do much to control the aperture except for making sure you pick the right setting for your camera based on the light sensor.
If you have a camera with exposed rollers, you need to always make sure you keep them clean. If there is any debris, chemicals, or particles on the rollers, it can impact the film’s development.
Looking to incorporate a Polaroid camera in your studio set-up? Check out this video.
How to Take Better Polaroid Photos
I have already mentioned a few ways to get better pictures, such as using the exposure compensation wheel, learning how to read your framing and adjust it, and keeping your rollers clean.
Welcome the Unexpected
The first and most important thing is to practice with purpose. Take pictures, then analyze what you did. Remember that there will be times when the results are out of your hands. Instant film is not an exact science like digital. It will give you results that are unexpected — both positive and negative.
Understand the Flash
If your camera has a flash, the major mistake people make is putting subjects too close to the camera. That is almost certainly going to result in a person who looks like they were standing next to the sun. Another common flash mistake is not putting several people in the same plane of the flash. If you have someone near the camera and another person in the background, that person is likely going to be way darker than those in the foreground. The flash operate best within a few feet of the camera and then its power significantly drops off.
Mess with Chemistry
I am talking about the chemical process of the developing photo. I have tested some ideas while photos were developing. Here’s what I learned:
Older Polaroid film was more easily manipulated. The protective layer used older materials that allowed for more pushing and marking of the film. Although, this does not mean that you can’t still do some cool things to the film as it begins to develop. I tried two different things, applying heat and drawing on the developing film. See the results below.
Please note: Be very careful with some modification of the film as the chemicals in the film can be toxic. Wear gloves if there is risk of getting any chemicals on your hands and be very cautious when handling the film.
Try Some Heat
For the images below — both of which were shot on SX-70 film — I wanted to play with heat and how it would alter the image as the developing agent worked. I waited a minute after both pictures ejected before applying heat. For the first one, I used a pair of kitchen tongs and held the picture over my stove. I did it slowly at first, and then a bit more intensely towards the end. You can see that the heat was a bit too much as it actually warped the frame as well as the picture. You can’t really see it, but this actually led to a s cool 3D-type lifted effect.
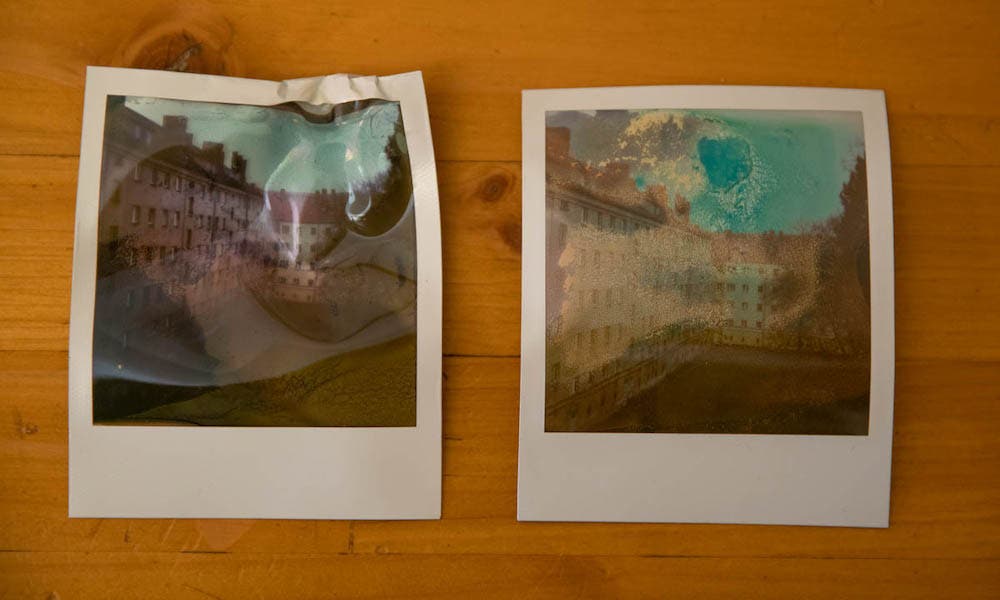
In the second picture, I used a lighter and applied it mostly to the sky, both from underneath as well as directly to the image. I think this version came out much better. The sky was quite grey in reality and I think the heat made the reagent turn blue in the first image and turquoise in the second.
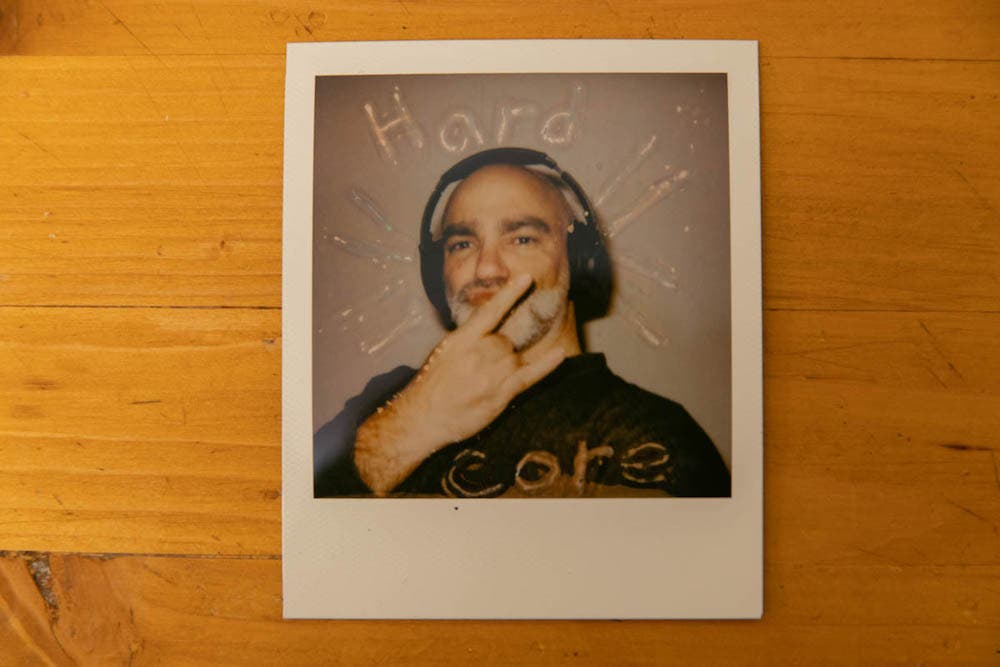
For this image, I used the Polaroid 600 film and decided to use a chopstick to write and draw on the image as it was developing. You can see that I was able to write “hard core.” I also drew some lines coming out of the headphones and made a series of dots to outline my hand. The outline of the hand didn’t really work that well, but the writing was quite clear. I also waited about one minute before attacking the film in order to give it some time to start working.
For more instant film techniques, check out this video:
There is a lot of interesting things that can be done to Polaroids both while they are developing as well as after. Mess around and have fun with it. Polaroid photography is a happy middle ground where you try to get a good image but since so much is out of your hands, you are also hoping for a bit of magic!
Looking to buy an instant camera? Check out our Best Instant Cameras to Have list.


