If you want to unlock your full creative potential, you must understand your camera’s basic settings as a photographer. Automatic modes can prove convenient and easy to use. But also, the best photographers understand that manual mode offers the best capability to have creative effects in your photos and shape each image to tell a story with every image. One of the best ways to learn your camera’s settings is to use photography cheat sheets in the field. Each one outlines the different settings and how they work. In this guide, we’ve compiled a few of our favorite camera settings cheat sheets to aid you next time you go out in the field.
Shutter Speed
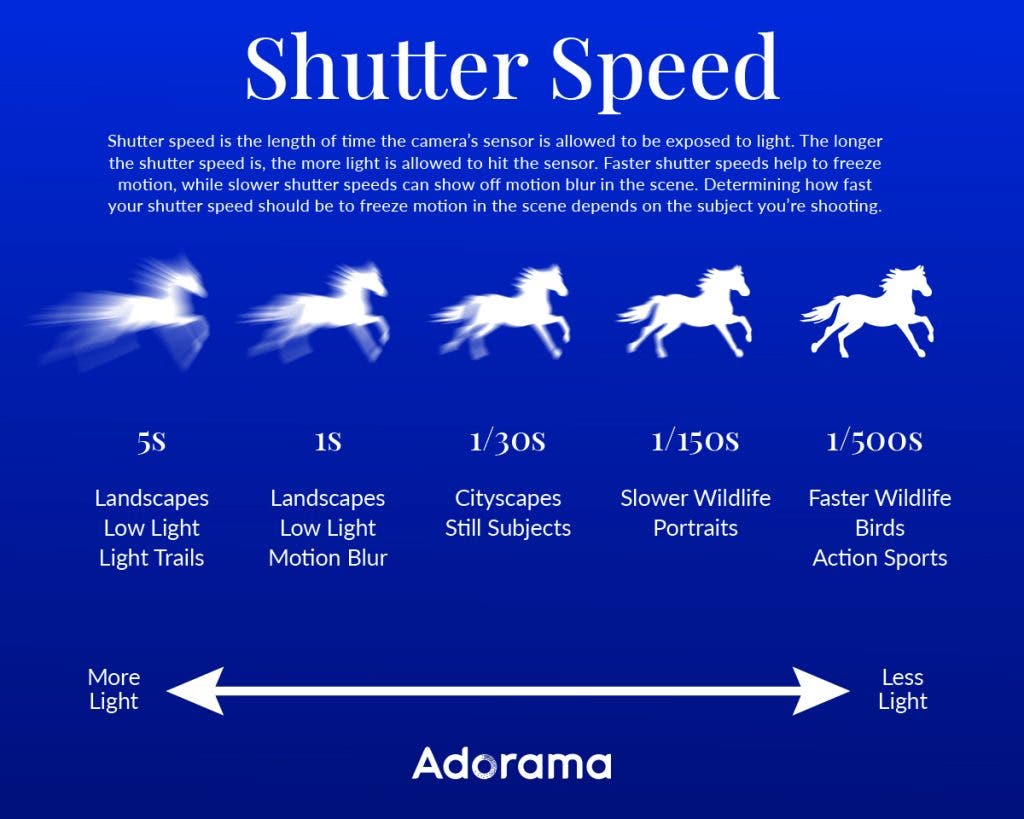
Shutter speed is measured in seconds, or a fraction of a second. It refers to the amount of time the camera’s shutter is open and the sensor is exposed to light. The longer the shutter speed, the more light can hit the sensor, resulting in a brighter image. Faster shutter speeds can freeze motion, while slower shutter speeds can show off motion blur in your image.
No one shutter speed will help you perfectly freeze motion every time, depending on how quickly your subject moves. For slower-moving action, such as posed portraits, a shutter speed of 1/50 of a second may be sufficient for sharp images. On the other hand, a cheetah running through the desert would require a much faster shutter speed, such as 1/4000 second. Look below for our shutter speed photography cheat sheet.
Aperture
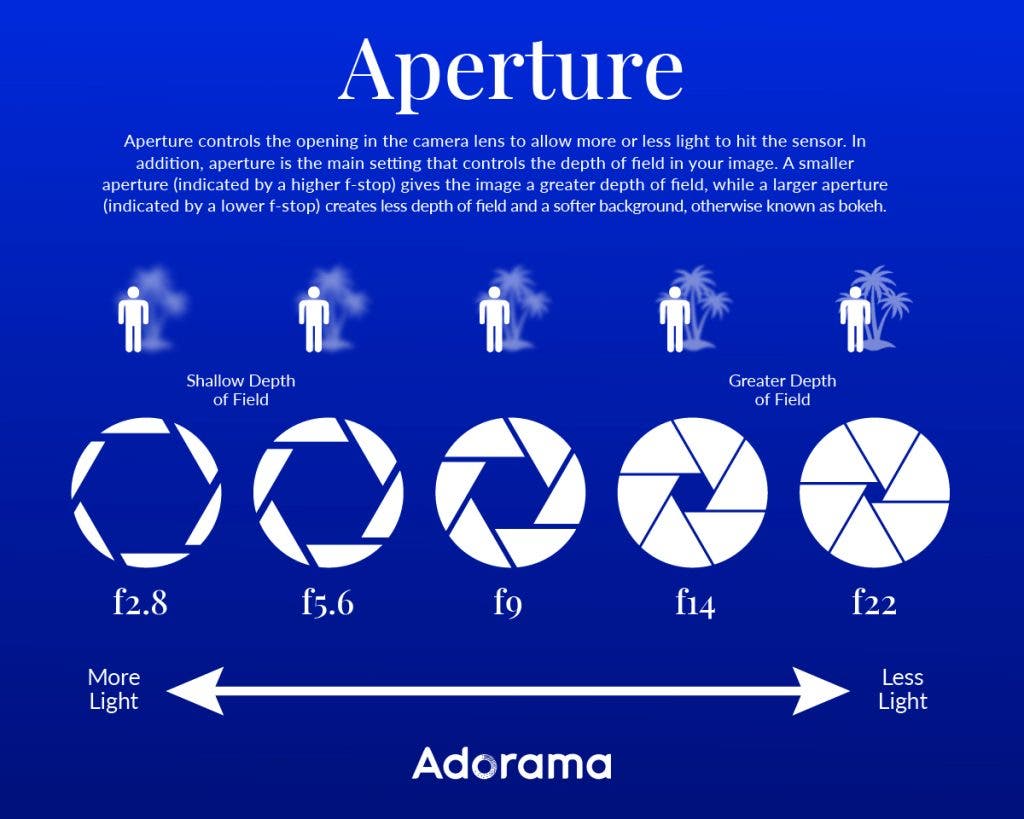
Aperture controls the blades inside your lens, allowing more or less light to hit the sensor. A “wide open” aperture refers to a low number, such as f2.8 or f1.4. That causes the blades to open up to their maximum, allowing the most light to hit the sensor. As you open the aperture, you lower the depth of field in your image, and the background begins to lose focus, otherwise known as bokeh.
While portrait and event photographers typically open their aperture as much as possible to blur out the background, landscape and travel photographers usually do the opposite to maintain as much of the scene in focus as possible. Below is a photography cheat sheet for aperture.
ISO
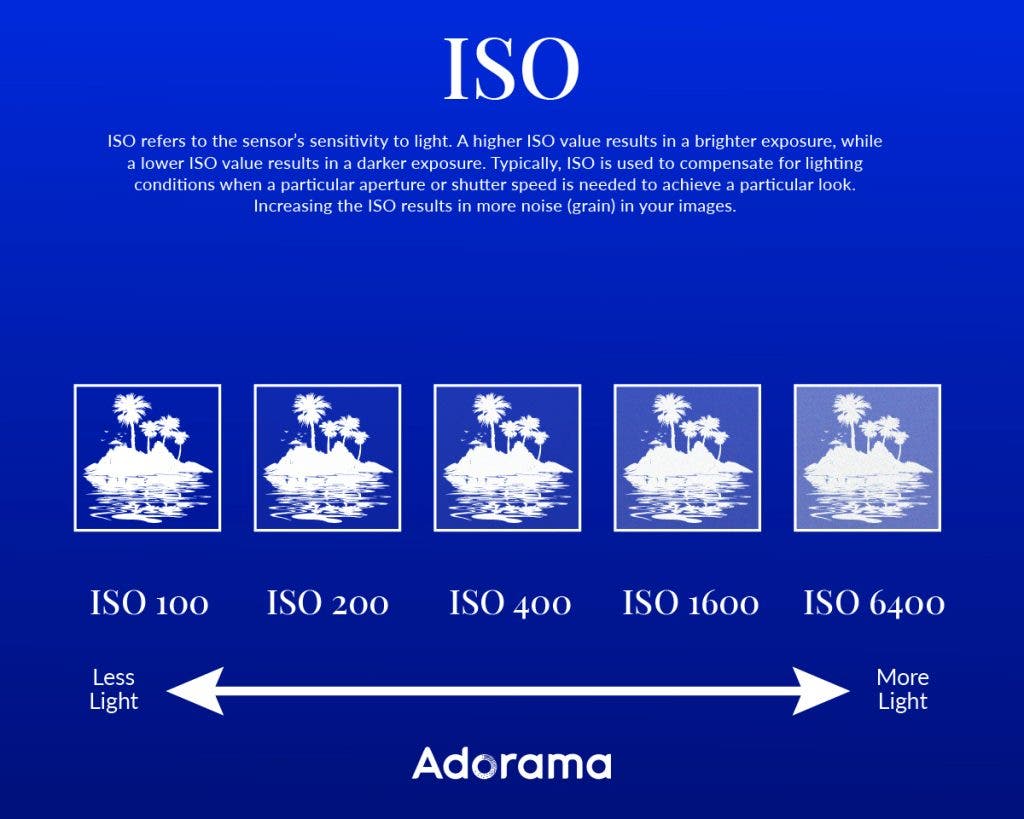
ISO refers to the camera’s sensitivity to light. The greater the ISO, the more sensitive the sensor is to light, resulting in a brighter image. Most cameras start at a base ISO of 64, 100, or 125 and go up to 256,000 (give or take based on the camera model). As you raise the ISO, you’ll begin to introduce noise or grain into your images. Generally, higher-end full-frame cameras can handle higher ISOs with less grain better than lower-end and crop sensor cameras.
The ISO is typically used to compensate for low-light conditions when a specific aperture or shutter speed is desired for a creative effect. To achieve the highest-quality image, leaving the ISO as low as possible is usually recommended. Here is the photography cheat sheet for ISO.
Exposure Triangle
Shutter speed, aperture, and ISO make up the exposure triangle, which refers to the relationship between these three settings to make up an exposure. All three settings must be adjusted to maintain equal exposure to achieve a balanced image. As you change one setting, you must compensate by adjusting another to keep the exposure consistent.
The best way to balance exposure is first to determine the importance of the settings in your scene. If you’re shooting portraits, shooting with a wide open aperture to achieve the best background blur may be the most crucial setting, followed by a fast enough shutter speed to freeze motion in your scene. Lastly, you can adjust the ISO to expose your scene correctly. For landscape or travel photography, you may want front-to-back focus in one shot, so you’d close down your aperture, meaning you’d have to compensate by extending the shutter speed or increasing the ISO. There are unlimited scenarios where one setting may be more important than the others, so always consider how you can use shutter speed, aperture, and ISO to properly expose the scene while maintaining the creative look you’re after.
Metering
You can use the camera’s meter to determine the proper exposure for your image. Metering is the camera’s way of reading the light values of each pixel in the image. The meter is displayed on the camera and is usually represented by a numerical value between -3.0 and +3.0. A value of 0.0 indicates proper exposure. However, the camera has different metering modes that can significantly affect the meter’s readout, which we’ll outline here.
Matrix/Evaluative Metering
Matrix or evaluative metering determines the meter by considering the average lightness value of the whole image. This is an excellent choice for scenes with balanced lighting and without too much dynamic range between the highlights and shadows. Most cameras will be in this metering mode by default out of the box.
Center-Weighted Metering
In center-weighted metering, the camera considers the lightness values in the center of the image more. This is similar to matrix metering, which still uses an average area. However, rather than looking at the whole image equally, center-weighted metering biases the meter toward the center of the picture. This is an excellent choice for portraits or events where your subject will typically be in or near the center of your frame.
Highlight Metering
Highlight metering considers the brightest parts of the image and sets the meter based on them. This type of metering is ideal for landscape photography, where you want to avoid overexposing the highlights.
Spot Metering
Spot metering reads the lightness value from one spot in your image. On most cameras, this mode will read from your focus point. Since it’s only reading from a very small area in your image, this metering mode can take some getting used to. That being said, spot metering is very powerful when used correctly.
Focus Modes
Choosing the best focus mode is crucial to ensure tack-sharp images. Different scenes require different focus modes to keep your camera in sharp focus. Let’s look at some of the most popular focus modes.
Manual Focus
Manual focus requires the photographer to fine-tune the focus by hand completely. While you can ensure perfect results this way, it takes much longer to manually focus a scene than the mere fraction of a second you can use autofocus in. However, manual focus is the go-to mode in low-light situations when your camera can’t quite pick up focus on its own.
Autofocus Single-Shot (AF-S)
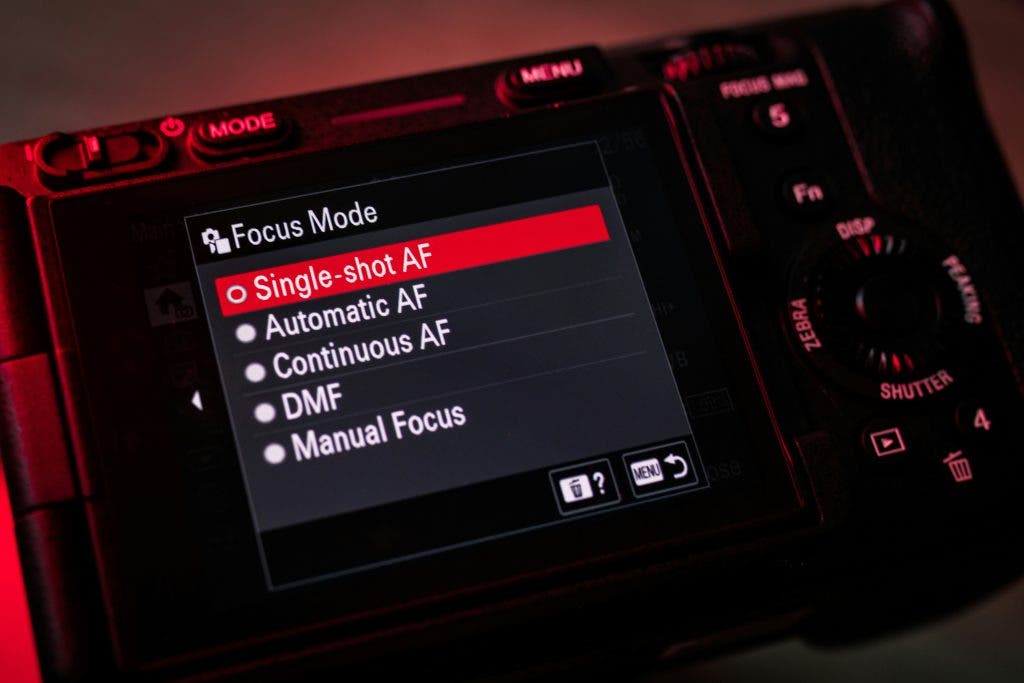
Single-shot autofocus focuses the camera only once when you depress the shutter button halfway. For shots with still subjects and landscape photography, AF-S is the ideal choice as it saves battery, and the camera won’t continuously hunt for focus.
Autofocus Continuous (AF-C)
Continuous autofocus is the mode of choice for sports, wildlife, action, and even portrait photographers. AF-C continually hunts for focus when the shutter button is pressed, making it ideal for moving subjects.
Autofocus Automatic (AF-A)
Automatic autofocus is a focus mode that allows the camera to determine when to use single-shot or continuous autofocus. It can automatically switch between the two modes based on the subject and can be helpful for photographers who constantly switch between moving and non-moving subjects.
White Balance
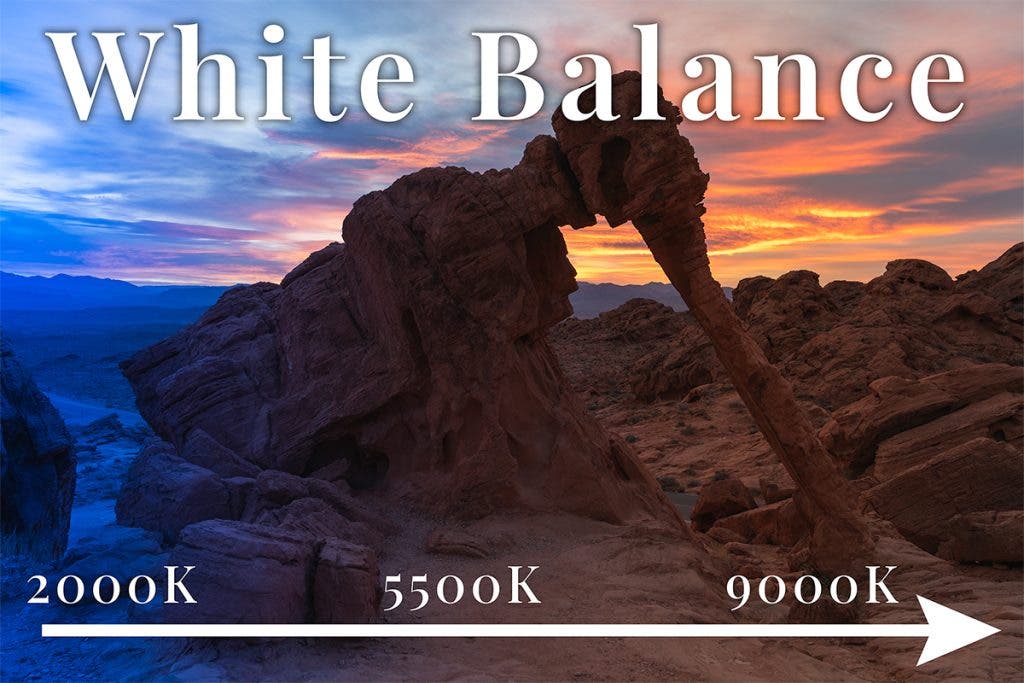
White balance affects the color temperature of the image and can vary significantly based on the scene you’re shooting and the time of day. Setting the correct white balance can help the image look more realistic, or you can use white balance creatively to tone your image warmer or cooler.
White balance is measured in degrees Kelvin (K) and is indicated by a number followed by “K.” 3000K would indicate a much cooler value, while 9000K would be used for a warmer image. If you’re shooting in RAW, the white balance can be adjusted in post-processing with no penalty, so many photographers choose to use auto-white balance in the field. If you’re not shooting in RAW, changing the white balance in the field is recommended by using the camera’s preset options, such as cloudy, sunny, daylight, tungsten, and more.
Save these photography infographics
Don’t forget to save these photography cheat sheets for the next time you’re in the field. Knowing how to make adjustments will not only help you properly expose your image, but it’ll help you do so in a way that allows your image to tell a story. Shooting in manual mode for the first time might seem like a lot, but with a bit of practice and a few camera settings cheat sheets, you’ll be on your way in no time!