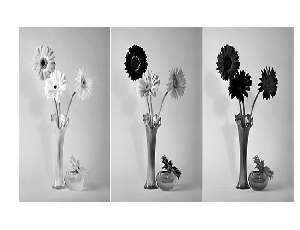
In the last few years there has been renewed interest in black and white images, partly because good desktop printers can now render beautiful neutral tones and can equal the tonal qualities and longevity of silver gelatin prints.
Many people who have become serious about photography with the advent of quality digital cameras lack the background of having worked in the black and white darkroom. But with some reading and experimenting they can learn the lessons of the masters, and apply them with new tools that are powerful and sophisticated.
In rendering a color scene in black and white, the underlying colors determine the grayscale tonalities of the final image. Black and white film has a built-in response to different colors, rendering green and red, for example, in different shades of gray. You can modify this response by using colored filters over the lens to lighten or darken certain colors. A colored filter darkens its opposite color and lightens similar colors; for example, an orange or red filter darkens blues in a sky.
Digital capture gives you much more flexibility than shooting black and white film with colored filters. You can dramatically modify the tonalities of the final image in the digital darkroom, in RAW conversion, or in Photoshop. With these tools you can completely change tonal relationships, lightening or darkening the gray values of different colors. The more saturated the colors, the more dramatic the changes you can achieve. There is no right or wrong way to set tonalities; you can choose the interpretation that is most pleasing to you, and interpret a scene several ways.
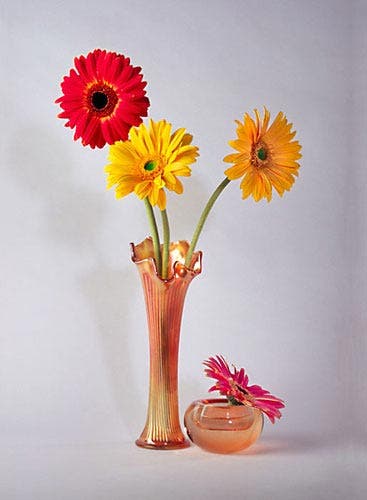
Regardless of the software you use, transforming a color image to black and white is accomplished by using the information in the red, green and blue channels that the sensor captures. Here is an image I shot of some colorful Gerbera daisies, but I think it is one of those images where a black and white image is going to be stronger than the color version.
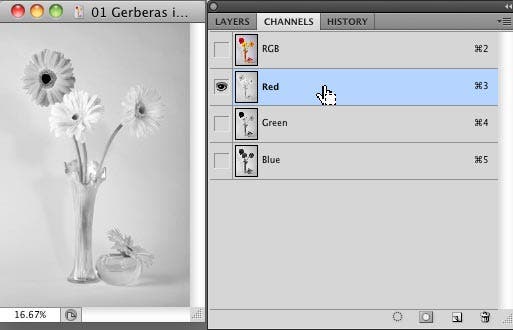
Here are the red, green, and blue channels. You can see the image will look quite different depending on how these channels are balanced.
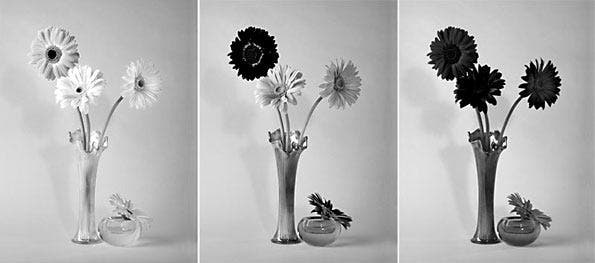
The three images above are what you see in the Channels palette when you click on each channel (R, G, and B) to make it the only one visible.
In camera black and white
With some cameras you can shoot black and white (or monochrome) in-camera. But the camera is making decisions for you based on a particular balance of the channels. As you can see from the image above, very different interpretations are possible when the balance is changed. An image might look blah in the camera’s black and white version when you could make it dramatic in the digital darkroom. It is also important to note that when the camera is set to black and white mode, it produces a JPEG image. Why not shoot in RAW (which is always color), and convert to black and white using whichever preset you like? You can batch convert an entire shoot if desired and still have the color version if you want to customize or refine some of the images.
There are many ways to do black and white conversion from a color image. Here are some of the methods, starting with the least desirable and moving to the more sophisticated and powerful. In all of these methods except Convert to Grayscale, the image remains in RGB color mode, even though all color appearance is removed.
A note about semantics: In the text I use the term black and white. Photoshop’s adjustment is called Black & White and Lightroom uses the term Black & White in the Basic panel and B&W for the name of the black and white settings panel. When I refer to those adjustments I use the appropriate term.
Desaturating
This is the simplest method, but the results are rarely good. Simple desaturation is done from the menu commands, Image > Adjustments > Desaturate or Layer > New Adjustment Layer > Hue and Saturation (or the shortcut in Layers palette). The highest and lowest of the three RGB values are averaged. This may result in a flat look and render some colors unpleasing.
Converting to grayscale
Using the menu command Image > Mode > Grayscale is somewhat better than desaturation as it uses more of the green channel (30% red, 59% green, 11% blue), which is close to the way our eyes and black and white film respond to colors. But you still have no control over the tonal balance of the different colors.
Using one channel
In the Channels palette you can click on one of the R, G, or B channels to make it the only one visible, then do Image > Mode > Grayscale. (That’s what I did to get the three grayscale channels shown in the second figure.) Or you can convert to Lab mode (Image > Mode > Lab color), select the Lightness channel and then do Image > Mode > Grayscale. But again you have thrown away the color information with no control, and it is rare that one channel will be ideal.
The Channel Mixer adjustment
A much better method is the Channel Mixer adjustment. It has been in Photoshop for a long time, and gives you control over blending the three color channels. Make a Channel Mixer adjustment layer and check Monochrome. The default slider positions for the three color channels will be 40, 40, 20. You can modify them as desired, even making some sliders negative, but the sum of all channels should be about 100 percent to keep the darkest and lightest tones under control. Getting the right balance can be tedious.
The Black & White adjustment
The Black & White adjustment was introduced with Photoshop CS3 and it is much easier to use than the Channel Mixer. You don’t have to worry about keeping the sum of the sliders at 100 percent and you have in-between colors to play with. It opens with a Default preset, which is said to be the same as a simple desaturation. You can see the slider positions don’t give an acceptable result with this image.
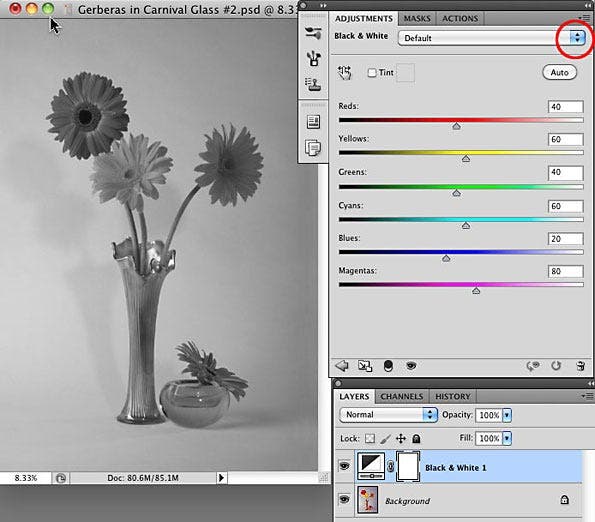
You can try the various presets in the dropdown list (circled in red) and modify the slider positions as desired to lighten or darken various color ranges. Moving a slider to the right lightens that color range, and to the left darkens it. If you go too far with a slider you may cause clipping (light tones blown out to white or dark ones blocked up to black). You may also get an odd appearance along the edges of some tonal transitions. You will find different images will profit from different slider positions, depending on the colors and your desired interpretation.
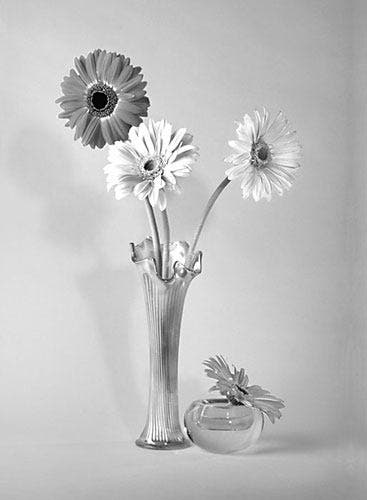
Here is a much better interpretation, achieved by experimenting with the sliders. (Disclaimer: I need to get rid of the shadow on the left.)
Comparing two different black and white adjustments
Here’s a handy trick I discovered one day, quite by accident. If you have two different black and white adjustment layers (any combination of Hue/Saturation, Channel Mixer or Black & White) and want a quick way to jump from one to the other for comparison, turn on the visibility icon of both layers. With both visible you are seeing only the effect of the bottom adjustment layer. The top one has no effect because it is “seeing” a black and white image below and there is no color information in it to alter. (Each layer affects the image as though all layers below were flattened.) When you turn the bottom adjustment layer off you are seeing the effect of the top one. So you can toggle the bottom layer on and off to evaluate the difference. When the bottom one is off you see the effect of the top one. When the bottom one is on you see its effect.
Refinements
You can make several different black and white adjustment layers and mask each one. Or you can make a grayscale version of each channel (as in the second figure) and bring them into one document as separate layers. You can then mask the top two to reveal the best areas of each layer.
Subdued color effects
You can let some of the original color back into the image by reducing the opacity of the black and white adjustment layer and /or masking it selectively.
Toning an image
In the wet darkroom, sepia or selenium toning (or others) were often used. These techniques set an overall mood with subtle color and helped achieve richer blacks and smoother gradation of tones in the highlights. In commercial offset printing, duotone, tritone or quadtone effects are used to create subtle colors in a monotone image by specifying a tonal distribution of one to three added ink colors. The technique is in Photoshop, but for digital darkroom users, toning (or tinting) can be achieved more easily by other methods.
The easiest way to tone an image in Photoshop is built into the Black & White adjustment. Check the Tint box, above the sliders, and you can change the Hue and Saturation as desired. The default is standard sepia.
If you don’t have Photoshop CS3 or later, which has the Black & White adjustment, you can tint an image by making a Color Balance layer above your black and white adjustment layer. Leave Midtones selected and adjust the R, G and B sliders as desired.
Split-Toning
Split-toning an image sets the darkest and lightest tones to different tints. A popular interpretation for a black and white image is to create cool shadows and warm highlights, with color shifts that are often extremely subtle. (Split-toning can also be done on a color image to simulate the peculiar color effects achieved by cross processing. In that case the effects are usually applied more strongly.)
The most basic method is to make a Color Balance adjustment layer above your black and white adjustment layer, and adjust the shadows and highlights toward different colors. Other techniques can be found on the web. More sophisticated techniques are found in Lightroom and Adobe Camera Raw, covered below.
Black and white in Lightroom and Adobe Camera Raw
My favorite black and white conversion tools are in Lightroom and Adobe Camera Raw. In Lightroom you can make a Virtual Copy of a RAW file and have several interpretations of the same starting image.
An easy way to see the possibilities of a black and white or tinted image in Lightroom is to use Presets. Many are included with Lightroom and you can download many more from various online sources. A preset merely sets positions of the various Develop module sliders, which you can further tweak sliders to taste. If you apply several presets their effect may be additive, depending on which sliders are specified. Not all need be, but they could be.
The most direct route to black and white conversion in Lightroom is in the B&W panel. Moving a color slider to the right will lighten the tones represented by that color, and to the left darkens them. You may wish to further tweak the Basic panel settings after making a B&W adjustment.
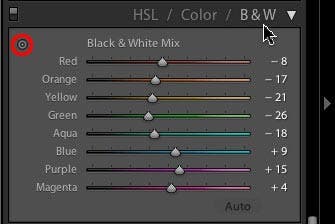
If you click the Target Adjustment tool in the B&W panel (circled in red) and move the cursor into the image, you can click on an area and drag up to lighten the underlying color tones and down to darken them. You can see the sliders move as you drag.
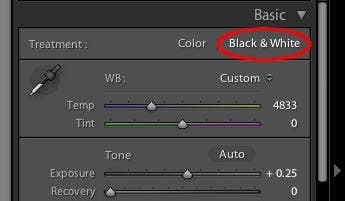
There is a Black & White “shortcut” in the upper right of the Basic panel. This option is placed here because an alternative method to adjusting the B&W panel sliders is to tweak the adjacent Temp and Tint sliders to get different looks. After making changes here, the Auto button at the bottom right in the B&W panel becomes active and you can click it to update the B&W slider positions with the results of the Temp and Tint moves.
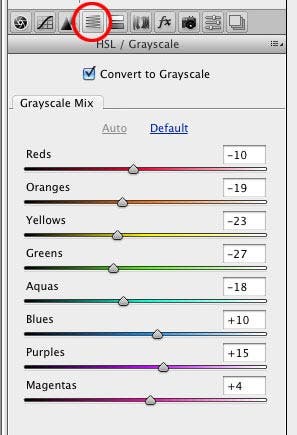
If you’re using Adobe Camera Raw, the equivalent controls in are found in the fourth tab over from the General tab, the HSL / Grayscale tab. Click the checkbox for Convert to Grayscale. You will have the same slider choices as in Lightroom, but without the Targeted Adjustment tool. The Default choice will set all sliders to zero, and Auto will set positions based on the Temperature and Tint sliders.
Split toning in Lightroom and Adobe Camera Raw
In Lightroom there is a Split Toning panel below the HSL/Color/B&W panel. Make a black and white adjustment and then go to the Split Toning panel. Set the two Hue sliders and bring up the Saturation for each as desired. The Balance slider will allow either the shadow or highlight color to be dominant over a wider tonal range.
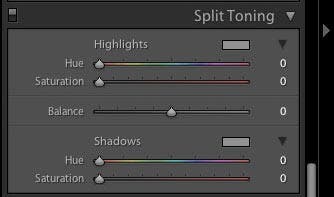
In Adobe Camera Raw you have the same options by going to the fifth tab over from General, Split Toning.

Printing black and white
If your printer has a black and white mode, it is the way to go for black and white or toned prints. On Epson printers it is called Advanced Black and White. It prints truly neutral gray tones and allows you to tone monochome prints easily. First do whatever adjustments you wish as discussed above to make the black and white image you want, and leave the image in RGB mode. In the Print Settings dialog choose Advanced B&W Photo.
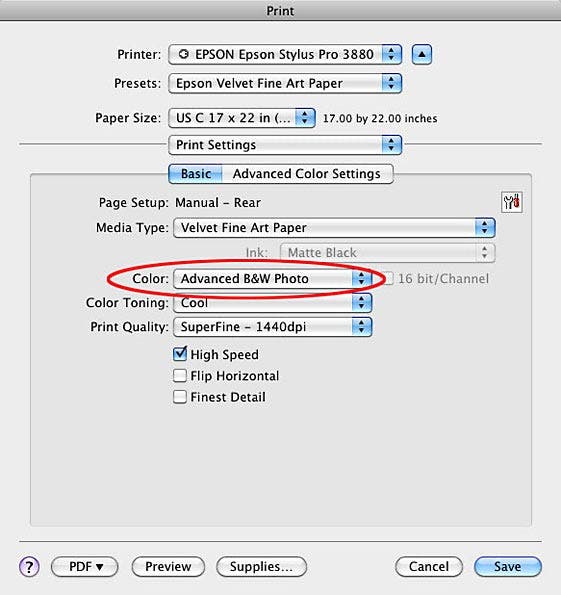
You have four basic choices in the Color Toning dropdown: neutral, cool, warm or sepia. But if you click Advanced Color Settings you get a dialog that lets you fine-tune the color.
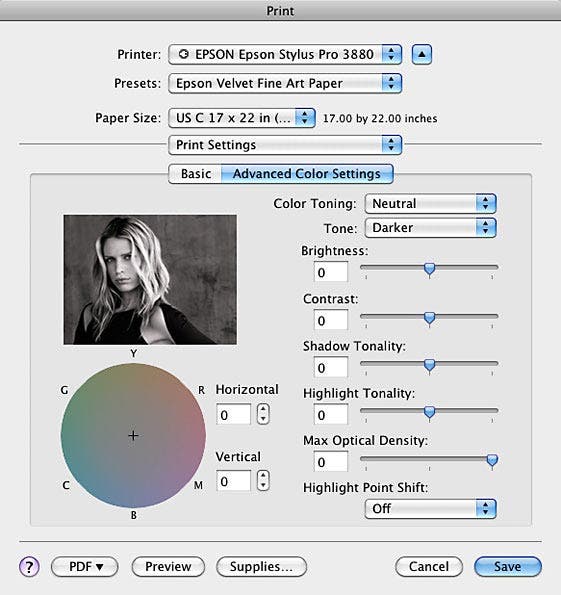
You can grab the crosshair in the color wheel and move it outward from the neutral center point to choose a tone and strength. If you have a favorite you can enter its numerical values in the Horizontal and Vertical boxes, so it is reproducible. The first two choices on the right, Color Toning and Tone, are just presets that move the crosshair. I prefer to leave all the other choices on the right at their neutral defaults; I have already made those adjustments more accurately in Photoshop.
I love color, but removing it from an image can sometimes improve it and allow tones to be rendered in a more pleasing or even dramatic manner. The tools are flexible, powerful, and not difficult to use. Give it a try!
Diane Miller is a widely exhibited freelance photographer who lives north of San Francisco in the Wine Country and specializes in fine-art nature photography. Her work, which can be found on her web site, has been published and exhibited throughout the Pacific Northwest. Many of her images are represented for stock by Monsoon Images and Photolibrary.
