Make 2015 your BEST photography year yet! #AdoramaUis a year-long tour through twelve essential photography topics. This lesson will focus on the fundamentals of light.
Welcome to Lesson 7: Using Natural Light
By Mark Wallace
Early in my photography career I got a short-term job as an assistant. I was helping a very successful photographer, he was published in dozens of magazines, and he shot for Sports Illustrated and National Geographic. I didn’t want to squander my big opportunity and so near the end of my contract I asked him for some tips. He said, “You have to understand light. If you don’t understand light you’ll never be successful.”
The big time photographer didn’t explain anything to me, he just left me hanging, and for years I thought that understanding light was a complicated and mysterious thing. Fortunately I found some mentors along the way and learned that light isn’t that complicated after all.
You’ll find that there isn’t really “good” or “bad” light. Different types of light can be used for different things. Every lighting situation has its own strengths and weaknesses. In this article we’ll focus on natural light – light that comes from the sun. We won’t be covering flashes, reflectors, of any kind of light modifiers. We’ll stick to the basics.
There are some very simple terms we can use to communicate the characteristics of light. Let’s explore two of the most important terms; direction and quality. Throughout this article we’ll be looking at the shadows that light casts.
Shadows are the key to understanding light.
It’s also important to note that the direction and quality of the light play roles in the overall photo. In order to keep things simple we’ll look at both of these individually and then we’ll put them together for a final look.
The Direction of light
The direction of light creates contrast. Contrast is the difference between the brightest and darkest area in a photo, the bigger the difference the higher the contrast.

A very high contrast image. The darkest areas are pure black and the lightest areas are almost white.

A very low contrast image. There is almost no difference between the lightest and darkest areas in this image. It looks flat, boring, and totally uninteresting.
It’s important to note that when we look at the direction of light it’s always measured in relation to our camera. We can change the direction of light by moving the position of our camera.
Let’s look at the following diagrams to get a better understanding of how this works. These diagrams are overly simplified. In the real world light reflects off buildings, clouds, and the ground. You may have strong sidelight but you’ll probably also have some reflections that will fill in the shadows on the opposite side of your subject. Or you may have strong backlight but you will probably have light reflected off the ground.
Front Light

Front light is usually coming from light that is behind our camera, but it’s called front light because it’s hitting the front of our subject.
Characteristics of Front Light
• Low Contrast: Because front light illuminates the subject evenly there is very little contrast.
• Strengths: Great for scenes with strong color or varied tones.
• Weaknesses: Because front light has almost no shadows it doesn’t do a good job of showing form. Form is created by shadows and gives photos a three-dimensional feeling. Front light photos can feel “flat” and one-dimensional.

This environmental portrait was shot in soft front light. Notice that there are almost no shadows in this image. This scene has strong colors and tones, it’s a perfect scene for front light.

Here’s another example of an image shot with front light. Notice that this photo also has strong colors and almost no shadows. It’s illuminated evenly from left to right and top to bottom.
Sidelight

Sidelight illuminates one side of our subject and leaves the other in shadow.
Characteristics of Sidelight
• High Contrast: Sidelight is very directional, it illuminates one side of the subject while leaving the opposite side in shadow. This creates a big difference between the brightest and darkest areas in the photo.
• Strengths: Side lighting emphasizes textures. Any subject that has strong texture will look great when photographed in strong sidelight. Scenic photographers love sidelight. Black and white photographs look great when shot in sidelight.
• Weaknesses: The high contrast nature of sidelight can be too much for some situations. Portrait photographers look for light that splits the difference between front and sidelight.

This padlock was shot with strong sidelight. Notice how it creates highlights on the padlock and deep shadows on the wall. The light creates contrast and draws our eyes to the subject.

Rugged terrain looks great in sidelight. The texture and the form of mountains are accentuated by strong shadows and highlights.

This photo of Machu Picchu was shot just after sunrise when the sun as low on the horizon. Early morning light is very directional and is favored by many scenic photographers.

You can create sidelight by moving your camera in relation to the light. The light and the subject in this diagram are the same as the front light diagram. The only thing that’s changed is the position of the camera. If you find that your light has too much or too little contrast try moving the position of your camera to find new light.

In this image I shot into the sun (backlight), the photo wasn’t very interesting so I swung my camera to the left and photographed some boats on the shore.

Notice that the light is now sidelight. The sidelight is much more pleasing and the boats create foreground interest in the photo.
Backlight

Backlight is light that is behind our subject. It creates a ring of light around our subject but leaves the front of our subject in shadow. It can be used to emphasize shapes because they will be shown in silhouette.
Characteristics of backlight
• High contrast: In the most extreme instances subjects will be silhouetted. This will create maximum contrast in an image. This only applies if the subject is directly between the light and the camera.
• Strengths: Backlit subjects that are translucent (leaves, ice, clouds, etc.) will appear as if they are glowing. Backlight is great for things that have strong shape and form.
• Weaknesses: Light can enter the lens and create undesirable lens flare. Light that enters the lens directly can also lower contrast.

This very strong backlight creates a silhouette of the cactus in the foreground.

This shot of a tapir swimming in the Amazon jungle was created using strong backlight.

This photo of the mountains surrounding Machu Picchu was shot with strong backlight. Notice how this light enters the lens and reduces contrast. In this scenario the light doesn’t work.

I came back to the same spot hours later, this time the light has changed to sidelight and works much better.
The Quality of Light
The quality of light can be described as hard or soft. To understand this let’s begin by looking at the shadows that light creates.
Shadows are made up of two parts, the shadow and the transition area.

Hard light creates deep sharp shadows with little or no transition area. Soft light may not have any shadows at all, and if there are shadows they are less opaque and have smooth transition areas. Sometimes it’s hard to tell where the shadows start and stop, if you see this you know you have very soft light.
Hard light is created by a very small light source. When there are no clouds the sun creates very hard light, it’s just a small dot of light in the sky.
Soft light is created by large diffused sources of light. On a cloudy day the entire sky becomes one huge soft source of light. Light is bouncing all over and that means there are little or no shadows. Shade also creates very soft light.

Notice that the shadows under this trailer are very dark and have no transition area. This is hard light.

Here’s another shot of very hard light. Notice the shadows from the gun are very hard, there is no transition area.

A large tree that casts a shadow surrounds this Buddha statue. This creates very soft light.

These sadhus are sitting in the shade of the temple. Once again we have very soft light.
Light in the real world

Take close look at this Cartagena street. The light on the lift side of the street is very hard while the light on the opposite side is in shade and very soft. In a situation like this you’d want to shoot portraits and things with strong color and varied tones on the “soft” side of the street. Use the “hard” side of the street to shoot high contrast images full of texture and form.

A bicycle shot on the “soft” side of the street. Although the bike is in the shade the reflection of the building on the opposite side of the street gives the image some form. The light is entering the street from high above, notice that the shadows are on the bottom of the bike and the basket. This is also considered sidelight because the light is at a 90 degree angle from the camera. Sidelight can be left, right or top.

This portrait was shot in a similar situation. The shade created very soft light, which is great for portraits. There was a white wall opposite my subject. You can see the reflection of the wall in his eyes. These reflections are called “catch lights” and give portraits more life.

This woman is illuminated by soft sidelight. Notice the shadow on the wall behind her. Because a window illuminates her there is more light on her than the rest of the image, this draws our eyes to the subject.

In this photo we have a mixture of hard and soft light. This is caused by something called a light isolate. A light isolate is simply a beam of light breaking through the clouds. The golden rice paddies and are lit by bright hard light while the surrounding mountains are subdued in soft light from the clouds. Like the portrait of the woman in the temple this type of light draws our eyes to the subject.

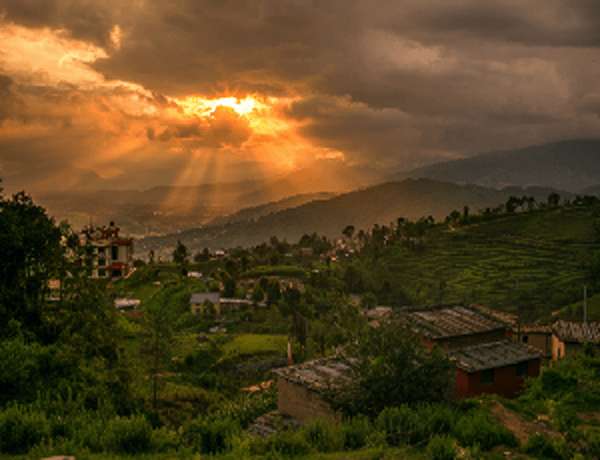
In this image we have diffused backlight. Because the sky is full of clouds a lot of light is bouncing around and we get nice soft light on the side of the buildings closest to the camera. The backlight casts a warm lining on the buildings and the hills.
Assignments
Week 1: Create a silhouetted image by shooting with strong backlight.
Week 2: Create a high contrast image by shooting with strong sidelight. Try converting your image to black and white for a dramatic effect.
Bonus: watch this AdoramaTV tutorial on creating high contrast black and white images. https://www.youtube.com/watch?v=DYi5yHTNjPk
Week 3: Experiment shooting portraits shaded areas. Place your subject deep into the shadows and take a photo. Next place your subject close to the edge of the shadow. Compare the two photos. What difference do you see in the direction of the light? What difference do you see in the catch lights?
Week 4: Find a subject that is illuminated by hard directional light. Move around the subject with your camera. Try to find front, side, and backlight by simply moving your camera in relation to your subject.
Week 5: Shoot a subject that is strong in color and tone using front light. Remember to keep the light behind you!


