Read this before you buy.
|
In mid-November 2008, Adobe released the next version of its venerable Photoshop program, I reviewed Lightroom 2 in August, and it has become part of my workflow. It is a powerful database, enabling me to keyword my images so I can quickly search for things such as pictures that contain flags plus children and dogs. And it is a robust and streamlined workflow for photojournalistic work such as event shoots that involve processing a large number of related images. But for my serious digital darkroom work I go to Photoshop. In addition, Bridge’s utility as a folder browser is a very useful adjunct to Lightroom, since the latter only works with images it has imported into its catalog. The idea in Lightroom is that you do adjustments on the raw file which are saved as settings alongside it to comprise a master file, and then convert to a pixel file only when you need to, such as today to make a small JPEG for a web posting for client review, tomorrow (after making client-requested changes to the raw adjustments) to a proof sheet, and next week to an 11×14 print. These three realizations of the image are each done directly from the raw file with its adjustment information. In the case of prints it is not necessary to keep the converted image file after the output is done. To do the next print (most likely at a different size anyway) Lightroom goes back to the raw file. Of course, if you need to do Photoshop magic (filters, perspective or lens distortion, sophisticated and detailed local adjustments, etc.) you will have to convert to a Photoshop file, which will then have to be resized as necessary for printing or web output.You often read that the Lightroom approach of working directly from the raw file is a huge improvement over Photoshop, where adjustments are destructive because they are done directly on a pixel layer. While this is fundamentally true, you have to keep the “huge improvement” part in perspective. Doing as much heavy lifting as possible on the raw file is certainly the way to go and you can do that equally in Photoshop and Lightroom. (They both use Adobe Camera Raw.) But if subsequent adjustments not available in Lightroom are needed, and they are done correctly in Photoshop, the “damage” is minimal. The image should be brought in from raw as a 16 bit file and adjustments done as adjustment layers, which can be modified non-destructively until the image is finalized. To minimize “damage” in Photoshop you should augment the raw conversion parameters as needed, but don’t try to reverse them. If that is necessary, re-do the raw conversion. When the image is finished, flatten and then convert to an 8 bit file (if necessary) for output. (Flattening must be done first or you will loose the advantage of being in 16 bits.) For most of my images Photoshop is a huge advantage. And of course I can save my raw adjustments without having to convert to a Photoshop file. I just hit Done instead of Open Image. The next time I pull up the raw file my last adjustment is there.InstallationInstallation of Photoshop CS4 was fast and hassle-free. And when I started Bridge I had a wonderful surprise. Among its workspace options were my two custom workspace layouts from CS3!After installing go to the Help menu and do an update to get the latest Camera Raw (5.1 as of this writing.)Interface changesA few menu items are always moved or renamed, and usually I wonder why. The Eyedropper tool has been promoted further up in the Toolbar, below the Crop tool and the Note Tool has been grouped with it. The Slice tool was there before and has been grouped with the Crop tool. Image > Rotate Canvas is now Image > Image Rotation. The new Rotate View tool is now accessible under the Hand tool as well as on the Application Bar.On the Mac there is now an option to run CS4 in an Application Frame that hides the desktop. You can turn this feature on and off in the Window menu. Having it on uses extra RAM.Some changes have been made to the interface. If you have several images open at once they can now optionally be arranged in tabs or tiled to fit the workspace. You can set this in Preferences > Interface > Open Documents as Tabs.Shown below is the new Application Bar at the top of the screen just below the menu bar, which can be toggled in the Window menu. It places frequently used items at your fingertips: Bridge, screen modes, guides, grids, rulers, magnification, the Zoom and Hand tools, Arrange Documents, Screen Modes and the new Rotate View tool to let you rotate the canvas to accommodate a graphics tablet set at an ergonomic angle. This is an extension of the Toolbar (some of the items are also there) and the Tool Options bar below it changes with the tool chosen as it does for items in the Toolbar. Not shown in the figure below, a handy Workspace Switcher is on the far right end of the Application Bar. You can customize the workspace and access yours along with the built-in presets there.
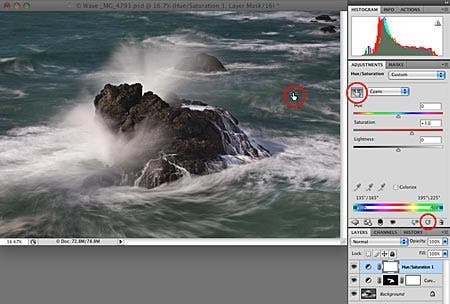
Photoshop now uses the computer graphics processing unit to display images smoothly at odd magnifications with no jagged edges. If you click the Zoom tool in the image and hold the mouse button you get continuous zooming.Some overall speed increases also result from use of the GPU. Caveat: Some older or inexpensive computers don’t have a GPU. You can see your situation in Preferences > Performance and there is a link there to further information.The most obvious interface change is that palettes now look different and are called panels, making the CS4 interface similar to that of Lightroom. See the figure below. Most panels behave as did the corresponding palettes in previous versions, but some items have been moved to the flyout menu which is accessible by an icon in the upper right of the panel. The new panels replace the pop-up dialog boxes; the adjustments are made right in the panel. With the old dialog boxes open you were frozen from access to other functions until you clicked OK. That limitation is removed with the panel system. Panels can be made wider on the fly, to make the adjustment interface bigger, with the icon to the right of the one circled in red in the figure below.Two new panels have been added: Adjustments and Masks.AdjustmentsThe Adjustments panel creates adjustment layers in the Layer panel. Of course, adjustment layers from previous versions remain fully functional. Just choose the adjustment you want from the icons at the top of the panel, or use the black/white circle icon at the bottom of the Layers panel as you did with previous versions, and you will get a new adjustment layer with its adjustment panel open. When you have made the setting click the arrow circled in red in the figure below to get back to the main Adjustment Panel. Clicking any adjustment layer will open its panel where you can further tweak settings.
After you have set a sample point for the Clone Stamp by an Alt-click, it will show a sort of ghost image of that point, reflecting the size and hardness of the brush. This enables you to see how well the sample point matches before you actually clone pixels. The biggest buzz about Photoshop CS4 is Content-Aware scaling, which is under the Edit menu. You can change the aspect ratio of an image and keep designated objects from being distorted. It is amazing. Smart Objects (introduced in CS2) can now be manipulated by the menu items under Edit > Transform. In Camera Raw the Shift key toggles Open Image and Open Object. Opening a file as a Smart Object is a wonderful thing because after building adjustment layers you can go back and change the underlying raw conversion parameters. But a roadblock was often the need to do perspective corrections on the imported Background layer. Now you can. There were no changes in HDR tonemapping but enhancements are widely anticipated in a future upgrade. Spring-loaded keys enable you to temporarily switch between tools by holding down a tool shortcut key. Release the key after using the tool and you are back to the tool you were using. PrintingImprovements to printing include built-in soft proofing: the ability to preview the appearance of a print with a chosen paper profile, and to preview out of gamut areas. These are accessed by checkboxes under the image preview in the print dialog box. They are only available if you use the Photoshop Manages Colors option. There is also support for printing 16 bit images on the Mac if there is a 16 bit driver for your printer. (You may need to check for updates to the driver that shipped with the printer.) Of course there is more, too much to cover here, but these are the big things for most users. Camera RawAdobe Camera Raw is, to me, one of the best features of Photoshop and my favorite raw converter. It was greatly improved in CS3 and now in CS4 it adds innovations first seen in Lightroom 2, with two new tools on the toolbar in the upper left: an Adjustment Brush and a Graduated Filter. These enable local corrections to be made to the raw file and saved as editable parameters the same as the global adjustments. And if you skipped CS3 you should know about the spot removal brush, the second icon to the left of these new ones. Just set its size and click on a spot and Camera Raw finds a perfect match to its surroundings and disappears it, non-destructively, of course.
Local adjustments can be made either as a gradient or a brushed-on shape, for exposure, brightness, contrast, saturation, clarity, sharpness, and color. As a beginner, leave the Flow and Density (equivalent to opacity for an adjustment layer) at 100 to make a straightforward masked area, and use the adjustment sliders to set the strength of the effect. A brush adjustment is shown by a pin at its starting point and a gradient is shown by pins at the start and end points. Click a pin to make it active to tweak the adjustment. You can rotate a gradient or change its span after it is made. You can remove an adjustment with the Delete key (Mac) or Backspace (PC). Below is a composite image showing a brush adjustment on the splashing wave and a gradient on the foreground. (You can only see one type at a time. Click the desired tool and click on the individual pin if there is more than one, to tweak the settings for it.) Both areas were blown out in the starting point adjustments. I could do another brushed on adjustment to lighten the rock. I could use the Straighten tool (the fifth one over) to straighten the horizon with a non-destructive crop but I will do that in Photoshop after I use the lens distortion filter to correct the barrel distortion of the horizon.
Options for the new adjustment tools, along with the Spot Removal and Red Eye tools, appear underneath the histogram in the area where the regular Camera Raw parameters are set. The Show Mask checkbox underneath the adjustment sliders lets you see the mask as you paint it; there is an Auto Mask function similar to the awesome Quick Selection tool introduced in CS3.Other additions: The Spot Removal tool now has an opacity slider to soften its effect. You also have access to post-crop vignetting. You can use a vignette slider to darken the edges and the effect will adjust to changes in the crop. This feature was introduced in Lightroom 2. (This is an additional use of the Vignette adjustment, whose original function was to remove darkening in the corners caused by some lenses.)Adjustments made in Camera Raw will be recognized by Lightroom 2 and vice versa as long as the metadata, which contains the raw conversion parameters along with numerous other items, is saved to the file. BridgeBridge is faster on all platforms, and the quirks of Bridge CS3 on my Leopard-powered Mac seem to be gone. The new Application Bar along the top of the screen is now where the workspace layouts are accessed along with other frequently used items. Folder navigation items reside here, along with access to recent folders, the downloader, output to web or PDF, sorting and filtering. Here are the left and right halves, to make them easier to see.
You can now sort by metadata and make virtual collections in Bridge, similar to Lightroom.The Bottom LineIf you have CS3 and are a professional or a serious amateur digital darkroom user, I think this upgrade is well worth the price. If you have CS2 or before, I absolutely beg you to go for it!!
|

 After making an adjustment you can toggle the “before” view with the third icon to the left of the trash can, which is in the lower right corner of the Adjustment Panel. The icon next to it resets the zero values. See the figure on the right.When possible, adjustments should be done as layers rather than in the Image > Adjustments menu. Adjustments done in Image > Adjustments change pixels values directly and can’t be altered without damage to values.There is now a Vibrance adjustment, as first seen in Lightroom and Camera Raw CS3. Vibrance is a subtler form of Saturation that works on the less-saturated colors first. The Clarity adjustment from Camera Raw didn’t make it into Photoshop, but it can be simulated by using Unsharp Mask with some much larger than usual values in the sliders. (A subject for another tutorial.) Shadow/Highlight still only works on a pixel layer. It is editable if applied to a Smart Object layer. MaskingYou now have a Masks panel to create and edit masks for both adjustment and pixel layers. After painting a mask on a layer you can use this panel to modify its density and edge hardness, and the sliders can be tweaked after the fact as with any other adjustment. This feature is similar to the Refine Edge feature introduced in CS3. The panel system does not change any fundamentals, it merely gives you an easier interface to do the same things you did before. Things such as my favorite technique of Quick Masking are still available.
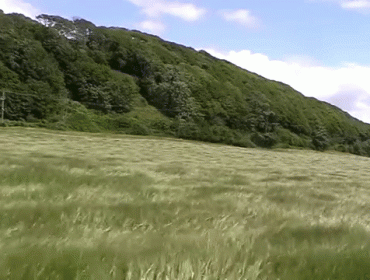
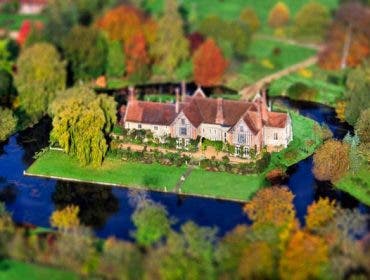
  Other goodies The Brightness and Contrast adjustment was vastly improved in Photoshop CS3 so it operated similarly to Curves and no longer blocked up shadows and blew out highlights. The Dodge and Burn and Sponge tools have been similarly improved in CS4 but I am not a fan of them. The Auto Align feature now has a fisheye correction that works by reading the metadata to see which lens was used. If the lens is supported it will compensate for fisheye distortion while building panoramas. And Photomerge (the panorama stitcher, under the File > Automate menu) now corrects for lens vignette. A wonderful enhancement to the Auto Blend Layers function, under the Edit menu, supports automatic depth of field blending to allow a series of shots with different focal points to be seamlessly blended using the sharpest part of each exposure. This feature and the long-established perspective corrections greatly reduce the need for tilt-shift lenses.In Select > Color Range you can now limit the selection to a localized area by checking the new Localized Color Clusters option in the dialog box. In the Curves and Hue and Saturation adjustment panels you can click the hand icon in the upper left of the panel and move the cursor into the image. It will sample the color and tone under the cursor (you first see it as an eyedropper) and you then drag the cursor as shown by little arrows to make adjustments to the selected tone. In this image I can change the water without affecting the rock or spray. This feature is in Lightroom 2 and is quite amazing. To reset the sliders to zero click the icon in the lower right of the panel to the left of the trash can.


