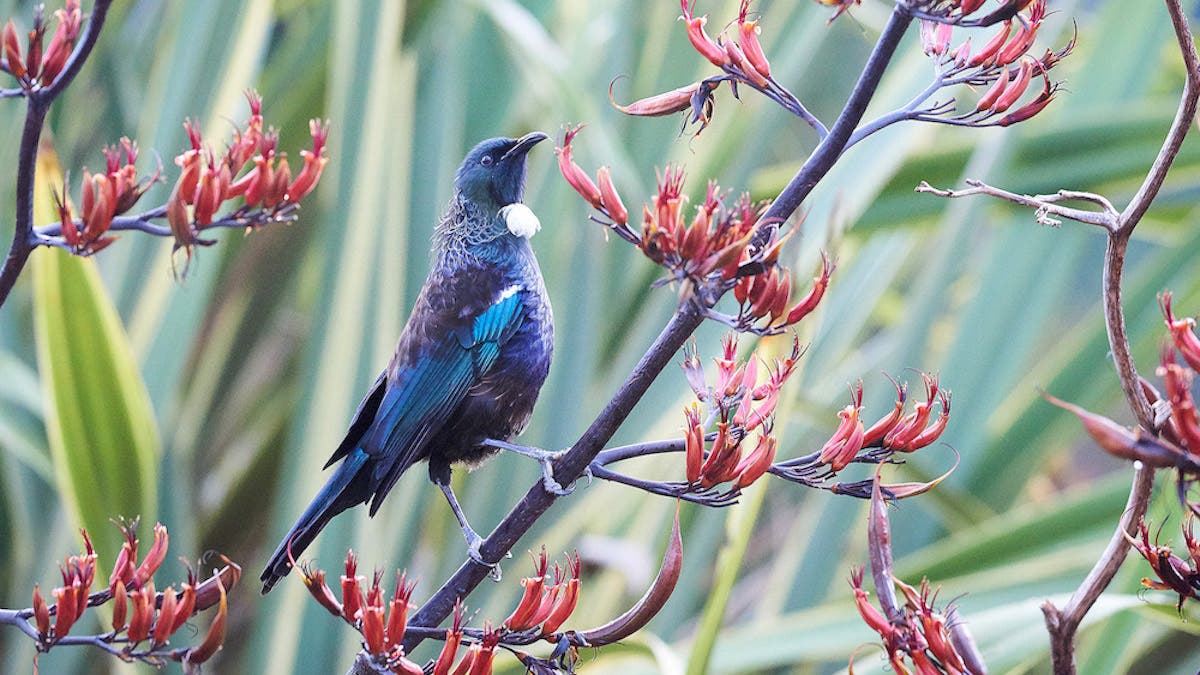
Contrast is usually an essential ingredient of great photos. You often want a full tonal range. This means having pixels from pure black to pure white, and everything in between. However, because you work with natural light and don’t control the environment, sometimes you have to perfect your images in post-processing. Adobe Photoshop provides all the tools you need to enhance contrast and add the sense of depth and three-dimensionality your photos need.
Use the Histogram for Ideas
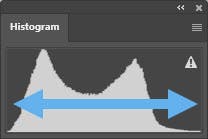
The histogram allows you to see the distribution of dark and bright values in your original image. You can find the histogram in the top right corner of Photoshop.
The left side shows you how many dark tones are present in your image. The right side shows how many bright tones you have in your image, while the middle of the graph shows how many tonal values you have in the mid-tones.
As a general rule, you want a histogram spread out with a bar that touches both the right and left side of the histogram with the peaks in the middle or a little to the right of the middle.
Using the Contrast/Brightness Adjustment Layer
The Contrast/Brightness adjustment allows you to change the number of shades between the lightest and darkest areas of an image. In other words, you can adjust the tonal range of an image.
If you move the Brightness slider, you favor highlights or shadows and make the image brighter or darker. But if you move the Contrast slider, you expand or shrink the tonal range of the image. The broader the tonal range is, the more contrast the image has.
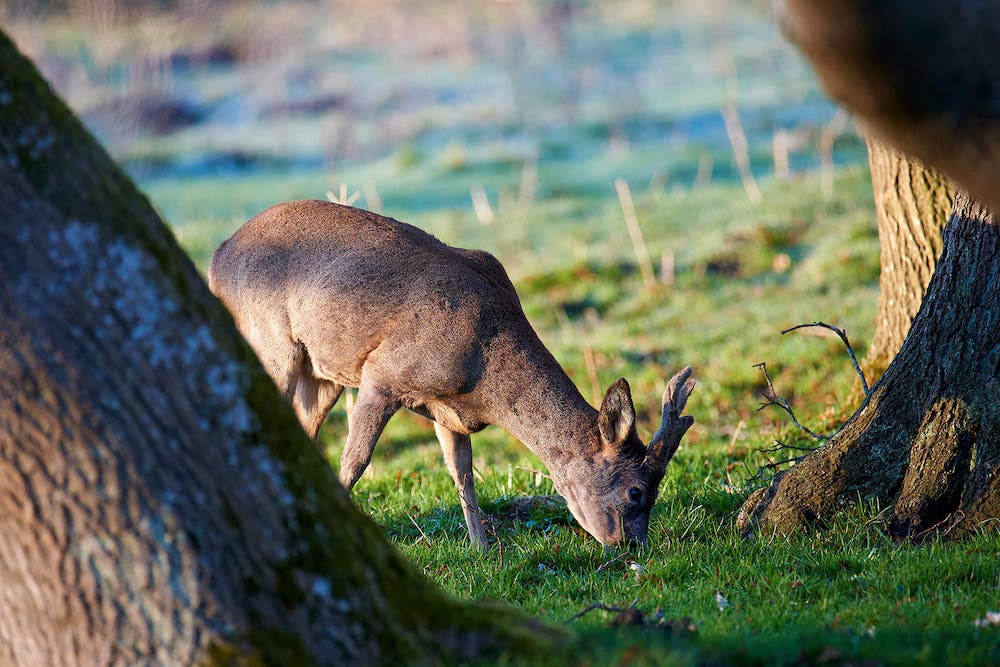
To add contrast to your photos, follow these steps:
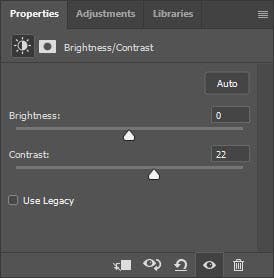
- Go to Layer -> New Adjustment Layer -> Brightness/Contrast (alternatively, you can open the Adjustments panel and click on the Brightness/Contrast icon).
- Drag the slider that controls Contrast to the right to increase the image’s contrast. The Contrast range is between -50 and 100.
Using the Curves Adjustment Layer
The Curves adjustment is another tool that allows you to adjust the tonal range of an image. Instead of using a slider like with the Contrast/Brightness adjustment, the Curves tool represents the tonal range as a straight diagonal line and allows you to move control points up or down. You can use a maximum of 14 control points. In the background of the Curves tool, you have the histogram representation of the original tonal range as a reference.
The upper-right values represent the highlights, and the lower-left values represent the shadows. So, on the horizontal, you have the original tonal values ranging from black to white. On the vertical, the output of your changes also ranges from black to white. So, if you want to make a point brighter, you move it up. If you want to make a point darker, you move it down.
To increase the contrast using the Curves adjustment, you have to increase the difference between shadows and highlights. Thus, you need to drag the control points left or right, up or down. When you drag a control point to the left, you increase its value. When you drag a control point to the right, you decrease its value. For increasing the contrast, move a control point in the highlights area to the left and one in the shadows area to the right.
To use the Curves adjustment layer in Photoshop for adding contrast, follow these steps:
- Go to Layer -> New Adjustment Layer -> Curves (alternatively, you can open the Adjustments panel and click on the Curves icon).
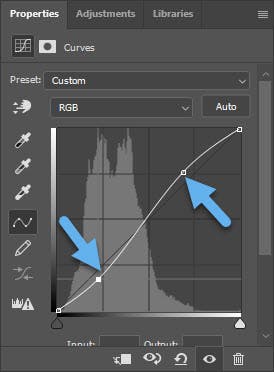
- Click on the curve line in the highlights (upper-right area) and define a control point. Then, drag the control point to the left or up.
- Click on the curve line in the shadows area (lower-left) and define a control point. Then, drag the control point to the right or down.
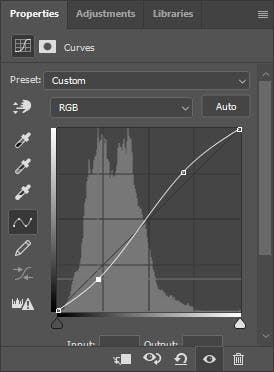
A typical contrast adjustment using the curves adjustment is to create an S-shaped curve by lowering the dark tones and raising the brighter values.
Use the background histogram as a reference to define your control points. Work on the parts where the histogram is empty by placing your control points there. If it is the case, move the endpoints of the line (i.e., the black and white points) towards the center of the curved line until they reach the extremities of the histogram. The adjustment will increase the overall contrast of the image.
Photoshop helps you even more. You can define the control points automatically by using the On-Image tool. Activate the On-Image tool by clicking on the corresponding icon in the Curves Properties panel. The On-Image tool allows you to create a control point by clicking somewhere in the image and making it brighter or darker by dragging up or down. Photoshop calculates how much light is in that area and places it accordingly on the curve line. Then, it adjusts the curve based on your dragging action.

Using the Levels Adjustment Layer
The Levels adjustment allows you to adjust the brightness levels in one of the histograms of the image. As you know, the histogram shows you how many pixels of different tonal values your image has. There are 256 possible tonal values. Therefore, the Input Levels sliders go from 0 (black) to 255 (white).
Ideally, your photograph will have a continuous histogram covering all 256 values and having both pure white and pure black pixels. However, as this isn’t always the case, the Levels adjustment allows you to set new white and black point levels and stretch the tonal range. As a result, you’ll increase the contrast of your photograph.
Photoshop allows you to use the Levels adjustment on a single color channel or the composite RGB channel. Therefore, you can use it to make the shades of blue darker and the shades of green lighter in landscape photography, for example. The tool increases the versatility of your editing process and gives you control over each detail of the image. Instead of adding contrast to the overall image, you can add contrast to a particular color and create a more subtle effect.
Nature photographs benefit a lot from having a well-balanced RGB histogram. Furthermore, because you can decide which pixels you want to be pure white, pure black, or mid-tone gray, you can make your photographs realistic-looking, for example, reproducing the whiteness of snow or clouds. You can also change the feeling of a photo and make it look more sunny or cloudy.
The Levels adjustment is a quick and efficient way to fix the overall contrast of an image. All you have to do is follow these steps:
- Go to Layer -> New Adjustment Layer -> Levels (alternatively, you can open the Adjustments panel and click on the Levels icon).
- Choose an option from the Channel drop list (i.e., RGB, R, G, or B)
- Drag the black and white Input Levels sliders to the right, respectively, to the left until they reach the extremities of the histogram.
You can also adjust the mid-tones by moving the middle Input slider. Going to the left, towards the black Input slider, will make the image look darker. Going to the right, towards the white Input slider, will make the image look brighter.

Don’t Forget the Manual Way — Dodge and Burning
When your photographs have a single subject that needs to stand out, you may use more localized methods to add contrast. For example, imagine you have taken a macro photo of an insect, and you want to create a contrast between the insect and the background. The best Photoshop tools for this adjustment are the Dodge and Burn tools. The Dodge tool lightens the area covered by a brush, while the Burn tool darkens it. So, you can use one tool on the subject and the other one on the background.
To use Dodge or Burn tool to add contrast, follow these steps:
- First, duplicate the background layer to make sure you don’t alter it permanently.
- Select the Dodge or Burn tool.
- Set up the brush options (e.g., size, opacity, exposure, etc.).
- From the Range menu, choose whether you want to alter highlights, shadows, or midtones.
- Click/Drag the mouse over an area of the image that you want to dodge or burn.

You would typically want to dodge and burn to either even out tonal differences that you don’t want or to emphasize tonal differences. In this image, I have brightened the belly and back of the bird while darkening the lower wing. This emphasizes the 3D shape of the bird.
Interested in bird photography? We also have you covered.
Concluding Words
Although the three described tools may seem similar, each of them produces a different effect and works better for a particular image. Practice all of them and choose the one that fits your photography and editing style. Adding contrast in Photoshop is among the first steps of a photographer’s editing workflow. A slight change of contrast may increase the value of your photographs and transform them into commercial or editorial material.

