In this installment of our Adorama-exclusive, mind-blowingly amazing tour of the natural beauty of the southwest, we visit Arches and Natural Bridges National Parks. They have a common link.
So far in this series of articles prepared exclusively for the Adorama Learning Center, we’ve visited Valley of Fire State Park, Zion National Park, Bryce Canyon National Park, and Grand Staircase-Escalante National Monument in Part 1,and Capitol Reef National Park, Goblin Valley State Park, and Canyonlands National Park in Part 2. Ready for part 3 of what I consider the most amazing photographic road trip in the world? Let’s go!

After paying the entrance fee (or showing your National Park Pass if you did as I suggested in the first installment of the article) and collecting your maps and info, you will be heading straight to Delicate Arch Trailhead. You will climb a steep switchback and this scene will be waiting for you as the terrain flattens out. The hardest part about this trip is passing by all the beautiful formations glowing in the late afternoon sun, but you always have tomorrow, and hopefully a few extra days here as well.
 This park demands more time to just scratch the surface of what it has to offer. I’ve been here more than a dozen times and I still discover new beauty each time I visit. I could easily do a 100 print gallery show (using Ilford paper, available at the Ilford store at Adorama) of this park alone; it’s that photogenic! In about 20 minutes you will come upon the Delicate Arch turn off. Wolf Ranch parking lot is on the left. The trail begins right by the bathrooms and yes, that’s a hint! The little access road you just drove down off the Park entrance road is shorter than the uphill hike before you.
There is little shade as only a few trees and some bushes dot the slick rock trail once you leave the river. Be sure to pack in plenty of water and some snacks as well. If you are like me, this will quickly seem more like a death march than a hike. Of course if you are an extreme hiker this will be pure bliss for you. At my age, with a 30 pound backpack strapped to me and a 1⁄2 gallon of water on my belt, well, let’s just say I stop a lot!
The quickest time was about an hour up and that was in the winter. Nevertheless, I’ve done this hike three times and it is absolutely worth the effort. Remember to bring that flashlight such as this one, available at Adorama, because you will be coming back in the dark. Don’t expect to be alone when you get there, you are not the only fool to torture test yourself today! Here is a shot I took while waiting for the sunset.
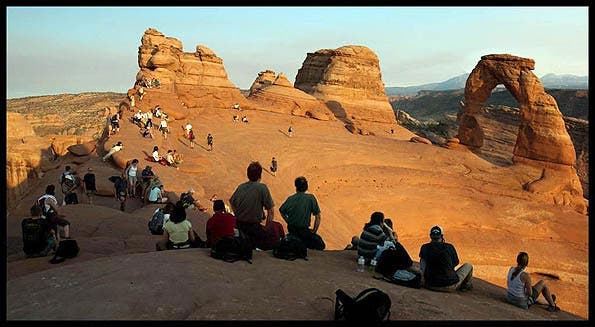
There is an etiquette in place however, and lots of peer pressure. Until the last 10 minutes or so as the sun sets, people will be lining up to pose under the arch. Then, as if by magic, people start booing them until they stop. You see, the last magic rays of sun are for pictures OF the arch, not UNDER it. It becomes like theater and everyone lines the rim to watch. That bowl in front of everyone is both wide and deep. This is telephoto time.

For those of you who want a less challenging hike, you can continue past Wolf Ranch and turn into the next parking area. It’s half the distance or less and looks at the backside of the arch. This shot was taken by my wife Sandie with a normal lens looking into the valley between the viewpoint and the arch.


This shot was taken from there at sunset. It does require a 400mm or better to get this shot; you can find long focal length lenses at the Adorama Lens Dept. If you look at your brochure you can see the suggested time of day for best shots at each of the locations. There are plenty of locations to shoot here in Arches.

Park Avenue can be shot about anytime of the day and it looks different each time. It is a series of flattish rocks forming a valley. It’s one of the first pullouts after coming up the hill from the visitor center. You can shoot right from the view area off the parking lot, or you can make a hike through it back down to the road and another series of great rock formations.


This is what you see at the trails end. Driving on down the road you can take the fork back to the Delicate Arch area or keep left and end up at the trailhead to a number of arches including the largest, (and the true delicate arch), Landscape Arch.

Pieces have been falling off this for years so it’s likely to become a broken arch in my lifetime. You can take all sorts of side trips to other overlooks and arches in the area as well.

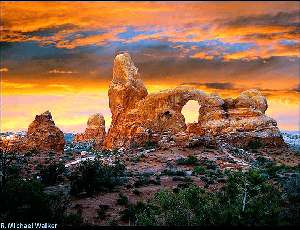
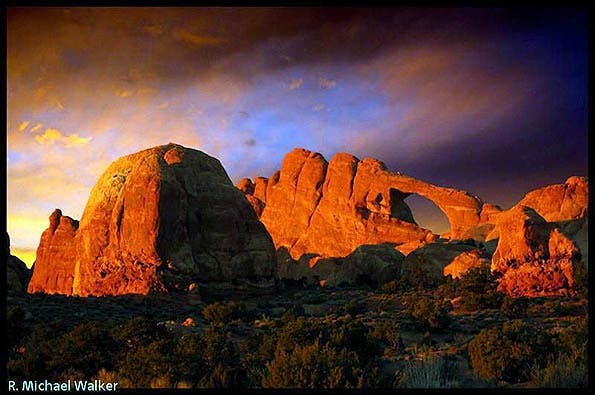
Another area that looks good most anytime you are there is “The Windows”. There you also find Turret arch and Double arch (pictured below).


“The Windows” are 2 large arches with trails up to and all around them. You can get the light you want anytime of the day. It’s worth a couple of visits here; I suggest one at sunrise and the other at sunset or late afternoon. This is a short walk up hill but it could be shot from the parking lot with some success.
There are numerous other arches here. Like I said, this park deserves its own show…and article. But it’s time to move on down US-191 to our next destination.

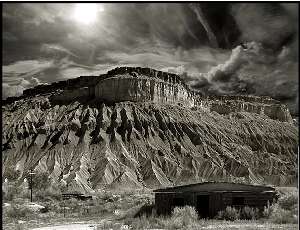
The Mountains you see on your left off in the distance are the La Salle Mountains. A side trip to them will reward you with streams, lakes and green alpine meadows, which are strange findings in this mostly desertarea. 100 miles down the road we will turn off on to UT- 95 toward Natural Bridges National Park. On the way you will also pass the turn off for the southern end of Canyonlands called “The Needles”. This is a 4WD wonderland that makes Shafer Road back in Canyonlands look like a super highway. Passenger cars have very limited access here. If you the time, take a look, but the road to it is long and looks like farmland between large red mountains.

I had traveled this road six or seven times before I took the loop. It is pleasant but not nearly as photogenic as what we have seen so far. The main passenger car accessible area features a lot of carved Hoodoo-like rock formations.
Natural Bridges National Monument

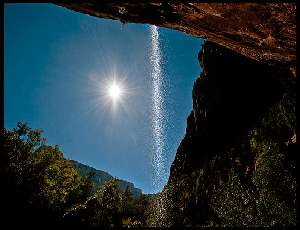
Our turn off is a right on UT-95, then a right on UT-275 about 6 miles down the road. There is a loop road that covers every bridge in the park. Some are long hikes down to the river floor, some you can see right off the parking lot. You could spend a day or two hiking them all. Usually I shoot sunset at Arches then head down to Blanding, UT and spend the night there. This allows for less than an hour drive to be at the bridges. But, plan ahead because most of them are down in a canyon so sunrise and sunset are not the best times to be there.

Again, I like to use polarizer both for the sky and to get the most out of the rock colors. Since very few can be seen without hiking down to them I’d leave the teles in the car. This is a wide angle wonderland, and panorama opportunities abound as well!

This is the same bridge from two different angles, with two different lenses at the same time of day. Be sure to walk all around them to get the best shots. Leaving here we are heading for Monument Valley Tribal Park. A long side trip would be heading over to Colorado to see Mesa Verde. If you have the time it’s worth the day, but we are skipping it this trip.
Many of these images have been on display at trade shows and elsewhere, and to get the greatest impact I like to print them big, with no flaws or anomalies. And I want to see detail in those rocks. They look great printed large, especially when I print them on ILFORD GALERIE Gold Fibre Silk, available at Adorama, my large-format inkjet print medium of choice.
For the fourth and final part of this amazing road trip, we’ll visit Monument Valley, Canyon de Chelley…and the Grand Canyon! Enjoy the ride!