You have a portrait shoot coming up. It’s possible you spent the last week preparing for the photo shoot to the point you feel confident you’ve got this and that nothing is going to go wrong. Excitement is in the air as you cannot wait to test your skill and creativity. While you think the shoot went brilliantly, after reviewing the images, you realize so many mistakes you made that could’ve been avoided that have now either cost you additional time in post production or they have made your images completely unusable.

A simple studio portrait.
It’s sort of a relief to know that even professionals make mistakes on portrait shoots too and that you should consider them learning experiences. However, here are seven common mistakes to be aware of and how to avoid them on your future portrait shoots to create a more pleasant experience for both you and your client.
MISTAKE #1 – HINDERING BACKGROUNDS & MERGERS
Sometimes we neglect to look at what is behind our subjects when photographing outdoors and even in more controlled environments like a photography studio. A merger is the appearance that an object behind your subject is merged with your subject, such as a light pole or tree branch sticking out of your subject’s head. This can also happen in a studio environment too depending on the set that you build. Sure, these mistakes can be removed with Adobe Photoshop – potentially hours later – but why waste the time when you can get it right upon capture?

An example of a merger is the tree branches appearing to stick out of my subject’s head.
A more common mistake is a distracting background. A few things can distract a viewer’s eye in an image: a sharp background, brightness, bold colors or high contrast. Since you want the attention to fall on your subject instead of the background, the idea here is to be aware of your subject’s surroundings including the background and foreground.

The image of me above looks quite busy and not very appealing.
Image courtesy of John Ritchie
Since you want your subject to be sharp, the best way to combat a busy background is to leave it slightly out of focus and you can do this in one of three ways: 1) shoot with a larger aperture, which creates a shallow depth of field; 2) use a long lens; or 3) pull your subject away from the background altogether. The goal here is to separate your subject from the background.

This image is much more pleasing than the previous image as the shallow depth of field separates me from the background.
Image courtesy of John Ritchie
MISTAKE #2 – INCORRECT FOCUS
The sharpest point in a photograph is where your viewer’s eyes will go first. The most important feature when capturing a portrait is your subject’s eyes, specifically, the one closest to the camera if your subject is even slightly turned to the side. Without the eye being in focus, your subject in your portrait can appear lifeless. The autofocus feature on many cameras can cause the mistake of incorrect focus, so it’s important to be aware of this and to set your focus to a single point on the eyes and not the nose or ear.
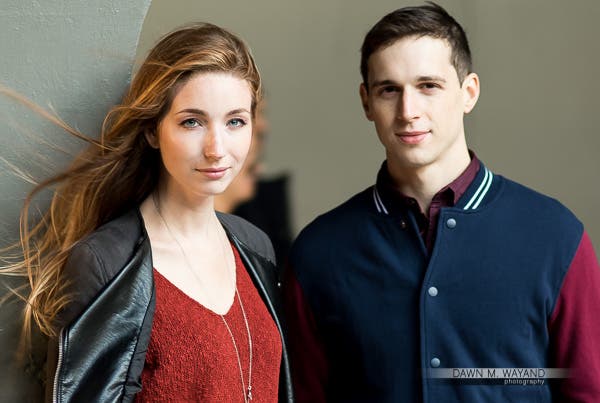
Her eyes look sharp and vibrant. His eyes look lifeless and out of focus.
Models/Actors: Valery Lessard and Bryan Fitzgerald
On the example above, you can see the difference in how it appears as the female model’s eyes are sharp and vibrant whereas the male model’s eyes are out of focus and appear dead and lifeless.
MISTAKE #3 – SHOOTING WITH THE WRONG LENS
Shooting with the wrong lens can cause very unflattering results in portraiture as distortion tends to occur on both ends of the spectrum. Below is a very extreme example but when you shoot a subject close up with a wide angle lens, their face becomes stretched and hardly recognizable, which can be a fun shot in some instances, but not for a professional portrait.

OK, so this is an exaggerated example, but this is distortion caused by using a Canon 8-15mm fisheye lens.
To avoid this distortion, an 85mm-150mm lens on full frame or a 50mm-105mm lens on cropped sensor is the choice lenses to use for shooting people. Around the equivalent of an 85mm focal length is generally the sweet spot for shooting portraits as the wider the angle of lens, the larger features like the nose and chin become.
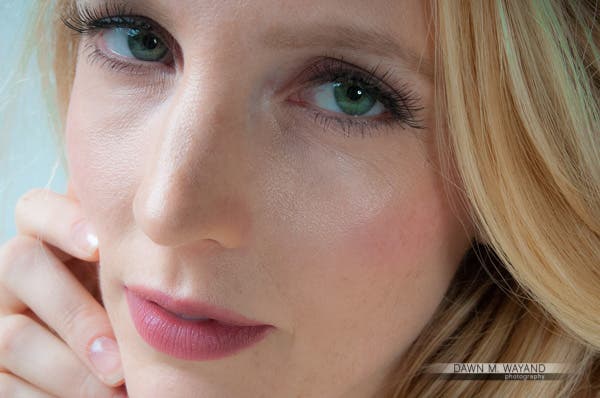
Minor distortion with a 50mm F/1.4 lens used close up.
Model: Sietzka Wiersma
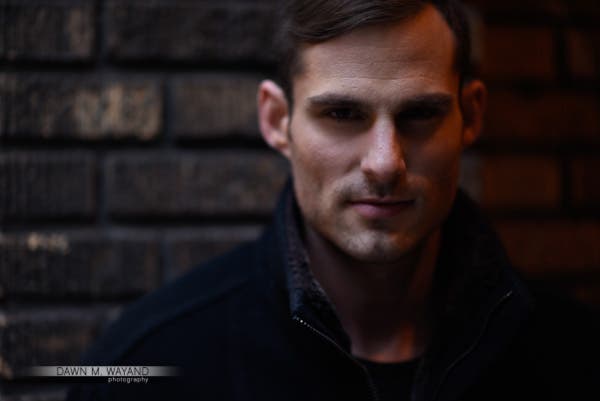
Stepping back with an 85mm lens hits the sweet spot.
Model: Andy Mizerek

Stepping further back with a 100mm lens offers no distortion here.
Model/Actor: Bryan Fitzgerald

A telephoto zoom lens like the 70-200mm F/2.8 also creates little to no distortion.
Model: Bonnie Byrnes
A wide angle lens can work well for people photography typically when shooting an environmental portrait.
MISTAKE #4 – FORGETTING THE DETAILS
Sometimes we get into a groove. The music is playing, your subject is moving – we are snap, snap, snapping! However, when you forget to pay attention to the details, you might be capturing a bunch of images that you’ll either end up finding completely useless or spending hours fixing in post-production.
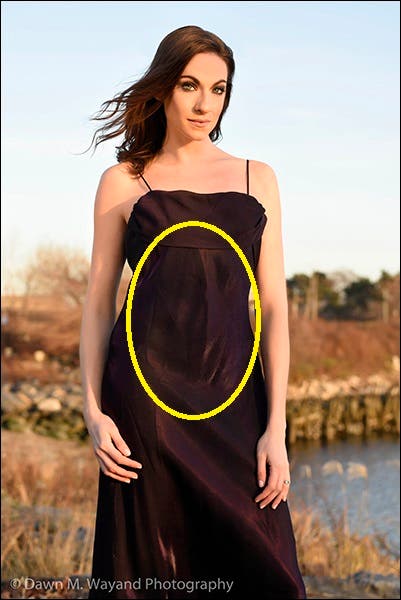
Missed wrinkles in a dress.
Model: Katie Buell
Save time by taking your time and being diligent. Does your subject have a hair band that they took off and left on their wrist? Do they have a flyaway hair on their forehead? A string on their sweater? Wrinkles in their dress?
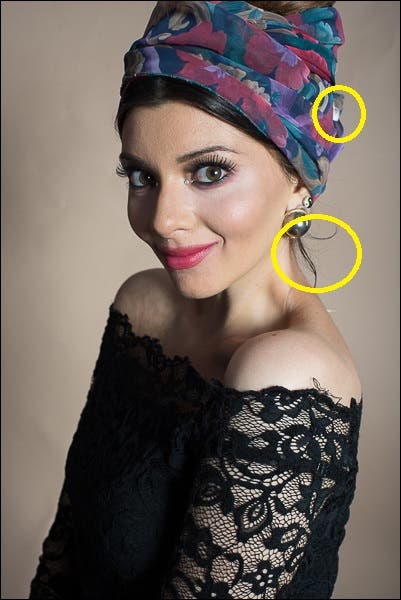
Missed tag on the scarf and stray hairs on the neck.
Model: Maria Iodice
Correct the issues before capture to yield more useable images to choose from otherwise you may end up shooting a half of a day worth of useless images because you did not notice and fix what was wrong before capture.
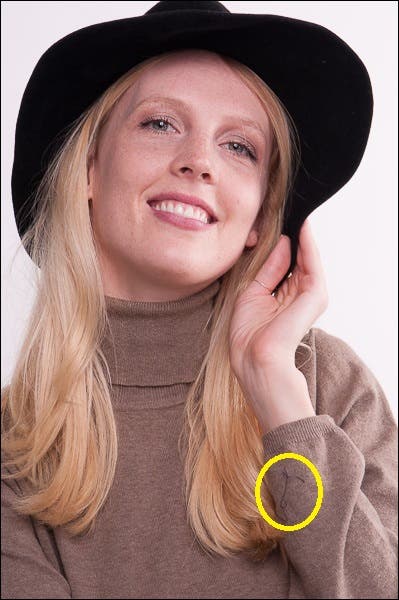
String on the sweater.
Model: Sietzka Wiersma
MISTAKE #5 – SHOOTING AT THE WRONG ANGLE
A common mistake in portraiture can be shooting your subject from the wrong angle. A typical guideline for a flattering portrait is to shoot them just above eye level.

Shooting at eye level.
Model: Sietzka Wiersma
Shooting a subject from above may be an interesting point of view, but it will make your subject look smaller than they are and/or for balding men, it can expose a receding hairline.
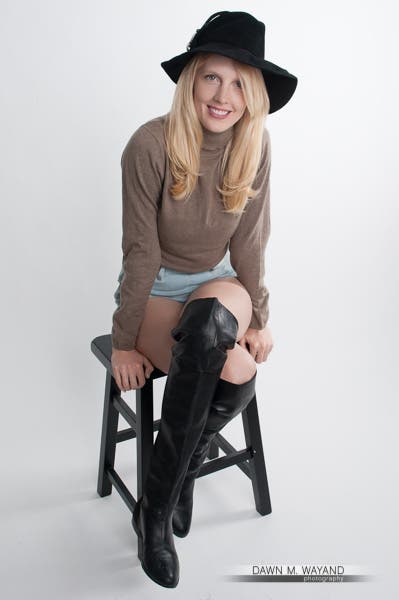
Shooting too high makes a person appear smaller than they are.
Model: Sietzka Wiersma
When you shoot a subject from below, you may make them look taller, but if you’re not careful to position them the right way, you may lose their neck to a shoulder, be looking up their nose and/or you may expose a double chin or even cause the appearance of a double chin they didn’t have to begin with!

Shooting too low can be unflattering, hides the neck and shows things like a double chin.
Model: Bonnie Byrnes
MISTAKE #6 – HARSH SHADOWS
Harsh shadows can appropriately be the result of an interesting choice of lighting for male subjects creating mystery and allure and for women, it can create a particular mood or add drama in a portrait.

An example of good, soft, flattering shadows.
Model: Shoko Fujita
However, very harsh shadows produced by a poor choice of lighting or from undiffused light from the sun, can be unflattering and very distracting.

The shadows in her face are too harsh.
Model: Daria Komarkova
You can create softer shadows by using a diffuser in between your light source and your subject, by using a reflector and filling in harsh shadows by bouncing light from the key light back onto the subject, and by proper placement of your subject in relation to your light source.

By using a reflector and bouncing light onto the shadow side of her face, the shadows are much softer.
Model: Daria Komarkova
MISTAKE #7 – STATIC POSING
Posing can be one of the harder elements of a portrait to master just after lighting. The goal is to create an extraordinary portrait rather than a boring, lifeless photograph. So good direction to your subject is in order as it not only relaxes your subject a bit, but most of us do not really know how to pose in a flattering manner in front of a camera so you must be their guide.

For a reclining position, this image exhibits good angles and dynamic feet.
Model: Daria Komarkova
Have your subject place their feet in different directions or positions from one another. This creates a dynamic stance. When the feet face the same direction, the image looks flatter than if each foot were positioned in a different way such as kicking one foot up on a toe, popping the hip out and placing one foot facing out to the side while the other is straightforward.

The pose here is a bit stiff. While there is a nice angle in the arms, the feet face the same direction losing the depth in the image.
Model: Shoko Fujita
In the similar image below, the subject’s feet are pointed in different directions, her hips are uneven and there are many angles to her arms and legs creating a better pose.

Many angles, relaxed figure and more dynamic feet.
Model: Shoko Fujita
Good posture is important in a portrait. A slumped over look can create make the stomach appear larger than it is whereas straight posture can actually pull it in. A sculpted face is typically also desired. By having your subject pull their head up, as if the top of their head is attached to puppet strings, pushing their face out (which will accentuate the clavicle), and pulling the chin down – all of which may feel a little unnatural – will create a slimmer, more sculpted look in the face.

Here her posture is straight and her head is pulled high, face out and chin slightly down to create a more sculpted face.
Model: Shoko Fujita
A good portrait will exhibit a more defined three dimensional look which is achieved by proper feet placement; good posture; angled arms and legs; and head placement that accentuates the face and exposes the neck as much as possible.

A good angled, dynamic pose.
Model: Shoko Fujita
LEARNING FROM YOUR MISTAKES
You can never know everything there is to know about photography so you will make mistakes as you go along. Even professionals still make mistakes as photography is a constant learning process. Don’t look at a mistake as the end of the world and hang up your camera. Look at them as a learning experience, something necessary to get even better at your craft. The seven tips above are just a few of many mistakes which can be learned and avoided. What are some mistakes you’ve made in the past? Feel free to share your mistakes and what you’ve learned from them in the comment section below.
