.jpg)
Family photos are one of the best gifts you can give your loved ones. And with some simple planning, they don’t have to cause anyone to panic or drag their feet. My husband and I recently rounded up both sides of the family for some long overdue photos and managed to keep the whole thing pain-free. Here’s how.
-
Embrace the moment.
One of the things that can quickly sour a family photo session is the stress we often bring to it. Of course we want to look good, we’d like the kids to cooperate, and naturally, we’d like to control the weather too. But inevitably, it doesn’t work that way. And having our expectations at odds with our reality is a recipe for intense frustration. Instead, go with the flow and roll with whatever your crew is serving up.

If the kids won’t look at the camera, it’s not the end of the world, it’s a reflection of where your family is in life at the moment. In the above example, our little guy was more interested in his cousin’s ear than looking at the camera—and that’s life with an infant. We rolled with it and it’s my favorite frame from this grouping. (Hint: Salvage a higher number of photos by asking the adults to stay focused on the camera instead of worrying so much about what the kids are doing. It’s cute when the kids poke each other’s ears, but when adults do it, it’s weird.)
Below is another example where the kids wanted their toys in the photo and rather than fight it, we took a few quick silly photos to get the goofiness out of their system. And—you guessed it, it’s another favorite from the day.

Finally, it’s also 100% ok if you get a group shot where no one is looking at the camera. This one makes me smile every time I look at it, and it’s a thousand times more genuine than the canned expressions the kids gave me when they were staring down the camera.
-
Style it simple.
Wardrobe planning can be another source of stress. Don’t worry about matching, or being overly coordinated. Just aim for a general color scheme (in this case, I told everyone to simply dress in “fall-ish colors”) and avoid text, graphics, or licensed character illustrations, and you’ll be surprised how easily things come together. (Seriously. Step away from Pinterest, it will be fine.)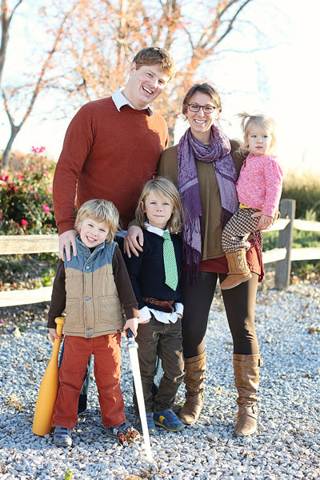
-
Don’t settle for crap light.
If you can, get everyone outside. The far better (ambient) light is worth the effort. Too cold? Bundle up—there’s no law against wearing hats, coats, and scarves in a family photo!
To avoid having to use any flash, I like to position subjects with the sun behind them. This backlighting technique not only allows for even lighting on their faces and avoids squinting, but can also create some gorgeous rim lighting too.

-
Nail the Exposure
Most of the time, backlighting your subjects will result in too dark of a photo if you don’t adjust for it, which can easily be done using your camera’s Exposure Compensation feature. First, make sure you’re shooting in a mode other than Auto or Manual mode (if you’re feeling intimidated, just switch to P for Program mode), then look for the symbol. Each camera is different, but in most cases, pressing the exposure compensationicon will allow you to bump the exposure up or down (brighter or darker) by turning a dial or pressing some the selection buttons. The goal is to move the indicator towards the plus side to brighten the exposure. How far you’ll need to move it will vary, so plan on a few extra minutes to get setup before starting to take photos.
Some cameras will show you a preview through your LCD screen while you’re making adjustments, while others might have you take a test shot or two before you can decide what looks best. Once you settle on a good exposure, you’re ready to shoot! -
Don’t Get Left Out!
You may not feel the need to be in every photo, but make sure to get in at least one! All it takes is a tripod (or chair/ledge/stack of books) and your camera’s built-in timer. (If you want to get fancy or you really loathe running, you can pick up an inexpensive wireless remote for less than $20.) Consult your camera manual (or Google) to figure out how to access your built-in timer and what your options are. You may be able to customize the length of the countdown time or tell the camera to take multiple shots in a row (saving you from running back and forth each time), so take some time to poke around, you may be surprised at the options you have.
(Now, if only I would’ve remembered to at least run a comb through my hair one more time…)