
Photographing glass objects is considered by many to be one of the most challenging tasks in commercial studio photography. It seems like capturing glass without also getting reflections is nearly impossible. However, with the right tools and proper techniques, taking pictures of glass can be fun and highly rewarding.
When it comes to commercial photography, lighting and attention to detail is everything. This multi-part tutorial explores the process of creating a conceptual tabletop wine shot using two continuous lights and a Plexiglas or acrylic shooting table. Follow along with these simple techniques and you’ll be photographing reflective objects with skill in minutes!
What Is Glass Photography?
Photographing glass is both a joy and a nuisance. It has three wonderful properties that captivate the imagination and have the potential to transform the mundane into the magical. These same properties, however, can also be frustrating aspects of the material.
Learning how to photograph glass is essential for photographers — but it doesn’t have to be a chore!
How Do You Use Glass in Photography?
How to photograph glass is something you should know regardless of your preferred photographic genre. Glass photography finds its way in various types of portfolios, from food and product (e.g., glassware) to real estate (e.g., windows, mirrors) to weddings (e.g., newlyweds making a toast).
Furthermore, glass photography means more than photographing objects made of glass. It also means working with see-through objects, reflections, and partially opaque glass. You need to know how to photograph glass in any form and color. Glass photography is not just a realistic representation. It is also a way to create atmosphere, emotions, and stories. Glass is an active element of the composition.
Working with Transparency and Reflectivity
The first appealing property of glass is its transparency. Who hasn’t been tempted to take photographs through windows, museum dioramas, aquarium glass, and shop displays? Besides shooting from the outside in, there are photo opportunities when you are on the inside looking out — such as when observing a street scene from inside a café or restaurant.
As shutterbugs, we are so taken by our ability to see through glass that we often forget it is there. That is when glass begins to play its tricks on us, luring us into photographic traps. For example, we fail to notice reflections that interfere with our ability to capture what interest us on the other side. Sometimes, we even activate our flash units, forgetting that the bright light will bounce right back at us.
A second enchanting quality of glass is its very reflectivity. While we don’t always notice reflections or want them in our image, they can become subjects in their own right. The sheen of a modern glass office tower can mirror all sorts of interesting city sights, sometimes with abstract twists and distortions. Reflections can also be combined with whatever is on the other side of the glass to create highly individual interpretations of the scene.
How to Avoid Reflection in Glass Photography
Whether you’re in a high rise overlooking Chicago’s Magnificent Mile or you’re on an Amtrak speeding through swaths of the pristine National Forest, you’ll eventually find yourself wanting to photograph a scene through glass.
Trips to museums can be especially frustrating for photographers because most art is protected inside glass display cases. Even worse, museum lighting won’t necessarily help you avoid photo reflections.
Taking pictures through glass without reflections is also a must in real estate photography. The problem of reflections rears its ugly head when you need to photograph a room’s interior and exterior at the same time. For instance, if you need to capture a beautiful living room with an attractive patio or pool outside.
Photo reflections are notoriously hard to remove with post processing, so it’s best to avoid creating them in the first place. But if you’ve ever tried taking pictures through glass and failed (as many beginner photographers have), you know just how difficult it can be to get your shot!
Clearly, marvelous images can be captured by photographing through glass. But to do glass reflection photography successfully, we have to be objective and take a few simple precautions. Here’s how to avoid reflection in glass photography:
Move Closer to Your Subject
By standing close to the glass surface, you will reduce unwanted reflections that may interfere with your picture. The lens can even touch the glass, preferably with a collapsible rubber lens hood as a buffer.
You can remove most reflections while taking pictures by simply moving closer to the glass. This is the ideal solution for shooting through a window, since it effectively turns the window pane into a second lens protector. But in museums, getting that close to glass cases is generally frowned on — and it may even set off an alarm! So with museums especially, you’ll need to have a few other tricks up your sleeve.
Use a Polarizing Filter
Use a polarizing filter to eliminate reflections or if you have no choice but to shoot at an angle that will retain some reflections. If you want just enough or a little bit of reflection, carefully watch through the lens as you rotate the polarizing filter until you get your desired result. Of course, if the reflections interest you, be sure you are not polarizing them out of the photograph.
Polarizing filters aren’t always an ideal choice. Many windows are already polarized, so using a polarizing filter can introduce bizarre effects. If you’re using a polarizing filter and you notice rainbow-colored striping in your image — or a pattern that looks practically psychedelic — then you’re trying to shoot through a polarized window.
Do Not Use a Flash
The light will only bounce off the glass, leaving a bright glare spot and little else. If a display is dimly lit, stabilize your camera on a tripod or nearby ledge and take as long an exposure as necessary. In museums that don’t allow tripods, just push your ISO up so you can get a sharp image with your camera handheld using a shutter speed of at least 1/60th of a second.
Remember that if you’re taking glass pictures on automatic settings like Portrait Mode, Macro Mode, or Landscape Mode, most cameras may try to engage the flash automatically. Shooting in modes like Aperture Priority, Shutter Speed Priority, and Manual can keep the flash from popping up.
Use a Wide-Angle Lens
This is a good tip for photographing anything that’s behind glass in fairly confined quarters, whether it’s a museum display case, a diorama, a store window, or even an aquarium. A wide-angle lens allows you to take in a broader expanse than other lenses and lets you work at a much closer range.
Using a macro lens capable of achieving a closer focusing distance will also help you achieve this goal. Regardless of the lens you use, remember that you can always crop out reflections or portions of images that don’t suit you later on. Your primary goal while shooting should be to avoid reflections directly on your subject.

Use a Backlight
When the primary lighting source is on the other side of the pane of glass, it’s much easier to avoid reflections. If you’re in a room or situation where you can control the lighting, one of the easiest ways to avoid reflection in glass photography is to turn off any lights behind you. Shifting to a more backlit scene may be all you need to remove reflections.
Regardless of backlighting, you may still be able to see your own reflection in the glass. Wearing dark colors will help you blend into your surroundings if the scene is backlit. In most cases, dark and especially black clothing will eliminate your reflection. Patterned and light-colored clothing will always result in more complex reflections.
Check Exposure Carefully
Whether you are shooting from the inside out or the outside in, there may be a considerable light differential between the two sides of the glass. To get good exposure on both sides of the glass, meter the brightest and darkest areas within the frame. If the difference is several f/stops, you may have to opt for proper exposure on only one side, leaving the other extreme either under or over-exposed.
If you want both extremes well exposed, you can use an HDR computer program to combine three or more separate, bracketed shots taken at different exposures – but your camera has to be on a sturdy tripod so the composition in each shot will remain identical. After you download these three images, the HDR program sandwiches them into one well-exposed image.
Playing with Translucency
The third property of glass, its translucency, has made it ideal for the inspired creations of stained glass artists through the ages. The magnificent windows of Europe’s medieval cathedrals draw crowds to this day, and stained glass touches abound in architecture around the world.
Fortunately, the gemlike beauty of stained glass is not hard to photograph and there are simple remedies for the problems photographers do encounter:
Watch Where You Aim
When we look at stained glass, we tend to turn spontaneously toward the brightest light and our eyes have the capacity to accommodate the disparity between the highlights and more subdued areas. But if we aim our cameras toward the sun, we’re likely to produce a high-contrast image that may distort the true colors of the stained glass. For better results, turn your camera toward an area of stained glass where the light is more uniform.
Compose Your Photos Thoughtfully
Frame your shots so they make sense of the design of the stained glass. Here is a good place to take overviews, vignettes, and details using the range of your zoom lens from wide-angle to telephoto. These can show the general setting for the stained glass, such as a chapel; as well as telling segments that reveal elements of the design.
Experiment for Good Color Rendition
Those jewel-like colors we love in stained glass may need different exposures for the truest rendition. Since you probably can’t get the ideal exposure for each color you see, take a series of shots at different settings on your white balance menu. When you see the results, you can decide which variation is best for the colors. Or, you may discover some interesting psychedelic effects that enhance your image even if the colors are not exact.
Glass Photography Setup and Preparation
Here are some important glass photography and studio setup tips:
- Safety-proof your studio—make sure that your area is free of messy cables and cords, and choose a large, sturdy shooting table.
- Clean the glass object first (any dust, smudges, and fingerprints may show up on your photos).
- Place your camera on a tripod to keep your shots consistent all throughout. This will also let you shoot at a low ISO.
- Use a translucent Plexiglas shooting table to make your background more conducive to various lighting techniques such as backlighting.
- Adjust your white balance according to your lighting setup.
- Go slowly and systematically when changing any variables in your setup (lighting position, exposure settings, etc.).
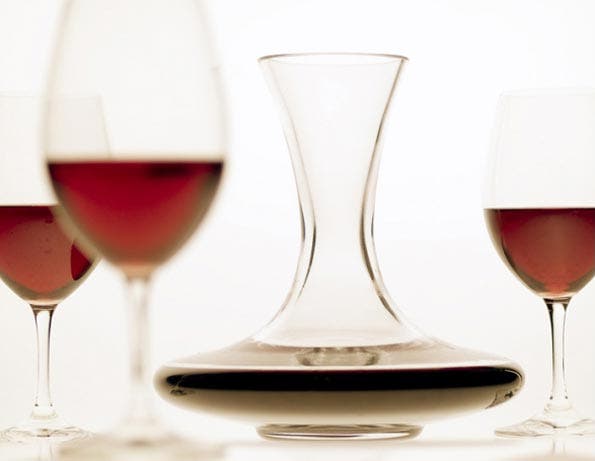
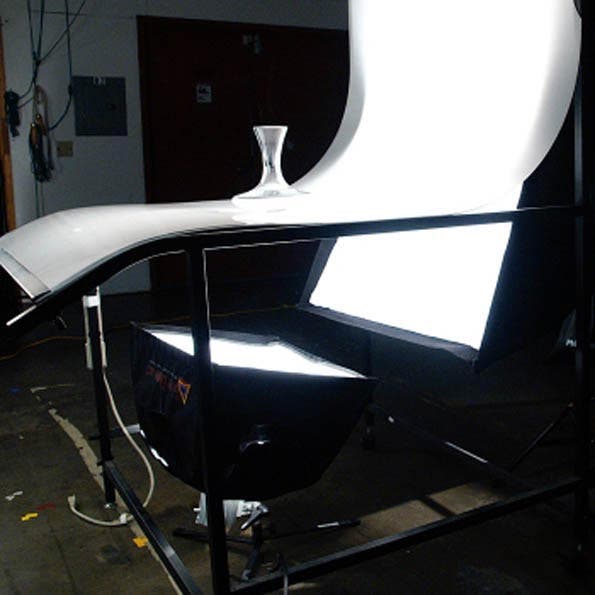
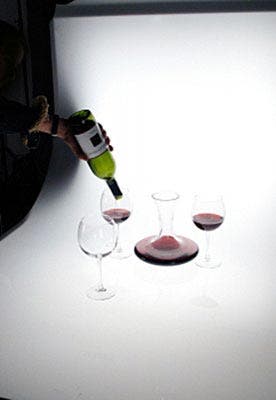
As with most commercial product photo-shoots, the easiest way to create a wine shot like this is to start simple and work step-by-step, changing only one thing at a time. In this situation, I knew that I had several issues to think about right from the start, including lighting, composition, and of course, the wine. I did not want to get ahead of myself by pouring the wine before we knew exactly how to light and arrange the glass objects. I decided to start out by placing the empty decanter on a Plexiglas shooting table.
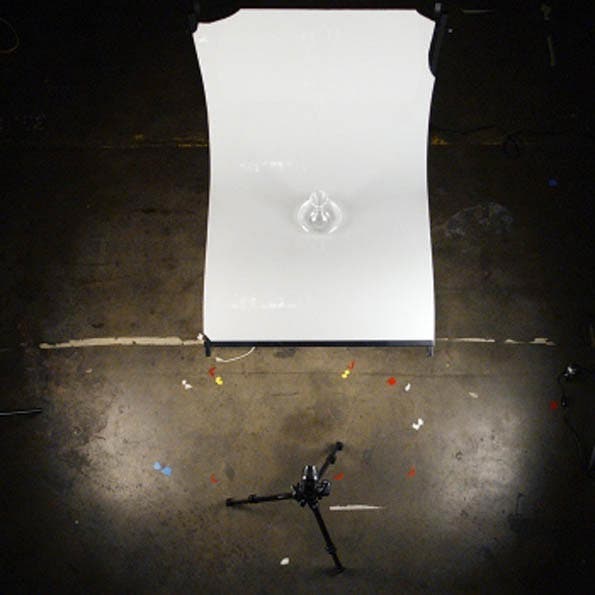
This kind of shooting table is commonly used in the studio. It is basically a metal frame, which supports a custom made acrylic sweep. As you’ll see, this kind of table is extremely versatile for many tabletop product photography applications.
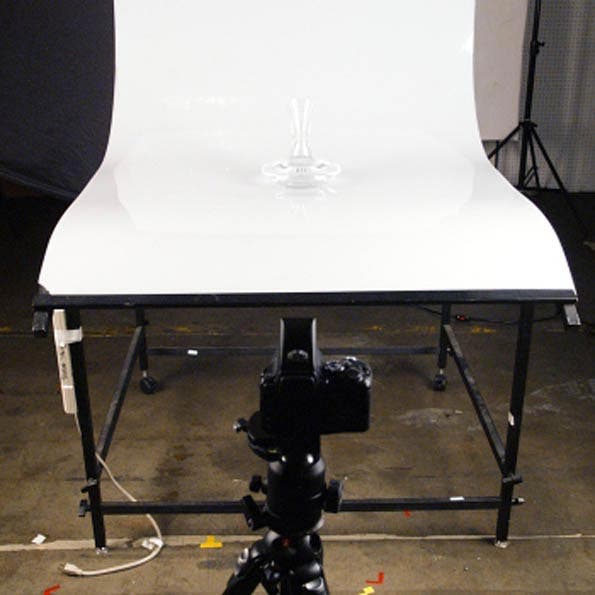
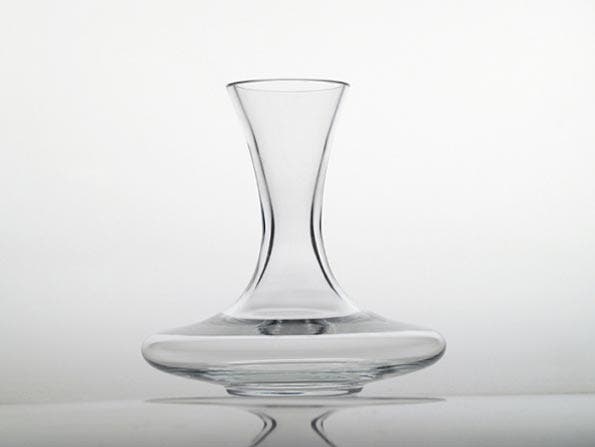
In order to provide a basic starting point, I wanted to first shoot the decanter with my camera set to fully automatic mode. I took my first shot with the built-in flash activated to show an example of how this approach would render a glass object on a reflective white background.
The result is one that many novice photographers who have tried to photograph glass objects have probably seen before. While this somewhat abstract representation of shadows and specular highlights is kind of interesting, it’s definitely far from the look I had in mind.
Experimenting with Side Lighting
I switched the exposure mode in the camera to manual and went about lighting the decanter. My first goal was to dial in the lighting on the decanter. I wanted to do my initial lighting tests using the decanter by itself. Only after I was satisfied with the lighting on this single glass would I be ready to add the wineglasses and then the wine.
When shooting products in the studio, it’s very easy to get ahead of yourself and try to do too much at once. I recommend doing things slowly and systematically, changing only one element at a time. This is why it can be very helpful to learn by following along with tutorials. Digital technology supports this approach by allowing you to preview every change you make on the back of the camera or tethered computer.
For the following shot, I set up a soft box attached and positioned it to the left of the table.
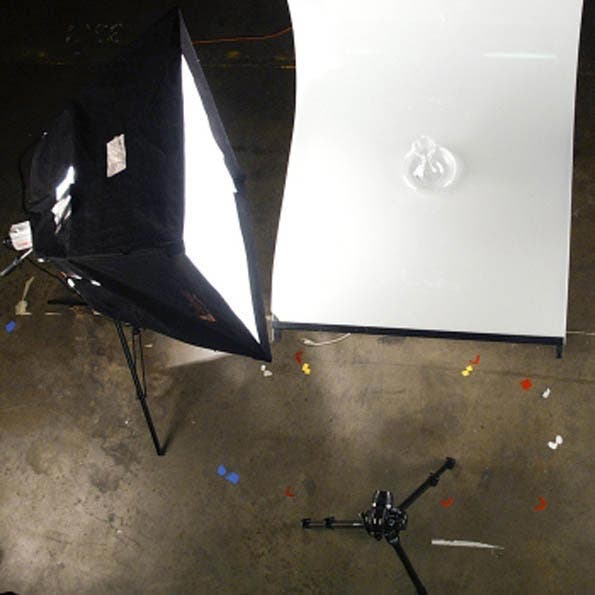
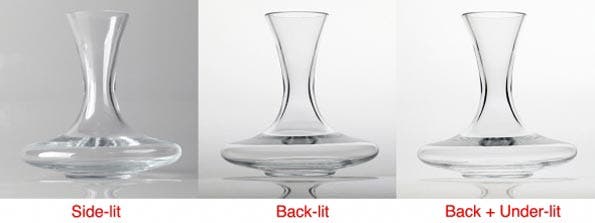
This side-lit result is drastically different from my initial attempt using the built-in flash. Although this is not the look I was after, you can still see what a difference there is between using a large soft box and a tiny camera flash. With the soft box, you can see long rectangular reflections in the glass, which helps to define the shape of the object.
Overall, this shot is a perfectly valid and elegant approach to photographing glassware. With some fine-tuning and maybe a second light or reflector on the right side of the decanter, this kind of lighting could produce a beautiful result.
This one or two-light technique is a great way to photograph multiple objects in the studio on a white background, or even a black background. It works just as well with opaque objects as it does with translucent ones. With a little more finesse, we can take this tabletop approach even further by adjusting the location of the light source behind the decanter for a reflection-free, high key image using only a few simple techniques.
Using the Backlighting Technique
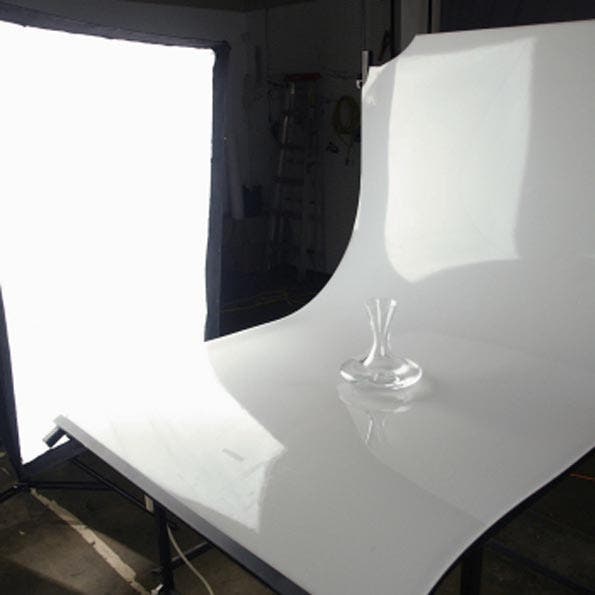
An alternate way to light glass objects is to use backlighting, a common studio technique that involves placing the light directly behind the glassware. If you’re using a large soft box, or shooting in a light tent, it can serve as the backdrop for the shot. This is where the Plexiglas product-shooting table really makes things easy. Because light can pass through acrylic very effectively, we can light the decanter from any direction we want. I placed a large Photoflex SilverDome soft box behind and as close as possible to the Plexiglas sweep so that its projected light would fully illuminate the translucent background. It’s important to remember that while this technique works perfectly with a white background, you’ll need to use other methods to backlight with a black background setup.
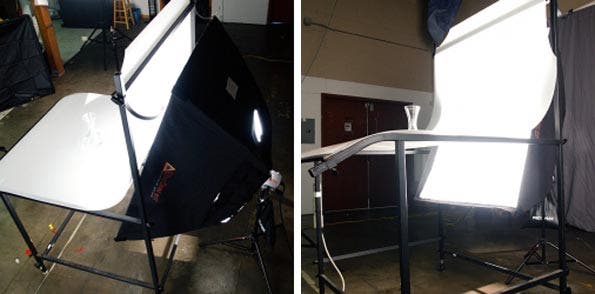
To do this I used a Small Photoflex LiteStand that would allow the soft box to be positioned lower to the ground. This also allowed me to point the SilverDome up at a slight angle to cover more of the Plexiglas and create a more even spread of light across the background.
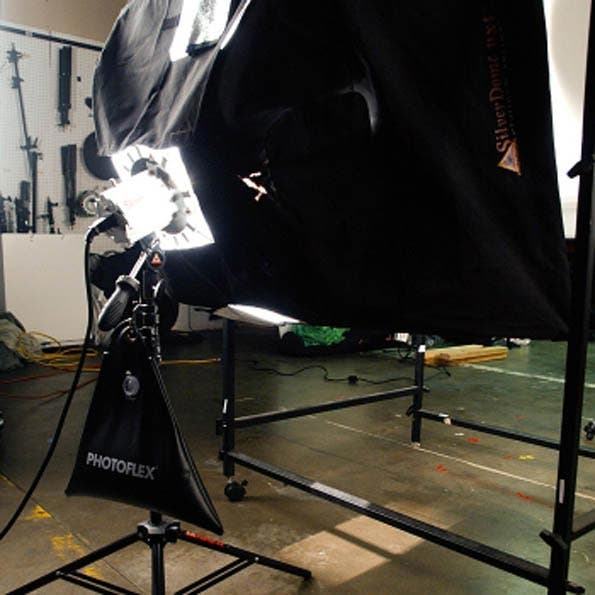
Technical Note: When you have a large soft box on a relatively small LiteStand, make sure to position one leg so that it is pointed in the same direction as the light is directed. This will also prevent the LiteStand from tipping forward and falling over.
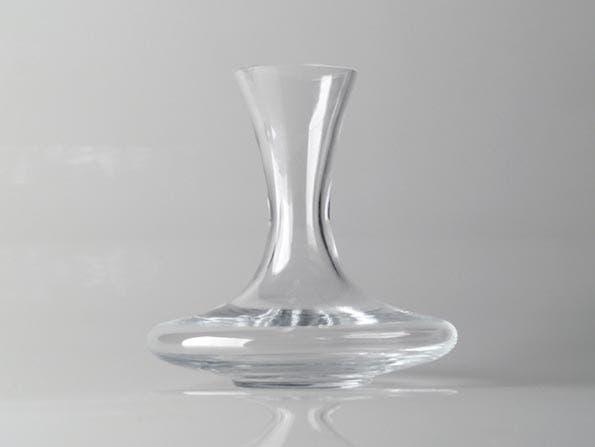
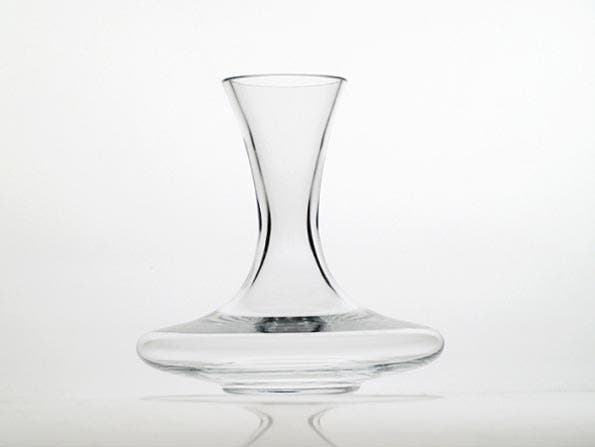
The image below is the result of using this kind of backlight setup. As you can see, the light source itself serves as the white background for the shot. This results in absolutely zero reflections on the surface of the glass. The glass object is more or less silhouetted against the light and all we can see is its contour, which is outlined with an elegant, black edge. This was definitely a step in the right direction for the type of look I wanted to create.
Adding a Second Light
In reviewing this last shot using the backlighting approach, I decided that the bottom of the decanter felt a bit too heavy and dark. I preferred to create the impression that the decanter was lighter, almost as though floating in white space. To do this, I positioned another StarLite, fitted with a small SilverDome soft box, underneath the shooting table using a Background LiteStand. I then pointed the light up through the Plexiglas. Because this second light is aimed through the acrylic table and the object itself, it could also be considered a backlight.
In the result below, you can see the difference this second light has made. Now I have a much more even white background all the way to the bottom of the frame and the decanter has a much lighter feel to it. The mirrored reflection on the Plexiglas surface had almost disappeared, which is just what I wanted.
Below is a side-by-side comparison of the shots taken so far.
Creating a Pleasing Composition
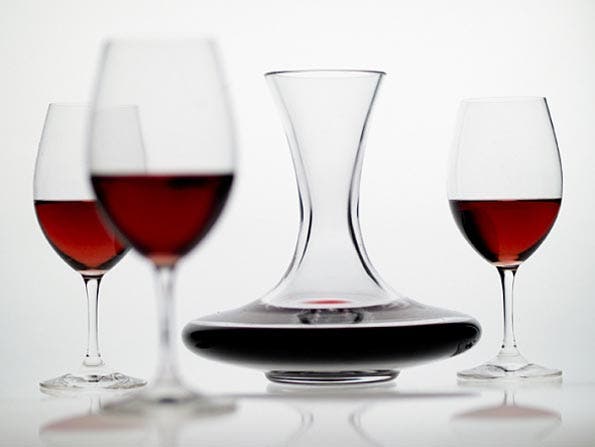
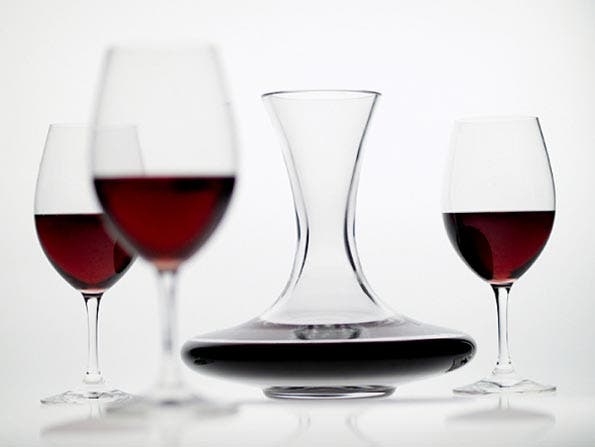
I was confident with the lighting setup at this point and was now ready to work on the composition. After a few variations using different kinds of wine glasses, I arrived at the image below.
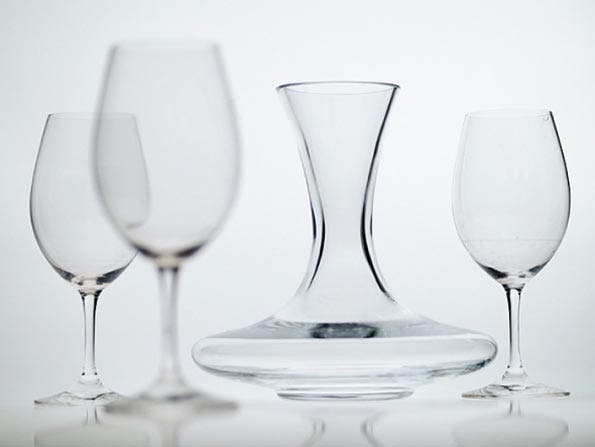
In this shot, the decanter was positioned slightly off-center with two wine glasses on either side at varying distances. The third glass was positioned well in front of the other two, which makes this glass appear much bigger than the other glasses and decanter. I used a wide-open aperture (f/2) in order to selectively focus on the decanter and the two adjacent glasses while leaving the glass in front completely out of focus. I felt that the selective focusing technique added a sense of intimacy to the shot, making the glass in front appear very close to the viewer. Even product shoots can use creative photography techniques for a more pleasing composition.
If you think about the way you normally perceive close objects, you’ll notice that your eyes have a limited depth of field, just like a camera. This is especially obvious when you try to simultaneously look at an object that is very close and one that is very far away. To experience this effect, simply hold out your hand in front of your face and try to focus on both your hand and the distant background at the same time. You’ll find that you can only focus on one or the other, but not both.
The selective focusing, or shallow depth of field, technique in photography is often used to simulate the way we normally perceive close and distant objects. In this case, I hoped to create a sense of depth and distance by purposely throwing the front glass out of focus. By using a wide open aperture, I’m also freeing myself to use a faster shutter speed and a lower ISO and still have enough light in the image.
After I had fine-tuned my composition, I was now ready for the fun part – pouring the wine!
However, this proved not as straightforward as one might expect. As it turns out, red wine is quite dense or opaque in color.
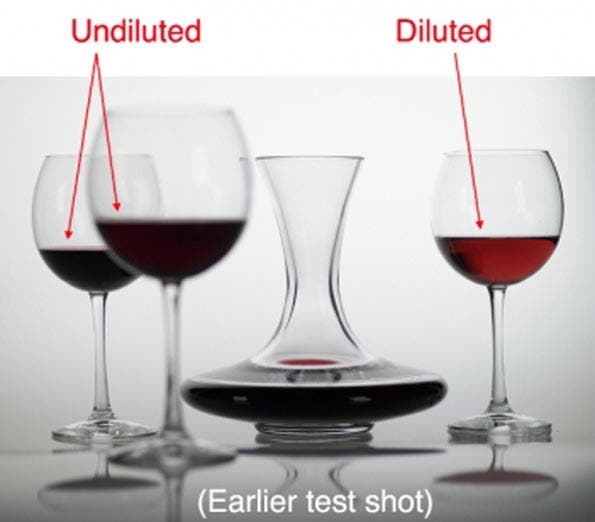
Dilute the Content
In order to see any color in the wine, I had to dilute it with water to about a 1:1 ratio. It’s not the best thing to do if you plan on drinking the wine (so use the cheap stuff!), but it sure helps to thin out the color and make it more visible in the photograph. Without diluting the wine, I would end up with glasses filled with a mysterious, black, colorless liquid. The dilution brings a pop of color into what would otherwise feel like a black and white image.
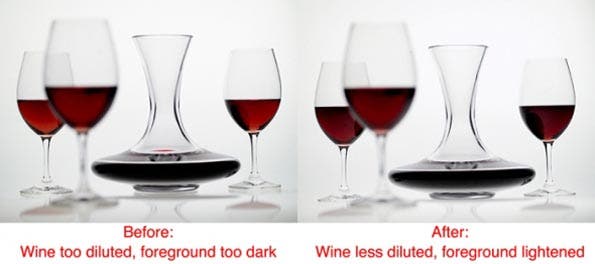
The shot below was taken with the same lighting conditions and camera orientation as the previous result, only this time with the diluted wine carefully poured into the decanter and glasses. My final shot was nearly there. All I had left to do was a few minor tweaks and adjustments before I was ready to take this photograph into the post-production stage.
Fine-Tuning the Lighting
One minor adjustment I wanted to make was to slightly increase the intensity of the floor light. I noticed that having the wine in the shot caused the reflections on the bottom to darken a little bit. To compensate, I raised the Background Stand up by placing some wooden boards under it.
The other thing I noticed was that the dilution of the wine was a little too strong, as it looked too light to pass for real red wine. To fix this, I added wine to each glass in small, carefully measured increments until each glass had just the right color density. Finally, I was able to achieve a rich red color that was true to the way it looked in person. A little bit of trial and error can help you find some simple techniques for the perfect look.
Below is a side-by-side look at the last two shots for a closer look at the changes made.
Tips for Creative Glass Photography
Sometimes the subject you intend to photograph is made of glass or a highly reflective surface. In those cases, it pays to learn how to photograph glass effectively. Photographing objects like glass vases, bottles, framed art, and glass sculptures can be incredibly frustrating if you don’t know how to deal with their innate reflections.
Fortunately, there are a few common and easy techniques for photographing glass and other highly reflective objects without reflections.
Combine Multiple Exposures
One technique for photographing glass is to take several images and then combine them in Photoshop or Lightroom.
For this method to work, you’ll need to ensure that your subject and your camera don’t move from image to image. Use a tripod and a stable surface for your subject. Use light sources that you can reposition between exposures. Try lighting your subject in a variety of ways. As long as each image features a portion of the subject without reflections, you can combine the frames in post processing to eliminate reflections.
Polarize Your Light
Using a polarizing filter won’t always eliminate reflections. Fortunately, if you’re in a studio setting you can use additional polarizing gear to completely remove all reflections. The trick is to polarize your light source as well as your lens.
Polarizing film is easy to use with many portable light sources like flashes, LED lights, and other compact fixtures. If you’re using larger light sources like softboxes, then you’ll need a big sheet of polarizing film.
If you’ve ever wondered how automotive photographers get such fantastic images of cars without reflections, now you know! Take advantage of this trick the next time you attempt creative glass photography.
Other Helpful Tricks
If all else fails, Dulling Spray is designed to temporarily remove an object’s reflectivity, so if you’re photographing glass soda bottles or other reflective objects, you can coat them with Dulling Spray with no lasting effects.