One of the advantages of film photography was that it was relatively easy to make a pinhole camera. You could learn a lot about how cameras work by making one, and it is still a great way to teach kids about the technical side of photography.
Unfortunately, with the advent of digital photography, pinhole photography has fallen by the wayside…until now. Read how Utah-based photographer Rich Legg helped his daughter build a digital pinhole camera for a school science project, then celebrate World Pinhole Day by making a digital pinhole camera yourself! –Ed.
My eighth grade daughter chose to make a pinhole camera for the science fair and asked me to help out. With this being the 21st Century and all, we opted to make a digital version.
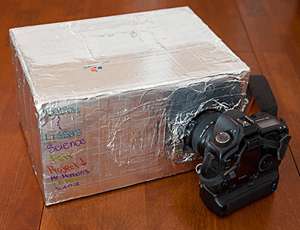
It was actually fairly simple to create. She, along with a schoolmate, took a cardboard box and covered it in foil tape to guarantee that it was lightproof. For the lens, a piece of aluminum soda can was used with a needle hole punched in the center. In place of film on the inside of the box, she put a sheet of white paper.

Shot with a home-made digital pinhole camera!
To add the digital part, a hole was cut in the front of the box next to the pinhole lens. It was through this hole that the digital SLR was used to record the pinhole image being displayed on the rear of the box’s inside. To eliminate any light leaks around the SLR lens, a combination of a rubber gasket made from a bicycle tube and foil tape was used. The lens was set on manual focus at its closest setting.
For exposure, she did a bunch of trial-and-error test shots (pretty much just bracketed her shutter speeds). She was eventually able to produce some fairly good images. In hindsight, I would have suggested that she used a smaller aperture on the lens to increase the depth-of-field and overcome the blurred left side of the frame.
All in all, I like what she came up with. It was pretty cool to see the image the was captured through a pinhole in a soda can. Canon 5D, Canon 24-105 f4/L lens – 40 seconds, f/4, ISO 3200
Step by step
The design is very simple and straightforward–a box with a pinhole in it. She began with a leftover Christmas gift box. The first step was to paint the interior flat black and attach a piece of white paper in the back to act as a screen to display the pinhole image. After doing this, she covered the whole box in aluminum foil tape to ensure that it didn’t have any light leaks.

The next step was to create the lens. For this, I cut out a piece of an aluminum soda can with scissors and she carefully punched a hole in it with a needle. This small piece of metal (approx 2×2″) was then placed over a hole that she cut in the front of the box and sealed with more foil tape.

After putting the lens in place, I helped her cut a hole next to the pinhole to be able to attach a digital camera body and lens. After cutting the hole, she lined it with a rubber gasket that we made out of an old bicycle tube. The camera was placed at a slight angle so it could capture the pinhole image projected on the back of the box. After mounting the DSLR to the box, she put foil tape around the opening to seal off any light leaks.
Exposure: Trial and error

Once the camera was complete, she then went to work testing it out. I helped her by providing an exposure starting point, which was 30 seconds at ISO 3200 with the DSLR lens wide open at f/4. Working with a classmate, they worked on bracketing their exposure times to find out which would give the best result.
One thing she learned in testing the camera was that the viewfinder of the DSLR had to be covered. Light was entering the box through the viewfinder during the beginning of the exposure and causing problems. One other recommendation that I would add is that a sharper image could be obtained by using a smaller aperture on the DSLR, but she liked having the relatively shorter exposure times with the digital camera set wide-open.
I have to admit that I had a lot of fun helping with this project. The final results were much better than I expected when she started.
(One final thing that needs to be noted is the website that she found when researching the project. The page located at ScienceBuddies.org helped her with her design of the project.)
Rich tells us that his daughter won an “originality” award from her school’s science fair for her digital pinhole camera!


