Open up those shadows!
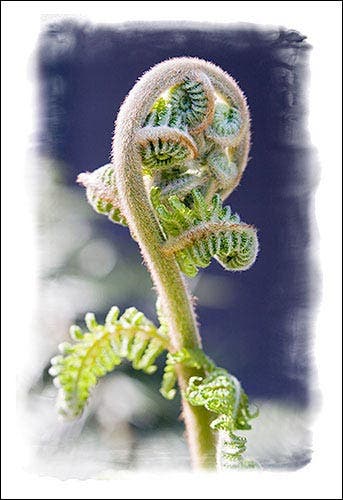
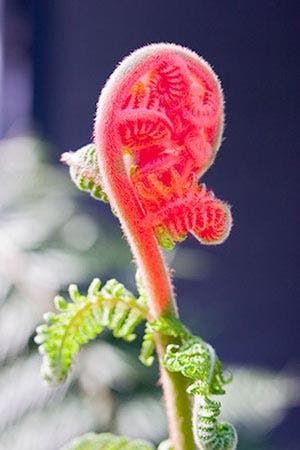
Fiddlehead Fern #10, © Diane Miller How did I bring this under-lit subject out from the shadows using Adobe Photoshop CS2? Read on for my step-by-step details!
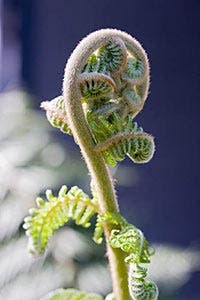
I love fiddlehead ferns, and when I found this one I was determined to shoot it although the only way I could get at it was from the shady side. It needed fill flash, but there was no way. I was hand-holding, leaning as far as I could over a railing with my feet barely touching the ground. I couldn’t increase the exposure without blowing out the highlights. I couldn’t make several exposures to combine later because I couldn’t get my tripod into a useable position. And I was using the camera and my head to push away intervening foliage, which blocked the flash. But Photoshop will save the day, with a masked adjustment layer to lighten the head.
In Artistic Photomontage Effects, previously published here, I used a powerful technique to select an area of an image to darken. It is something I use on virtually every image. It is the equivalent of dodging and burning in the traditional darkroom, or a split neutral density filter on steroids. Let’s see how it works as a traditional darkroom tool.
Here’s the unretouched image:
I’m using Photoshop CS2, but this should work on future versions. You may be able to use other programs. In order to utilize this technique fully you need an image editor that allows masked adjustment layers. Some have workarounds for some features they don’t support directly. Of course, menus will be different in different programs and versions. And I’m speaking Windows here–if you use a Mac substitute Cmd for Ctrl and Option for Alt.
Adjustment Layers
Before we jump into the fun, let me demystify adjustment layers and masks for those who think they are difficult. When I want to make an adjustment to an entire image (darkening, lightening, contrast, color balance, saturation, etc.) I make an adjustment layer rather than making changes to the actual image in the Background layer. The adjustment layer hovers in cyberspace above the Background layer and only changes the appearance of the image, somewhat like a filter. If you make an adjustment to the image itself and then later reverse it, you have lost tonal information that you can’t get back. Why do that when you can use an adjustment layer?
The technique I will show you here uses a mask on an adjustment layer. The mask limits the adjustment’s effect to part of the image.
A mask may sound complicated but it isn’t–it’s just another way to represent a selection. It shows a much better view than the “marching ants” (the dotted lines marking the selected area of an image) because it can show feathered edges and other partially transparent areas. It’s like looking through a stencil that can have partial opacity, whereas the marching ants only show areas more than 50 percent selected. With the click of a mouse you can convert a selection to a mask and vice versa. Nothing intimidating here.
There are two approaches to making a masked adjustment. Most people tell you to make the adjustment layer and the adjustment first, and then mask out the areas you don’t want to be affected. I’m going to show you a better way. We’ll make the mask first (an approximate shape is ok–you can refine it later) and then make the corrections only to the desired areas.
I like to do it this way because I can judge the correction much better if it is being applied only to the part of the image I want corrected. And after I have made the correction I can tweak the shape of the mask with complete control. Since the masked layer will remain part of my master file, I can modify it any time in the future–either the amount of the correction or the shape of the mask, or both. If I decide to change the strength of the correction I often need to tweak the edges of the area affected.
Here’s what I need to do to add fill flash to the fern: I’ll go into Quick Mask mode and use a soft brush to paint the area I want to brighten. Then I’ll come back out of Quick Mask to Standard mode, which gives me this area as a selection. Then I’ll make an adjustment layer (for Curves, in this case) which will automatically have the selection incorporated as a mask. Photoshop will do all the work for me–I only have to tell it what I want. I like that!
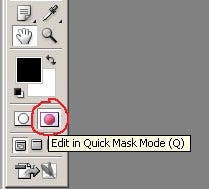
To get into Quick Mask mode you can click its icon at the bottom of the Tools Palette (circled in red in the figure below) or just hit the “Q” key. This changes the active layer in the Layers Palette from blue to gray.
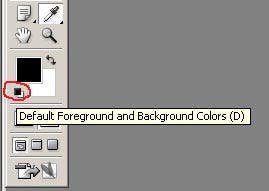
Choose a brush of the appropriate size and hardness for the area you want to lighten. Click the Foreground-Background Color icon at the bottom of the Tools Palette to make the foreground (brush) color black, and make sure the brush opacity is 100%.
Then just paint in the area you want to lighten. You’re making a best guess–you can tweak its shape if you need to after you’ve done the correction. The mask will be translucent to allow you to see what you’re painting over, but if the brush opacity is set at 100 percent, the areas you paint will be 100 percent selected. For a soft brush, the feathered edges will paint an area that is partially selected, which is just want we want. That means the strength of the adjustment will taper off at the edges.
In most cases you want a soft edged mask/selection. This method is so much better than the old idea of making a selection with the Lasso Tool and feathering it, because here you can have the edge softer in one area and harder in another, and you have total control of its shape. The figure below shows the mask I painted.
After the mask is done, hit the “Q” key again to return to Standard Mode and you have a selection, but the area you didn’t paint is the selected area. Although the marching ants outline the area you painted, you’ll see that they also outline the rectangular border of the image. It is the area enclosed by these two rows of ants that is selected. You need to “inverse” the selection by going to the menu bar and choosing Select > Inverse. (“Invert” has another meaning in Photoshop–the change from a positive image to a negative.)
By the way, you can change a Photoshop default so you are painting the selected area, and you don’t have to inverse the selection. (I almost always paint a fairly small area that I want selected, rather than one I want protected.) You can double-click the Quick Mask icon and get a dialog box that lets you choose the option to make the painted areas the selected areas.
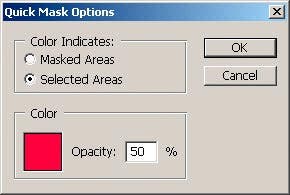
Here you can also change the mask color and opacity. If you’re working on a red rose you can click on the red color swatch to change the mask color. Sometimes you also need to change the opacity in order to better see the mask or the detail under it.
By double-clicking on the Quick Mask icon to change the defaults you have gotten yourself into Quick Mask mode, so you’ll have to click the Standard Mode icon, to the left of the Quick Mask Icon, or just hit the “Q” key again, to get back out.
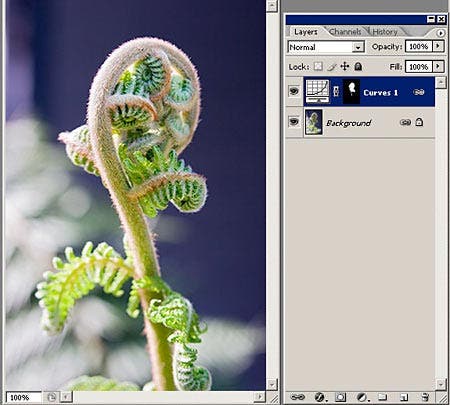
So, now that you have your selection, you can make an adjustment layer (from the menu bar, Layer > New Adjustment Layer) and the selection is automatically incorporated as a mask. You can see the mask thumbnail, just to the left of the layer name, Curves 1, in the figure below.
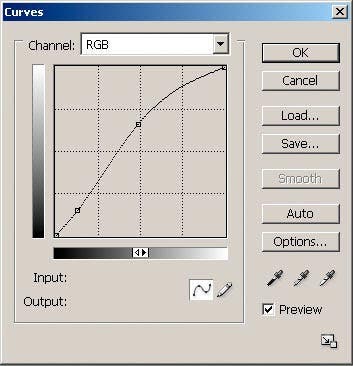
Below is the Curves adjustment I made, which has lightened the fern head dramatically. I use Curves rather than Levels in cases where I want control over contrast. Generally when you lighten an area you lose contrast, and when you darken it you gain too much. Curves is a subject for another tutorial. If you are not comfortable with it (or your software doesn’t offer a Curves option) you can use Levels, but you should learn Curves when you can.
When you have the adjustment made, click the visibility icon (eyeball) of the Curves layer on and off several times, watching the edges, to see if you need to tweak the mask shape. You may need to zoom in to as much as a 100 percent view to see fine details.
I saw I had been a little sloppy drawing the mask. The left edge of the selected area went a little too far into the highlight area, and on the right edge it didn’t cover enough of the dark area. And the area going down the stem needs to be feathered at the bottom. But I can fix it easily.
You have three options for tweaking a mask. 1) You can make it visible and paint on it, 2) you can paint on it without its being visible so you can better see the effect directly on the image, or 3) you can see the mask in black and white without the image, so you can patch up flaws you didn’t see in the translucent version over the image.
Option 1) In order to make the mask visible, make sure its adjustment layer is the active layer, then go to the Channels palette. Here you will see the RGB channels of the image itself, and if you have saved selections you will see them below as additional channels. You will also see another channel below these if the active layer is an adjustment layer with a mask. This channel will be named with your layer name and the word Mask. Turn on the eyeball for that channel and you will see the mask, with the default representation of the colored areas representing protected areas, even if that is not how you have the defaults for drawing it. (Heads up: you’re not in Quick Mask mode. You are only seeing the mask.)
To turn off the mask, click off its eyeball. Step back in the History palette to see your changes. Click on the state before your first brushstroke for the “before” view, then click on the last (bottom) state to take you back to the “after” view.
Option 2) If you can visualize where the mask is, you can paint on it without making it visible. If its adjustment layer is the active one, you can go into the image window with a brush and paint away just as you did in option 1. You will see the changes to the image as the shape of the mask (the areas it effects) changes.
Option 3) To see only the mask, in black and white, Alt-Click on the mask thumbnail for the adjustment layer. This lets you use the brush as above, to touch up flaws you can’t see in the translucent view. Alt-Click again to toggle back to the normal image view.
It is sometimes necessary to use the Clone tool to patch softly feathered or gradient areas. If you need that level of precision it is best to work in the mask-only view of option 3.
I used option 1 to touch up the mask, so I could see the areas that needed more work. I used a small, fully soft brush, with the foreground color set to black, to add to the red areas. If I needed to erase red I changed the Foreground color to white. If I needed to, I could set the brush to partial opacity.
After I tweaked the mask I wanted to try still more lightening, in the center of the first lightened area, so I repeated the process with another adjustment layer with a second, smaller mask.
You need to be careful of overdoing adjustments, both local (masked) and global (applying to the entire image.) It is easy to get drawn in and it becomes difficult to see when you have gone too far. I like to compare several levels of adjustment by opening them on screen side by side, or comparing prints.
Here is the final image with the adjustment layers.

This technique really shines when used on a face. In anything less than perfect lighting a face can be flat. If you want it to be the center of attention, its contrast and brightness should make it stand out. For a face, as with the fern, you want a soft-edged mask. You don’t want the mask to extend beyond the edge of the face (you don’t want to lighten the background), but it is OK if the mask stops short of the edges. That gives a 3D effect to the lighting, and if you are subtle about the adjustment nobody can tell it isn’t natural. You’ll learn how soft to make the edges. It will vary with each case, and with the strength of the fill flash. Try it–you’ll be amazed.And of course, this masking technique isn’t limited to fill flashadjustments. You can use it for any kind of adjustment layer.
Whenever I make a masked adjustment layer I link it to the Background layer to prevent it being moved. You could have the Move Tool active and inadvertently drag it across a layer. That will shift the the position of the mask and you might not notice until you have made a print–or several!
Diane Miller is a widely-exhibited freelance photographer who lives north of San Francisco, in the Wine Country, and specializes in fine-art nature photography. Her work, which can be found on her web site, www.DianeDMiller.com, has been published and exhibited throughout the Pacific Northwest.
