Check out Los Angeles photographer Brian McCarty’s techniques as he creates….THE TRICYCLE TERROR!
Guest author: Brian McCarty
Merging fantasy with reality is what Brian McCarty does best. There’s a lot of whimsey in Brian’s work, but to make his work feel authentic, Brian relies on the world’s best lighting equipment, made by Photoflex.
The Concept
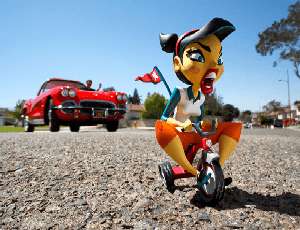
On what seemed like an especially warm, sunny day in July, I headed down to Orange County for a photo shoot of a toy called “Tricycle Terror.” The character might as well be the tough, tomboy cousin of Red Hot Riding Hood from classic Tex Avery cartoons. And it’s no wonder.
Her creator, Scott Tolleson, has spent over a decade in-house as a Disney artist, drawing from a range of influences that include everything from classic pin up art by Gil Elvgren to masterful character design by Ward Kimball.
I was determined to capture the Tricycle Terror girl in a scene reminiscent of her cartoon heritage. For as wacky as classic animation can be, a dark edge and sense of peril is often a central theme. It’s setup for the real laughs that come from seeing how characters humorously outsmart their pursuers.
I decided to show Tricycle Terror mid-story, in the tension build up to whatever came next. To achieve this, I took over a cul-de-sac and brought in a classic 1962 Corvette to act as a car in pursuit, complete with irate driver hanging out the window.


LitePanels and LiteDiscs: A Whole Lotta Bounce
Photoflex’s LitePanel Kits and LiteDiscs were integral to my lighting design. A 39×72 LitePanel with white fabric was set up to softly bounce fill on the front of the car.
One of my assistants held a 39×39 LitePanel with silver fabric attached off camera left to provide an edge light on the driver hanging out the car window, while my other assistant, just outside the frame on camera right, held another 39×39 silver LitePanel to provide front fill for the driver.


And finally, I handheld a white 12″ LiteDisc off camera right to bounce in fill for the toy and surrounding asphalt, which felt like a 1000 degrees!
Portable Shade
To make working within a few inches of the hot asphalt a little more tolerable, I suspended a 32″ LiteDisc over the camera and me via a Compact LiteDisc Holder and LiteStand. The small amount of shade it provided made a world of difference!


A Reason For Post Production
With the car in place and set lit, it was time to capture the action. The toy’s designer played the part of her pursuer, doing a fantastic job. As anyone who has spent time around classic Corvettes will tell you, the door opening is relatively tiny. To get Scott in the proper position, I had to cheat a little and have him open the door and place his foot on the ground. This was easily removed in post afterward, and ultimately, his body positioning read as I wanted it to.

With the lighting and positioning where I wanted it, I was ready to shoot. Afterwards in the studio, I made only minor edits in Photoshop and I had the image I was after.

When it comes to placing toys in real life scenes, it’s paramount to have the lighting right. Take your time, do it right, and you’ll surprise yourself with what you can achieve!
Photographed and written by Brian McCarty, contributing instructor for PhotoflexLightingSchool.com
Brian is also part of the Photoflex Pro Showcase. Click here to view his portfolio.
Brian’s professional websites:
McCarty Photoworks
BrianMcCarty.com
Related Products:
- Photoflex Litepanel 39″ x 39″ White / Silver Fabric
- Photoflex Litepanel 77×77 Kit – Aluminum Frame with Translucent Fabric, Stands, Gripjaw & Case
- Photoflex MultiDisc Kit with 42″ 5-in-1 Reflector, Holder & Lightstand
- Photoflex MultiDisc Five-In-One Portable Reflector with Gold, Soft Gold, White, Silver & Translucent Fabrics, Small 22″
Learn more at the Adorama Learning Center:
- Brainstorming
- Picture-taking techniques – Outdoor portraits in the sun
- Picture-taking techniques: Outdoor portraits, Part II
- Shoot Better Environmental Portraits


