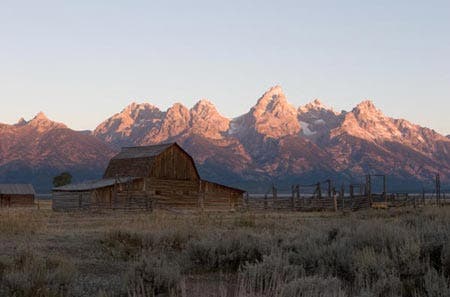
I often have an image in which I want to darken a sky, such as this one from my tutorial “A Split Neutral Density Filter on Steroids.”
The image was a compromise between proper exposures for the sky and foreground, so it had a washed-out, overexposed sky and an underexposed foreground.
In that tutorial I darkened the sky with Levels, using a masked adjustment layer mimicking a split neutral density filter. Then I used the same technique (with Curves) to lighten the foreground, giving the final image below.
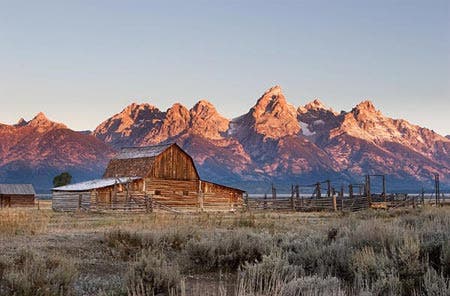
I want to use this same image to show a pitfall in darkening a sky, since a washed out sky is a common problem. At casual glance, darkening a sky can make it look great, but you need to be careful not to overdo it or you will get posterization (Posterization occurs when the number of colors in an image is limited, and the change from one tone to another is sudden, rather than continuous and gradual). I want to show you how to use the Levels histogram to see when that is happening, and how to avoid it.
I’m using Photoshop CS2, but you may use any image editor that shows histograms will do. Of course, menus will be different in different programs and versions, and I’m speaking Windows here–if you use a Mac substitute Cmd for Ctrl and Option for Alt.
What a histogram shows
To darken the sky without posterization we need to understand the information in the histogram. A histogram consists of 256 vertical lines that represent the 256 possible levels (or values), from black on the left to white on the right, which comprise an 8-bit image. The height of each line represents the number of pixels with that value, some of which may be zero. It is an important tool because it shows the tonalities of an image or part of an image.
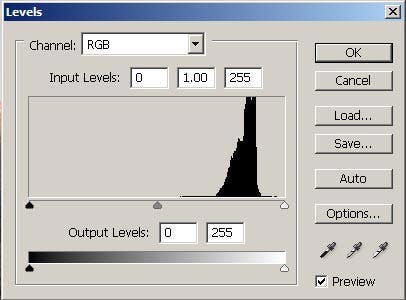
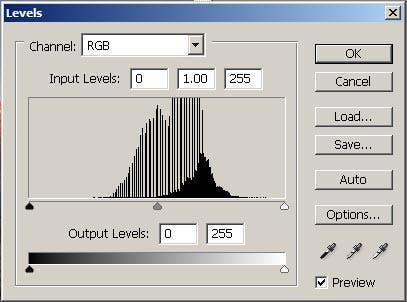
Let’s look at the histogram of the sky. Simply use the Magic Wand tool to select the sky. The tolerance value isn’t very important here–just set it to something that doesn’t extend the selection very far into areas you aren’t going to darken. With the selection in effect, make a Levels adjustment layer, which will go above your background layer. Since you have a selection, the histogram in the Levels dialog box will show the values only for the selected area, as shown in the figure below.
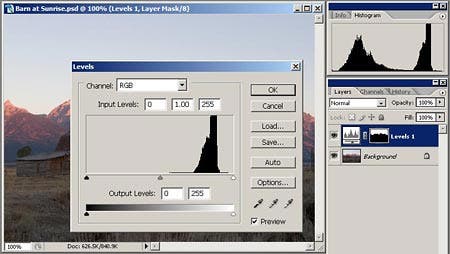
You can see the tonalities in the sky are light and don’t cover a big range.
You can see I also have the histogram palette displayed. It is a handy additional reference if you have that feature in your image editor. Here it is showing the histogram of the entire image, which you can compare to the one for just the sky. You can also see in these figures the palette layout I like to use. These are the palettes I constantly use, and I like to keep the others out of my way.
Leave the Levels layer there for later reference, but don’t make any adjustments to it. Just click OK.
We need to keep this layer above the adjustment layer we are going to make to darken the sky, so we can use it to see what the darkening does to the values in the sky. (An adjustment layer that is not grouped to a pixel layer “sees” the values of, and affects, all the layers below it.) So before you make the darkening adjustment layer, click on the Background layer so the new darkening layer will go above it and below our “sky selection” Levels layer.
Let’s darken the sky
Now let’s see what happens to this limited range of values when we darken the sky. Since the mountain tops are also overexposed, I don’t want to use the Magic Wand selection for the darkening–it would look artificial to darken the sky but not the adjoining mountains. Instead I’ll make a Levels adjustment layer masked to mimic a split neutral density filter. I’ll just do a summary of the darkening steps here, since you can refer to the previous tutorial for details.
I’ll go into Quick Mask mode and use the Gradient tool to draw a mask with a soft edge that fades out over the mountain tops. Then I’ll come out of Quick Mask mode and I’ll have a selection in effect that matches the quick mask I drew. (If you have not changed the default for Quick Mask mode, you will have to inverse the selection–see the previous tutorial for details.) Then I’ll make a Levels adjustment layer to do the darkening and that selection will be incorporated as a mask, causing the darkening to affect only the sky and tops of the mountains. But to better illustrate what I want to show you, I’ll darken the sky more here than I did before.
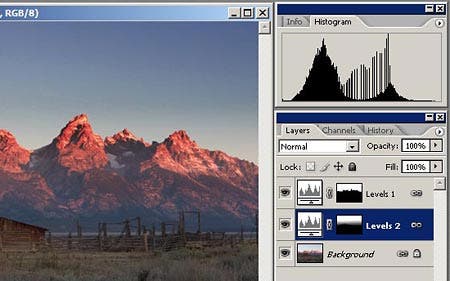
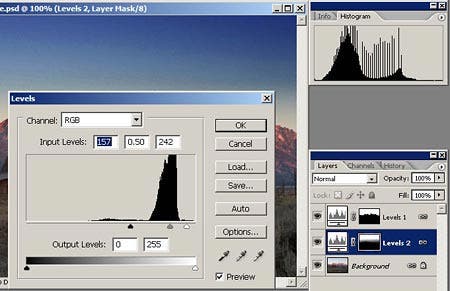
You can see the mask in the Levels 2 adjustment layer in the second figure below. Here is the darkening adjustment I made:
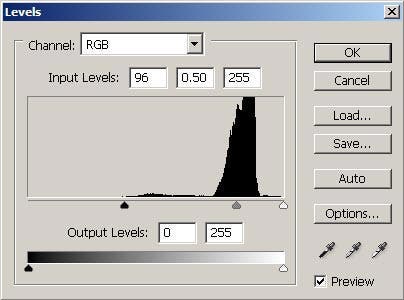
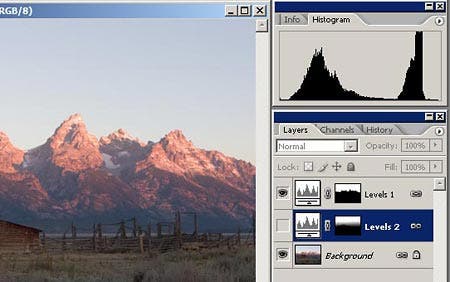
If you have a histogram palette you can see the before and after information by clicking the darkening adjustment layer off and on, using its visibility (eyeball) icon, as shown below.
After (Levels 2 eyeball on):
Before (Levels 2 eyeball off):
Now to posterization
Note the difference in the right-hand part of the before and after histogram, which represents the light values of the sky. You can see I have created spread in the values by darkening them. Since the left end of the histogram represents black and the right represents white, darkening values pulls them to the left, spreading them over a wider range and leaving gaps, which are jumps in values with no intermediate tones. This is posterization. If you have a narrow range of values to start with and you create a lot of spread, at some point it will be detrimental to your image.
Looking at the histogram of the entire image, as in the two figures above, is a little deceptive because the sky tonalities are mixed in with similar values from other parts of the image, so let’s use the Levels 1 layer to look at just the sky. This will show you the tonalities you would see in the sky portion of a print. Double-click the Levels 1thumbnail to bring the dialog box back up. Depending on whether the darkening layer is “on” or “off” (with its eyeball icon) you will see the histogram for the original or darkened sky.
Original:
Darkened:
Now let’s push things a little further. You can see in the histogram below I’ve pulled the left slider in to darken the sky even more. But the sky is also pretty drab, so let’s succumb to the temptation to brighten it up, and saturate it, by pulling in the right hand slider to bring it closer to the “information” in the histogram, as shown below. This gives a beautiful color to the sky. It might not be something we’d do to this particular image, but I’m just using it as an example. There are some images where it could be very tempting.
Now let’s see what this move of the sliders did to the sky tonalities, using our Levels 1 histogram.
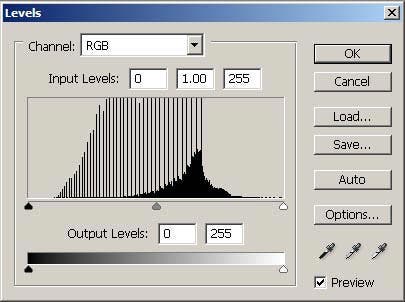
Oops–This doesn’t look so great. The gaps here are getting dangerously wide. Let’s zoom in on the sky:

This is a 100 percent zoom of a segment from the lower left part of the sky. You can see the discontinuous values in the blues. This isn’t something you can clone out, as it isn’t in the pixels themselves, but in the range of values in the image. You can also see the posterization of noise in the sky. The noise can be reduced somewhat with noise-reduction methods either in RAW conversion, in the image editor, or by second-party plug-ins.
Now you have a way to monitor how far you can go with darkening. And of course the same technique would apply for lightening a dark area. It can be tempting to go too far. Posterization will show both on your monitor and in prints, but not always to the same degree, so evaluate whichever is your intended final use of the image.
In Part 2, “Avoiding Posterization” I’ll show you how you can make fairly drastic adjustments and get away with them. This is a lot like having your cake and eating it, too–an idea which has appealed to me ever since I was a little kid.


