If you’re ready to take on product photography, let’s take a look at seasoned pro John Beckett’s techniques on how to do it right and on a budget!

Times are changing. Digital cameras and the Internet have opened a range of possibilities for many people to enter the photography field in ways we would never have thought possible ten years ago. With millions of people starting their own businesses online, there is an ever-increasing market for professional-grade photography. Some of these entrepreneurs hire professional photographers, while others will try to do it themselves.
Unfortunately, this second group often fails to achieve a professional look because they lack an understanding of their camera, lighting, color balance and a few tricks of the trade needed to do it correctly.
So, if you’re ready to take on product photography, let’s take a look at seasoned pro John Beckett’s techniques on how to do it right and on a budget!
Topics Covered:
- The Shooting Space and Lighting Gear
- Creating a Reflective Surface
- Positioning the Lights
- Balancing Light Levels without a Light Meter
- Bouncing Light into the Shadows
- The Negative Fill
Camera/Lens Used:
- Nikon D300
- Micro-Nikkor 55mm f/2.8 (non AF) lens
Lighting Equipment Used:
- Accessory: HeavyDuty Swivel
- FlashFire™ wireless kit
- LiteReach Kit
- LiteStand: medium
- StarFire™ Digital Flash
- The Complete Studio Kit

The Shooting Space and Lighting Gear
One of the most popular types of product images you’ll see online is called a “block-out”. Here, the object seems to float against a white background, or may sit on a white surface that fades into a stark white background.
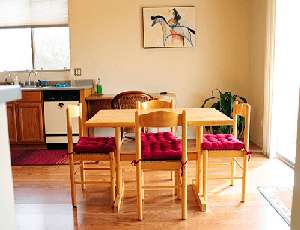
This type of shot can be difficult for some photographers to achieve well, even in a large studio using powerful flash units. But here, I’m going to show you how to do it in a 16 x 20 foot kitchen.
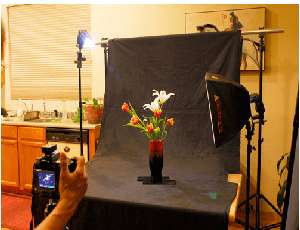
As you’ll see, I turned my kitchen into an effective studio using a simple background setup and some basic lighting equipment: three StarFire and FlashFire units and one XS LiteDome softbox.

First, I mounted two StarFire™ flashes with FlashFire™ triggers to two LiteStands via two ShoeMount MultiClamps. I then set up an extra small LiteDome®, connected the third StarFire™ and FlashFire™ to it using the Adjustable Shoe Mount Hardware and ShoeMount Multiclamp, and then attached a LiteReach™ to the ShoeMount Multiclamp. Finally, I mounted the other end of the LiteReach™ to a LiteStand via a Heavy Duty Swivel so that the unit could serve as a small boom light.


My kitchen happens to be 16 feet wide and 20 feet long, but a 10×10-foot room is all the space you need to do some good tabletop shooting. Your kitchen, a spare bedroom or the garage can easily be set up as a tabletop studio.
For this setup, I suspended a four-foot-wide roll of white seamless paper using two LiteStands and a cross bar. The LiteStands were set about two feet back from the edge of the table. This would allow the paper to take on a gradual curve as it came into contact with the tabletop and provide enough room behind the product so the background lighting would not interfere with the light falling on the product.


Creating a Reflective Surface
I then placed a piece of high gloss white board on top of the backdrop paper on the table. You can find something similar at your local hardware or art supply store. Be sure to choose something that reflects light. White Plexiglass is also a great surface to use. If you can’t find any of these materials in your area, try a piece of window glass.

Positioning the Lights
Next, I positioned each LiteStand-mounted StarFire™ on either side of the table that pointed at an imaginary “X” spot in the center of the backdrop. I adjusted the power on each StarFire so that the white paper would be exposed as pure white.


I decided that the main light for this shot should be the extra small LiteDome® placed overhead. I roughly positioned the lights prior to setting the product in place. But given that I had spent a good deal of time pre-visualizing the end results, any adjustments to the lighting would be relatively minor. As you gain experience in this type of shooting, it becomes easier to see the end results in your head. Then all you have to do is choose the camera angle, determine your light direction and then position your subject matter.
For the lesson, I decided to create a visual tribute to Nikon film cameras, which have served me well over the years.


Once I had the cameras positioned, I fired a test shot to see how the balance of light was looking. I didn’t use a light meter here, as I figured most who would be shooting like this wouldn’t be other. Instead, I’d use the LCD in the camera to review the light levels.


Balancing Light Levels Without a Light Meter
In reviewing the test shot, I saw that the background was too bright, as the light was causing “ghosting” along the perimeter of the cameras. StarFire™ flashes can be adjusted by increments of 1/7th of a stop at a time. I had the power of the main LiteDome® flash already set to its maximum power level, which was too low compared to the two StarFire™ units pointed at the backdrop. To bring the light levels into balance, I lowered the power on each of the background flashes.
Digital photography allows you to use the trial-and-error method in real time. If you are not using a light meter, the only way to ensure your lighting is where you want it is to shoot test frames and review the results in camera. Then you can make adjustments to your power settings and/or aperture setting to balance out the lighting. By recording your distances, camera settings and strobe settings, you’ll be able to recreate similar shots in a fraction of the time.
In this next example, you can see that I came in a little tighter with the crop and achieved a better lighting ratio than before. You can also see that the light from the window affected the exposure level along the right edge of the cameras, since I had the shutter speed set to a relatively slow 1/60th of a second. I wasn’t sure if I liked the addition of the ambient light or not, but I knew that I could either minimize it or eliminate its influence entirely, depending on how fast I wanted the shutter speed to be.

Bouncing Light into the Shadows
Next, I decided to add some reflectors to bounce light into the front of the film cameras and increase the exposure value in the shadow areas. I positioned some silver bounce cards on either the side of the set to “kick” light from both the LiteDome® and the background lights back into the shadow areas of the film cameras.


Below, you’ll notice that I moved the overhead LiteDome® toward the rear of the camera arrangement slightly in order to get better light bounce into the fill cards.

But when you angle a light towards your lens, there’s always a risk of getting flare. To prevent this, while simultaneously bouncing a little more light into the top of the film cameras, I set up another bounce card just above and in front of the camera lens.

Below, you’ll notice that I moved the overhead LiteDome® toward the rear of the camera arrangement slightly in order to get better light bounce into the fill cards.
Keep in mind, when you angle a light towards your lens, there’s always a risk of getting flare. To prevent this, while simultaneously bouncing a little more light into the top of the film cameras, I set up another bounce card just above and in front of the camera lens.

I also positioned another bounce card below to bounce light into the bottom areas.
The Negative Fill
For the final touch, I added black cards to either side of the cameras to keep the window light from spilling onto the cameras, as well as to create a “negative fill.” Even though my set was designed to project and bounce light from almost every possible angle, I also needed to throw in some light-absorbing black cards in order to help define the chrome edges of the cameras. It’s all about balance.

Here’s the final result, which required only minor editing touches in Photoshop to clean up the background and foreground.

There are a number of approaches to accomplish a block-out. In the end, the product is the determining factor of what will work best. Understanding how to shoot on white is a mainstay of advertising photography and meets the growing need for better imagery on websites. For those just starting out, this lighting setup provides you with a great starting point to meet your small product photography needs or those of your clients.
Photographed and written by John Beckett, contributing instructor for PhotoflexLightingSchool
Edited by Ben Clay and the Adorama Learning Center
To see more of John’s work, visit www.j2photopro.com


