A rose I had planted recently bloomed for the first time and I was struck by the beauty of one of the buds. I wanted to shoot a shallow depth of field image with only the center of the bud sharp.
I made several exposures at different depths of field, but was disappointed to find that the wider apertures were not as sharp as I wanted in the center. The depth of field in close-up images is very small and the petals in the center were not in a sufficiently flat plane for all to be sharp.
The only image that gave me the sharpness I wanted in the center was at f/22, but in these the rest of the rose didn’t have the gossamer softness I liked at f/2.8 to f/4. I could have composited two or three exposures with different depths of field but I decided to use one and simulate shallow depth of field by blurring the parts of the image away from the center. Then I decided to make the center stand out even more with further sharpening.
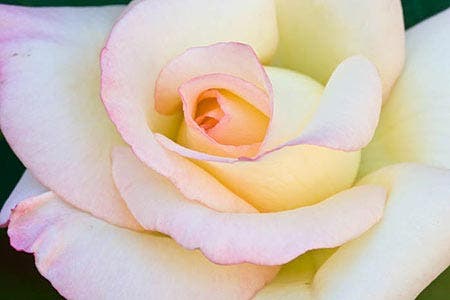
Here is the original image, which is not very dramatic.
I’m using Adobe Photoshop CS3 but you may be able to use other image editors. Of course, menus will be different in different programs and versions.
My first step will be to blur the outer petals, but before that I wanted to get rid of the distracting dark areas in the corners. It was easy to clone them out; I didn’t have to be obsessive as the areas would be blurred, but I didn’t want to be too sloppy either. There are several ways to blur the image:
- I can make a selection and blur the selected area directly on the Background layer.
- I can duplicate the Background layer and blur the entire image (with no selection) and then mask part of it to reveal the original sharp layer underneath.
- I can make the Background layer a Smart Object and blur the entire image. Because of the special properties of a Smart Object layer I can not only mask the blur effect, similar to the first method above, but also change both the mask and the blur amount at any time, similar to an adjustment layer. Let’s look at the first two, because the Smart Object method isn’t readily amenable to the sharpening I want to use after the blurring is done. I’ll show you Smart Objects in another tutorial.
Blurring a selected area
The simplest way to do the blur is to make a very soft-edged selection of the center area (because this circular area is the simplest shape to select), inverse the selection to apply to all the rest of the image, and do a Gaussian blur. I could make a circular selection with the Marquee tool and feather it, but I prefer the Quick Mask method, which lets me see and adjust the feathering amount directly. I chose a fully soft (zero percent hardness) brush about the size of the area I wanted to keep sharp. I made sure the foreground color (near the bottom of the Toolbar) was black and the brush was at 100 percent opacity. I hit the Q key to go into Quick Mask mode and painted over the center area.

In this case I only needed to make a single click with the brush. You can see the circle showing the brush size in the figure above. I hit the Q key again to come out of Quick Mask mode to get a selection, shown below. The circle of marching ants is the point at which the selection will be 50 percent. You can see that point is a little smaller than the indicated brush size.

I had to do an extra step before the screenshot shown above, which you might or might not need to do. When I came out of Quick Mask mode I had the marching ants only around the center circle, not around the edges also. That meant the circle was the selected area, and I wanted everything except the circle to be selected. So I had to click on Select > Inverse. This was necessary because I have changed my Quick Mask default so the area I paint will be selected; the default is to have the painted areas be protected. If you haven’t changed the default you won’t need to inverse your selection.
I prefer to set Quick Mask for the painted areas to be selected rather than protected because most of the time I need to paint a fairly small area that will become a selection. To change the default, double click the Quick Mask icon in the Toolbar and check the appropriate choice in the dialog box. When you click OK to your choice you will be in Quick Mask mode; if you don’t want to work there further just hit the Q key to get back out.
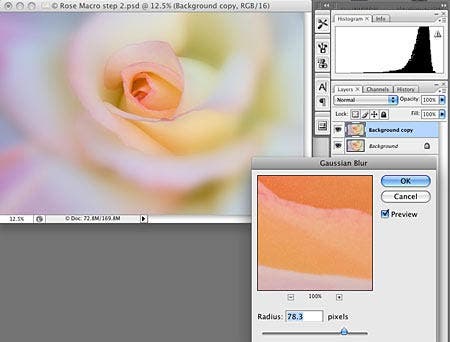
I made a copy of the Background layer to work on, so if I didn’t like the blur I could go back to the original, duplicate it again and try a different amount or selection. Other than sitting around as a safety net, the original Background layer isn’t doing anything. Then I clicked on Filter > Blur > Gaussian Blur and moved the slider until I liked the result. The marching ants made it hard to see the effect so I hit Cmd-H (PC: Ctrl-H) to hide them. (Pitfall: when you hide a selection it is easy to forget it is there. The same key command will un-hide it.) When I had the blur I liked I hit Cmd-D (PC: Ctrl-D) to deselect.
Masking a Blurred Layer
A more flexible approach is to duplicate the Background and blur the entire layer and then mask it in the center to reveal the underlying sharp layer. This method has the advantage that you can tweak the mask as much as you want, any time you want, without causing any degradation to the image. This is done by painting with black or white brushes of whatever size, hardness and opacity you need. (See my tutorial, “Refining Selections”). A disadvantage is that in the large area where the mask is of partial opacity you will see a ghost image of the sharper underlying layer. In this case the underlying area is not so sharp that this is a major problem. Here’s how I did it.
I duplicated the Background layer and did the same Gaussian Blur as above. Then I added a mask by clicking the mask icon at the bottom of the Layers palette:
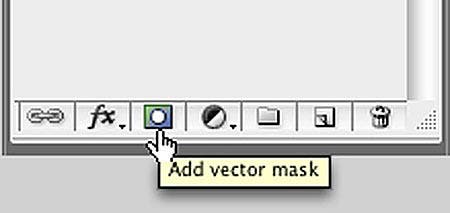
The mask this created is circled in red in the figure below. Make sure the mask thumbnail is active, not the pixel thumbnail to its left. (It will be active if you just made it.) Then I took a “black” brush (the Foreground color in the Toolbar is set to black) and painted over the area of the image I wanted to “erase” on the blurred layer. If I painted too far I just switched the brush to white and painted back over the extra area. The mask thumbnail started out all white and on its thumbnail you can see the black area I painted. The size of the brush is shown in the image window. I chose a large, fully soft brush to get a large gradient at its edges.
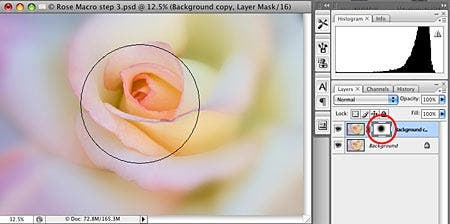
The mantra for masks is: Black conceals and white reveals, similar to a stencil made of black paper. Here the black area has concealed (think erased, only reversibly) part of the blurred layer, allowing the original sharp layer underneath to show. You can tweak the mask as much as you want, even next year. One caution: Link the two layers so you don’t inadvertently move the top one. Select both layers and click the link icon at the bottom of the Layers palette. It is the one on the left in the second figure above.
Sharpening the center
After I finished the blur I wanted to further sharpen the center part that shows on the original layer. Using Unsharp Mask or Smart Sharpen isn’t very dramatic with this image; they sharpen too subtly. The High Pass method is more dramatic for the fairly large details here. I duplicated the Background layer again, making a new layer below the blurred and masked layer. (You can see it as Background Copy 2 in the figure below.) Then I went to the top of the Layers Palette and changed its mode to Overlay (circled in the figure below). Don’t worry about the very oversaturated look you will get. It will go away in the next step. I zoomed in on the center of the flower, to about 25 to 50 percent. Then I clicked on Filter > Other > High Pass. Setting the blending mode first enabled me to preview the effect as I changed the Radius slider for the filter.

Here are the before and after views. You can see the High Pass filter method sharpens by increasing contrast and punching colors along the edges. In some cases it can be an elegant alternative to the more traditional sharpening methods, which work similarly but have a different look. If I had chosen a smaller radius I would have gotten a more traditional sharpening look, with finer detail brought out.

I zoomed back out to make sure I liked the sharpening amount in the context of the entire image. I decided the shape of the bud could be improved so I double-clicked the Background layer to make it into a regular layer that I could distort. I made sure all the layers were linked so all would distort together and clicked on Edit > Transform > Distort and pulled the lower left corner down and to the left. This made the bud less angular and more round.
Then I added the final touch of a soft edge using OnOne PhotoFrame Pro. I used the position of that frame to do a final crop. Here’s the result. I think it is an improvement over the starting image.

Diane Miller is a widely exhibited freelance photographer who lives north of San Francisco, in the Wine Country, and specializes in fine-art nature photography. Her work, which can be found on her web site, www.DianeDMiller.com, has been published and exhibited throughout the Pacific Northwest. Many of her images are represented for stock by Monsoon Images and Photolibrary.
© 2009 Adorama Camera, Inc.
