To make a visually stunning rock band image, Kevin Kubota was ready with a plan, a location, and the right gear.
Guest author: Kevin Kubota
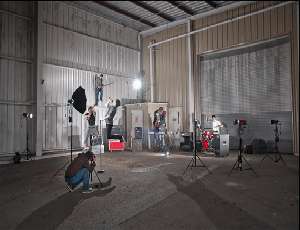
Working with the band Lyible, from Bend, Oregon, I set up the shoot on a loading dock that was open on two sides to the street. This six-man band was spread out over a huge area, so I employed the use of nine lights. Each member of the band was lit separately with a flash that could freeze the movement.

Just yelling, “ACTION!” wasn’t enough to make an exciting shot. I had to work with each band member on specific moves that would look good with the other subjects. This lesson reveals the challenges and solutions that produced a great final image.
Behind-The-Scenes Video:
PhotoflexLightingSchool- Kevin Kubota Shoots a Band from Photoflex on Vimeo.
Selecting Location
How do you capture the energy of a hot young alternative rock band? Let them play loud music and scream! My assistant Ben and I set up this fun shot of Lyible, an up-and-coming band in Bend, OR. We found a loading dock location that was open on two sides to the street, which would be perfect for the image I had in mind and which would give us easy access to the location.
While Ben and I unloaded the lighting equipment (which was rather extensive), Lyible set up in the background.

Lighting the Scene
The lighting arrangement for this shoot was relatively complex. In order to get the right exposure, I needed to play around with the set and figure out the best way to light each member.
The small OctoDome® was the perfect light modifier for the lead singer. We wanted the light source to be directional, with enough falloff from head to toe to create emphasis on the face and gradual darkening towards the feet. We also didn’t want the light to spill wildly all over the set, as it would with an umbrella or larger soft box. The shape of the OctoDome® is more like a spotlight, maintaining the drama and direction of light, while still affording some softness to the shadows for beautiful chiaroscuro! We positioned the OctoDome® so that when the lead singer jumped in the air, his head would be level with the center of the light.

Coming in from the right side, we used another TritonFlash™. We initially tried it further back, shining through a wire grid to cast some shadows on to the background of the set, however, there was so much going on already in the background that this didn’t really add to the image.

So, we removed the wire grid and brought the TritonFlash™ in closer where we could focus the light on one band member instead. The attachable reflector provided just the right amount of coverage and light spread.

To cover the entire band over such a large area, I needed more lights. We used a combination of Photoflex® TritonFlash™ battery strobes, StarFlash® 300watt studio strobes, and Nikon speedlights to achieve our goal. The StarFlash® units are very easy to use and adjust. We plugged them in to portable A/C battery packs and simply taped our existing grid spot modifiers to the front of them for more focused beams of light. Each band member got their own moment in the spotlight, so to speak.

We used the Photoflex wireless FlashFire™ triggers to get all the lights to fire in sync. They are easy to use, basic units, with very little to worry about figuring out.
The bass player got ambitious and climbed up on a beam. In the final image, it looks like he is jumping off, but he is actually quite safely “strapped” in by the metal cross-rods.

In order to make this complex shot work, we had to dial in each light for an equal exposure on each band member. We didn’t want much of the light to spill onto the background, so we used grid spot adapters and other modifiers to focus the lights just on the players and some on the amplifiers. The ambient light took care of the fill, which was one of the benefits to the location opening up to the street on two sides.
One key to making setups like this easier is to be prepared with lots of Gaffer tape, clamps, step ladders, straps, and other grip equipment. We had to clamp a Speedlight up high on a beam as we didn’t have a light stand tall enough. We used gaffers tape to attach various accessory modifiers to the lights, and climbed up and down to get lights in unusual places. Be prepared, just like a scout, and things will run much smoother!

Posing and Camera Placement
When all the lights were in place and Ben and I were satisfied with the exposure, it was time for the fun part—posing! The key to this image was in the timing and expressions of the band members. Fortunately, they were full of enthusiasm and understood what we were going for.
To get my desired shot, I chose a low angle about three meters away from the lead singer.

My angle would accentuate the height and drama of the shot. To get everyone in frame, I chose my Nikon 24mm f/1.4 lens and had my camera set to the following:
- Shutter Speed: 1/125
- Aperture: f/4.5
- ISO 200
In the photos below you can see the full setup and the placement of each band member in relation to my lights.


Achieving a Final
I added to the grungy feel of the image in Photoshop, using my Bor-Tex texture tools and our Photoshop Dashboard plugin. These tools gave me my final result.

Technical Notes
The OctoDome® and TritonFlash™ is a winning combination! It’s a lightweight kit and its portability makes it my first choice for location lighting setups. I’ve been able to cut my lighting bag size and weight in half by switching to the TritonFlash™. I’ve lost nothing in power, but gained flexibility and accuracy. The TritonFlash™ units have very consistent light output compared to that of my previous location lighting setup. The only problem was that I had to buy a new, smaller carry bag – which is not so bad, as I’m kind of a bag freak anyway.
For more lighting tips and tricks, check out my blog at KevinKubotaBlog.com and make sure to look for to my new book, Kevin Kubota’s Lighting Notebook, 101 Lighting Styles and Setups for Digital Photographers.
Images and text by Kevin Kubota, award winning wedding and portrait photographer and contributing lesson writer for PhotoflexLightingSchool.com®.
Models: Lyible
Assisted by: Ben Edwards
Related Products:
- Photoflex OctoDome NXT Extra Small Location Kit
- Photoflex StarFlash® 2 Lite 300watt Umbrella Kit w/ Case: Two StarFlash 300ws Monolights, FlashFire Sender/Receiver Kit
- Photoflex TritonFlash Kit, 300 W/s Strobe Head & Lithium-ion Battery Pack, 35W Modeling Lamp
- Photoflex 3′ Octodome nxt Softbox Kit with 3′ OctoDome nxt, Starlite QL, OctoConnector, 8′ LiteStand, 1-500w & 1-1000w Lamp, Gig Bag
Learn more at the Adorama Learning Center:
- Concert Photography: Tips from the Pit
- Photo entrepreneur and FORMER wedding photographer, Kevin Kubota—AdoramaTV

-1.jpg)
