When preparing for a photographic journey and researching a destination or location, the Internet is your best friend. Here’s how widely-published travel photographer Michele Westmorland prepares before she goes.
No matter how often I travel, I spend more time doing research beforehand than I do on location. Think that sounds like a burden? Actually, it can be a fun chore-like a “Where’s Waldo” of scouting without having the benefit of actually being on site.
Develop a self-assignment
It is no mystery that the Internet is the “go-to” place for basic information searches. But where do you start? Give some thought to the direction or theme of your photo shoot. This will help weed out many locations so that you can concentrate on getting the images that meet your goals and not just a plethora of “happy snaps.”
One of my trips to Croatia was planned as a travel stock photo shoot. I investigated many areas of the world and by watching travel magazines noticed that Croatia and Slovenia were up and coming destinations. It took several months but in the end, by applying all the basics listed in this article, I came home with plenty of usable images.

Canon 5D Mark III using the Canon EF 24-70mm f/2.8 lens, ISO 200 1/320th second at f/4.5.

Canon 5D Mark III with Canon EF 24-70mm f/2.8 lens, set at 70mm, ISO 200 1/100th second at f/6.3.

Mix it up! I switched to the Canon 8-15mm Fisheye Zoom to give the same scene as above a totally different look.
Read magazine articles on the destination written in the past 2 to 3 years. You can identify the most popular and up-and-coming spots for the area as well as the over-photographed.
Create research files for destinations of interest. I have folders already set up to collect tear sheets and articles I come across. You may be on a flight to one location and the “In-Flight” magazine in the back of the seat has a story about your next destination. I’ve also collected many handouts at travel shows. If there is a travel show coming to your area–don’t miss it. These can provide some of the most important logistical information and give you possible contacts within the country.

Plitvice Lakes in Croatia provides stunning waterfalls. Canon 1D Mark III (discontinued) with the Canon 24-70mm lens on a tripod. ISO 200, Slow shutter speed at f/6.3.

Make sure you collect detail shots. The lavender bouquet bags were photographed in a small local market. Same camera and lens as above.
Check stock agency and portfolio sites. The last thing I want to do is repeat an image that been photographed to death. It may be a popular photo opportunity but can you shoot it differently? Put your own stamp on your work and make it compelling.
Utilize Google Maps. Having a lay of the land before you arrive gets you on the ground running. The information and visuals provided through mapping sites can also give you a great reference of where to shoot from. Your stress level will be much lower if you know about obstructions or traffic issues ahead of time. All of this helps to make you more efficient once you reach your location.
Know the weather patterns for the time period you plan to travel. This is easier said than done in some places. It helps to know the seasons for a destination or if they even have them. When traveling to tropical locations, it is not about whether it is spring or fall but whether it is dry or monsoon season. Even so, always be prepared for the unexpected. Unseasonal weather changes have given me some not so pleasant surprises on more than one occasion. Maybe that image of stormy seas and wind-blown palm trees will be more valuable than the perfect puffy-cloud day?

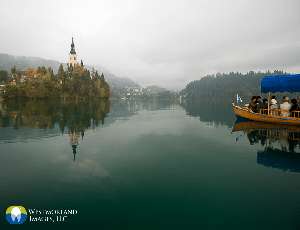
Fall was the perfect time to be in Bled, Slovenia. The fall colors and foggy/overcast sky provided for saturated colors. Canon 1D Mark III with a Canon 16-35mm f/2.8 lens. ISO 200, 1/125, wide open on both the shot above and the one below.

Pay attention to the sun and moon phases. For me, this is the single-most important information I can have. I’ve traveled to city locations where I need to get the perfect dusk light but if I don’t know the sunset time, I will miss those few minutes I may have to set up and shoot the perfect twilight scene. Moon phase is also an important element. On a recent trip to Botswana, I knew that I would have a full moon while in the Kalahari Desert. A blood red sphere adds a lot more impact to the photo than a tiny sliver!

Dusk in Dubrovnik: Long exposure on a tripod with the Canon EF 24-70mm lens, 5 seconds at f/9.

Moon Over Kalahari: Two exposures. The moon was shot with a Canon 500mm f/4 L IS II lens and combined that with the photo shot with the Canon EF 24-70mm lens. In the composite, the moon was placed in the exact location where the moonrise occurred.
Talk to friends. Interview your friends if they have traveled to your chosen destination. Don’t forget about acquaintances that may have family history in the area as well. What do they find noteworthy and completely memorable?
Do not forget about cultural celebrations. It is not all about buildings or the landscape. People stories help to give an assignment a well-rounded view and add the human element. What’s happening in the area? Bali is a perfect example of a location with lots of cultural interest. Hindus celebrate the full moon each month by wearing colorful dress and making beautiful offerings at the temples.


Fave Glass: All images photographed with a Canon 5D Mark II and a Canon EF 24-70mm f/2.8 lens. From big scene to details, this is a great lens for all occasions.
Respect the Local…and the Locals
Understand the customs and traditions. The opportunity of photographing cultural celebrations comes with a responsibility. Make sure you are not an intruder. Learn what is acceptable to photograph, especially where religion is concerned. Ask permission to photograph inside temples or churches. Ask permission to photograph individuals. Ask permission to photograph children. Take the time to learn the basic greetings and etiquette—in their language.
Know the local flora and fauna. For goodness sake, if you are going to photograph wildlife please thoroughly research their behavior and environment. Take care to shoot ethically, which means that you do not disrupt behaviors, disturb nests, or destroy plant life—and leave quickly if the animal becomes stressed by your presence. Even if you do not plan on photographing animals it is a good idea to know what you might come across.
Hire a guide! This may initially seem like a costly endeavor. However, it can save you money in the long run. Often, the guides I hire on location get me to spots that either have not been photographed before or are a totally new perspective on a popular location. Even more important is the driving they do. I have found I cannot concentrate on finding the right location if I’m stressed about driving in unfamiliar territory. Having the stress of navigation and unfamiliar rules of the road off your shoulders allows you to focus on the photos you are creating. It also feels good to know you are supporting the community by hiring a local guide. When it comes to communication, your guide can help you out in potentially embarrassing situations where you don’t understand the language or customs.

Guides help: Canon EOS 1D Mark III, EF 24-70mm f/2.8 lens, ISO 100, 1/200th second at f/2.8. I used a shallow depth of field to isolate the singer. This image could only been achieved with the help of my guide to communicate. I was even able to get a model release!
Be prepared to shoot some video. As a still photographer, I must admit that it can be a challenge to switch between creative modes quickly. To help with this issue, practice shooting footage at home in a variety of techniques. In addition, have one of your custom settings ready for video. Getting cultural song and dance can certainly add to any story telling. For better sound, use an external microphone.
Gear to Take
As a Canon shooter, I take two camera bodies – Canon 5D Mark III and Canon 5DMark II (which will soon be sold and upgraded to the fantastic III)
If you have to pack light, make sure you include zoom lenses that give you the range you will need.
I prefer the Canon 16-35mm f/2.8 lens for landscape and cityscapes. The Canon 24-70mm f/2.8 is my go to for mid-range and people. When my beautiful old Canon 70-200mm f/2.8 finally died, I replaced it with the much lighter Canon 70-200mm L IS USM f/4. I found this new lens to be tack sharp and still provide what I need for long range shots. You can always add a 1.4 teleconverter and be covered at even further distances. Of course, I include other lenses if I have room based on what I think I will use the most on that particular trip. These include the Canon 500mm f/4 lens for any magical birds or wildlife, Canon 8-15mm fisheye for creative work, either the Canon 50mm f/1.4 or Canon 100mm f/2.8 L USM macro for detail and the Canon 24mm Tilt Shift lens for architectural shooting.

The Canon 24mm Tilt Shift lens is perfect for architecture and interiors. Using it wide open at f/3.5 also allows for a select focus image.

A tilt shift lens even works for landscapes! At f/22, it helped to bring the mountains in closer while keeping all areas in focus.


Even on a safari, you need to understand the environment you are traveling to. Plan on using wide angle along with the big lenses to complete the story. I used the Canon 5D Mark II with a Canon 24-70mm f/2.8 lens for the safari vehicle to establish a sense of place. The saddle-billed stork was photographed with the 500mm f/4 lens.


