Everything you need to know to bring home great shots.
Indoors: Whenever possible, try not to use a flash for indoor shooting. The harsh light from a direct flash will often make your pictures look (you guessed it!) harsh. If you do have to use a flash, bounce the flash off the ceiling. For that technique, you’ll need a flash with a tilt head. Bouncing the light will spread and soften the light for a more even and flattering effect. This barbershop photograph is a flash shot, taken with bounce flash lighting.
For indoor, natural light photography, a tripod is necessary when shooting at slow shutter speeds (usually below 1/30). For hand-held pictures, you’ll need to use a high ISO setting (maybe 400, 800, or even higher).
To help steady your indoor shots, try using an image stabilization (IS) or vibration reduction (VR) lens. These lenses, because they reduce the effect of camera shake, let you shoot at slower shutter speeds than are usually possible for handheld photography. The general rule for handholding a lens is this: Don’t use a shutter speed slower than one over the focal length of the lens. For example, when using a 28mm lens, don’t use a shutter speed below 1/30. With the IS lens, you can handhold a 28mm lens at 1/15 sec, maybe even 1/8 sec, and still get a sharp shot. (Keif’s Barbershop, near Camden, Maine)
Jungles: Deep in the jungles (or the rain forest) you have to deal with really dim lighting conditions. When you go, be prepared to shoot at relatively high ISO settings, maybe even as high as ISO 800. (Survival Camp, Ariau Towers, Amazonas, Brazil)
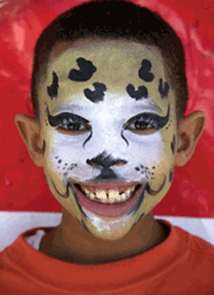
Kids: When photographing kids while traveling, keep in mind this saying: “Silence is deadly.” During an impromptu photo shoot, keep taking to the kids, even if you are using a guide/translator. Also keep in mind the saying: “The camera looks both ways; in picturing the subject, we are also picturing a part of ourselves.”
In other words, the feeling and attitude you project will be reflected in your subject. Another tip is to “see eye to eye,” that is, get down to the child’s level when you take your picture, rather than standing up and looking down at the child. (Boy with cat makeup, Tampa, Florida)
Mind Your Manners: When you travel, you need to respect your subjects and be respectful of local customs. When you respect your subjects, they will respect you, helping you get the kind of pictures you are seeking. Reading about local customs and religions gives you an understanding of what to expect on site. (Buddhist monk, Angkor Wat, Cambodia)
Nighttime Shooting: Cities come alive with lights after the sun goes down. To capture the lights, I recommend setting your DSLR to ISO 400 and the White Balance to Automatic (due to the different light sources). ISO 400-or-faster color negative film also provides better color tracking with mixed or unusual light sources.
To add drama to nighttime city photographs, use a slow shutter speed (perhaps as long as 30 seconds) to get taillights streaking through a picture. Those long shutter speeds will require a tripod. Check your camera’s LCD monitor to make sure that bright lights are not overexposed. If they are, use your camera’s +/- exposure compensation control and reduce the exposure accordingly. Finally, remember what your mother told you: Wear white at night for safety. (South Miami Beach, Florida)
Owls and Other Birds: For close-up shots like this in the wild, you’ll need a telephoto lens. As a basic “bird lens,” I’d recommend a 100-400mm zoom. To get an even tighter shots of a far-away bird, use a 1.4X or 2X teleconverter, which effectively increases the focal length of the lens by 1.4 times and 2 times, respectively.
To light subjects in the shade and to add a catch light to a subject’s eyes, use a flash with a flash (a device that fits over the flash head and increases the flash-to-subject distance range). (Screech Owl, Anna Maria Island, Florida)
Practice: When you go on location, you often see photo opportunities that can be gone in the blink of an eye. If you have to fumble around with camera settings, you’ll miss the shot. I’ve seen that all too often in my workshops.
If you practice before a trip, to the point where making camera adjustments becomes second nature, you’ll get a higher percentage of “keepers” when you travel. Practicing, however, goes beyond technical camera adjustments. If you have not photographed strangers for a while, photograph your family, friends and neighbors.
If your travels will be taking you to a foreign city, make a trip to your local big city and shoot throughout the day. If close-up nature photography is your passion, spend time experimenting with lighting to see how best to light your subjects. Taking pictures on location is like jazz piano improvisation; knowing what to do n becomes almost automatic. (Rick Sammon photographing in the field)
Quality Control: Novice digital photographers often think that getting a camera with the highest number of megapixels and shooting in the RAW mode will give them the highest quality image. Well, those factors do affect image quality. However, they are not the only things to consider when it comes to this crucial factor.
The quality of the lens not only affects the sharpness of an image, but can also affect how much light reaches the corners of the image sensor or film frame. When light is reduced in the corners, the image will look darker in those areas. How a digital file is processed in camera also affects the quality. Usually, more expensive cameras have higher-quality image processors than relatively inexpensive cameras.
In addition, how you process an image in your image-editing program impacts image quality. For best results, save and work on your pictures as TIFF files, which is a lossless way to save pictures. If your imaging program can open 16-bit files , go for it. You’ll get less “banding” in shadow areas and you’ll have a file with maximum color depth. Finally, when sharpening an image, always sharpen as a final step. (Crowned pigeon, San Diego Zoo, California)
Rainy Days: To protect your gear when shooting in the rain, travel with a camera bag with a water repellent, foldout cover. For in-the-rain shooting, use large sandwich bags with openings cut out for your lens and viewfinder. For the ultimate in waterproof protection, check out the waterproof plastic housings from EWA marine. Be careful that your camera does not get wet! Digital cameras don’t like moisture. (Roadside restaurant, Anganguero, Mexico)
Rick Sammon is the author of The Complete Guide to Digital Photography, published by W.W. Norton. He also recently completed two interactive CDs, Photoshop for the Outdoor and Travel Photographer and Photoshop Makeovers, distributed by Software Cinema. For information, please go to www.ricksammon.com.


