If your photography interests lie in taking outdoor and travel photographs, you have come to the right place. Beginning with this article, I’ll share my best photo tips and techniques, from A to Z.
< Aerials
When shooting from an airplane, you’ll most likely be shooting through Plexiglas. For sharper shots, ask for the door to be removed when you’re shooting from a small plane. To avoid reflections on the Plexiglas, cup your hand around your lens and hold it near the window, or use a rubber lens hood. Wearing a black shirt will also help reduce reflections. Conversely, wearing a white shirt will create bright reflections that can ruin your shots.
When taking pictures from an airplane, especially a small one, you don’t want any part of your upper body to touch the window, or any part of the interior of the plane for that matter. If your upper body does come in contact with, say, an armrest, the vibration from the plane can be transferred to your camera, causing camera shake, which, in turn, can cause blurry pictures. To reduce the effects of camera shake, use an ISO setting that gives you a shutter speed of at least 1/250 of a second. I usually set my ISO to 200 on a sunny day. When it comes to lenses, use a medium wide-angle setting for sweeping views and a medium telephoto for tighter shots. (Palau, Micronesia)
Behind-The-Scenes Shots >
We all love to zoom in on our subjects to get pictures with impact. But if we take behind-the-scenes shots, we add a personal touch to our slide shows and photo albums, giving the viewer the feeling of being there. (On safari in a South African National Park)
< Caribbean Carnivals
Caribbean carnivals are great fun and offer great photo opportunities. You’ll find hundreds of people dressed in colorful costumes. The key to getting good photos is to actually get into the slow-moving parades that pass through the streets. To reduce harsh shadows caused by direct sunlight, use a flash for daylight fill-in flash photography. If you don’t have a flash that offers variable flash output (needed for daylight fill-in flash pictures), or don’t want to use a flash, wait until the end of the parade (or get there early) and ask your subjects to move into the shade. (Performer, Carnival, St. Martin)
Deserts >
Deserts, as well as beaches, offer two major challenges for photographers–dealing with bright sunlight and lots of sand. When direct sunlight falls on the front element of a lens, it causes lens flare. At its worst, lens flare looks like a bright, glowing point in a scene that is distracting at best. At its worst, it can adversely affect contrast, making the overall picture look soft. To help avoid lens flare, use a lens hood or shade your lens with your hand or a hat.
As far as dealing with sand, which can get into the focusing and zooming rings of lenses, avoid sand exposure at all cost. Never placing your camera bag down in the sand will help keep your gear sand free.
When changing lenses in the desert or at the beach, try to select a location that is protected from the wind. The last thing you want is getting even a single grain of sand on your camera’s image sensor (only possible with digital SLRs), which will look like a large blob in all your pictures. Also, change lenses very carefully. I was teaching a workshop on the beach not long ago when one of my students, while changing lenses, actually dropped one of his lenses in the sand! This is really asking for trouble. (Sunset, Rajasthan, India)
< Exploring a Location
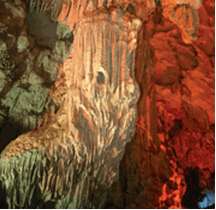
Part of the fun of taking pictures outdoors is exploring a location. On your explorations, being prepared to capture unexpected sites is a key element in getting the best shot. On a trip to Ha Long Bay in Northern Vietnam, I packed a variety of lenses and accessories, including my flash. Without my flash, and fresh batteries, I would have missed capturing this quite unexpected view–a massive cavern inside the island that was discovered accidentally by a fisherman a few years before my 2003 trip. (Cavern, Ha Long Bay, Vietnam)
Fun Shots >
It’s easy to get caught up with taking the best possible pictures when you’re on location. However, if you try too hard, and don’t have any fun, you may not get the best pictures, or even get a high percentage of good pictures. So, my advice is to have fun! And when you are having fun, record the moment. In later years, your fun shots may mean more to you than your serious photographs. A flash was used to lighten my face in shot at right. (Author and photographer Rick Sammon, on a mule ride in the Grand Canyon – before the saddle sores.)
< Glare on Glass and Water
The #1 filter you need for outdoors and travel photography is a polarizing filter. A polarizing filter can reduce or even eliminate reflections on glass and water. It can also make outdoor pictures look sharper, because it can reduce reflections in atmospheric haze. Polarizing filters are most effective when the sun is at a 90?? angle to the subject. Warming polarizers (which provide a warming effect as well as polarization) are also available. Nik multimedia, Inc. offers a polarizing filter in its Photoshop Plug-in, Color Efex Pro 2.0. (Colorado River, Mobah, UT)
Heat and Humidity >
Digital cameras don’t like heat and humidity. When an image sensor heats up, the colors it records may not be accurate. And when it comes to humidity, if you have a digital SLR, don’t change lenses when you go from an air-conditioned area into a humid environment. If you do change lenses under these conditions, condensation can build up on the image sensor (actually on the filter over the image sensor) and fog your pictures. (Taj Mahal, Agra, India)
Rick Sammon is the author of The Complete Guide to Digital Photography, published by W.W. Norton. He also recently completed two interactive CDs, Photoshop for the Outdoor and Travel Photographer and Photoshop Makeovers, distributed by Software Cinema. For information, please go to www.ricksammon.com


