By Mitch Goldman
This is a thrilling time to be crafting images. Even the camera in your phone is capable of doing things that were not even dreamt of a few short years ago. But we camera operators are sometimes so taken with our magnificent digital tools that we forget that there are simple, practical solutions available that are not just cheaper than their digital counterparts but are actually more effective.
Let’s take the example of excessive contrast. You need to take a portrait photo or a talking head video on a sunny day and the light and shadows are overwhelming that little chip’s ability to render fine gradations of chiaroscuro (the dirty little secret of digital media is that the dynamic range is often far lower than it was in the analog era; many digital cameras do not render shadow and highlights as well as film does, and film falls far short of what the human eye can see). Instead of shooting Joan from Accounting for the company newsletter, you’re shooting Rocky Raccoon. You’re wishing you had some diffusion on a C-stand but all you have is some ABC gum. Now Joan is looking at you like a cat watching a football game. The pressure’s on: what to do? Well, there are all kinds of very effective post-production tools for this in Premiere Pro, Photoshop and probably right in the phone in your pocket but are there some simple steps you might take to get it right in the camera rather than needing to fix it later? (I think you know the answer to that question). Here are half a dozen of them:
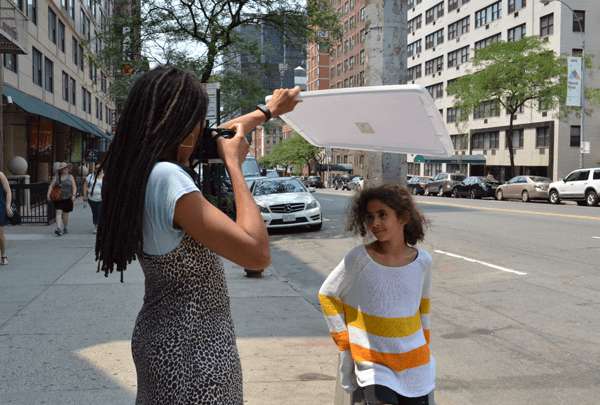
1. You really should bring a few simple tools, like a bounce card (or a FlexFill or a T-shirt or whatever you can find). Set your bounce card below the frame to reflect light into those shadows and soften that contrast. The challenge with this method sometimes is that the amount of light, direct and reflected, can be too much for the subject. Be sensitive to his or her experience. You don’t want Joan to be squinting in the photo. (See Figure 1)
Figure 1

2. “I don’t have a bounce card. Now what?” Cross the street. Or at least look around you and see if you can’t find a shady spot in which to shoot. The shadowy side of a building or a tree will instantly eliminate this problem.
3. “There is absolutely no shade; what do I do?” Look at the ground. If you can find a light-colored sidewalk or some gravel (as opposed to dark pavement or earth) it will become your instant bounce card.
4. “Nope, it’s all dark on the ground.” Is there a light-colored wall? You can get a nice bounce effect by standing in front ofa light-colored wall that is in direct sunlight. Your subject will be bathed by lovely, soft, reflected light and won’t have to squint (See Figure 2)
Figure 2
 |
 |
 |
| Direct sunlight causes harsh shadows. |
Put your subject’s back to the sun and your back to a light-colored wall. |
A much more flattering image. |
5. “Can’t. I need that background for this piece.” Use what we call “negative fill,” i.e. something that will put a shadow on your subject’s face. It could be anything translucent or opaque that will block that naked sun. I have used a jacket, a cardboard box… whatever I can get my hands on; we grabbed the lid of a plastic storage bin. (See Figure 3)
Figure 3
 |
 |
 |
|
Before |
Using whatever is available as a negative fill. |
After |
6. “I got nuthin’. What now?” Now we play the waiting game, Or better yet, do something else first: need to shoot some B-roll? Have to cover another location? The closer to sunset that you shoot this bit, the better it will look.
So what’s the takeaway?
A. Don’t fight the sun! You will never win that fight; find a way to make the sun your friend instead.
Here’s an example: I have done lots of work in the Caribbean. The producer on one TV job was constantly scheduling the stand-ups on the beach in the middle of the day (it’s a nightmare trying to make this look good).
Me: “Y’know, this will look a lot better if we shoot it in 3 hours.”
Him: “You’re good; you’ll make it work.”
Then one day the interview subject wasn’t available until an hour before sunset. The producer wanted the sun setting over the water behind the interviewer and the subject but I turned it around; I shot them in magic hour light surrounded by gorgeous tropical foliage. Once the producer saw that footage I never had that problem again.

Portrait taken using light around sunset, a.k.a. “magic hour.”
B. Stay loose. It’s important to go in with a plan, especially when other people are involved, but don’t be so tied to it that you can’t respond to the circumstances that life gives you. Keep your eyes open; look for opportunities.
Another case study: on another job (that happened to be my first HD shoot), I was shooting the painter Leroy Neiman in his fabulous studio on New York’s Upper West Side. I had just finished lugging my lights and stands and sandbags through the building’s basement and up into his studio when I saw his north-facing, double-height windows spilling magnificent painter’s light across the room. My lights never came out of their cases as I enjoyed the play of natural light across Mr. Neiman’s well lived-in features. As digital video goes, that shoot had a painterly warmth that suited the subject perfectly.
So the next time you don’t like what you see in your viewfinder, think about what might be available right at hand to make that photo pop.


