No, this is not about camping out! Want to shoot pro-quality pictures of their pottery, figurines, model trains, or rare coin collection to be used as a record for their insurance agent, to email to a friend, or even to sell on eBay? Pro photographers who specialize in shooting small objects often “tent” their subjects. Even more universally, photographers who specialize in shooting small reflective objects, almost always “tent” their subjects. Photographic tents, unlike the camping variety, can make creating beautiful photographs of small objects easy.
The Same but Different
A camping tent is big enough to fit people inside, can be almost any color, and can be either translucent or opaque. Photographic tents are the same general shape and idea, but they are smaller and translucent neutral white. When using a photographic tent, the subject being photographed goes inside the tent while the lights and camera remain outside. The lens on the camera taking the photograph peers into the tent through a hole, slit, or rectangular opening; and the light(s) that illuminate the subject is outside the tent shining their beam(s) through the translucent surface(s) of the tent.
The side of the tent the light is aimed at diffuses the light source and the sides of the tent not being used to transmit the light become perfectly placed fill cards. There is an old photographic pun that says a photographer’s best friend is a guy named “fill” and, in a way, photographic tents provide automatic fill lighting.
A Tent For You!
Most pros build their own tents, which can be an involved process. (Want to see how? go to the end of this article.) But is there a simple tenting solution for the hobbyist who doesn’t want a spare bedroom full of bank lights, booms, acrylic sheets, and domes? Is there a ready-made, collapsible tent for someone who wants to take a quick shot of something they want to post for auction?
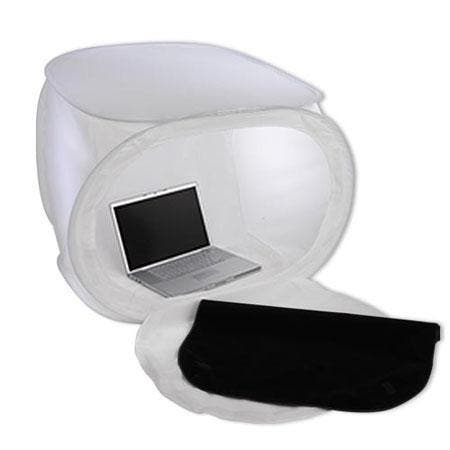
I have found a solution to many of my tenting requirements in a readymade, collapsible tent called the Digital Lighthouse by Photek. Basically, it’s four fabric-covered hoop reflectors (you know, the kind that goes “foop” when they are snapped open and are hard to figure out how to collapse) that have been squared off and arranged in a rectangular box shape. In addition to its modest price, the Lighthouse comes in small and large sizes, and features zippered openings on both a big and small side of the box.
There is a rectangular opening surrounding the zippered slot on the small side that’s held shut with Velcro. It also includes a hard plastic bottom panel within it and comes with a zippered carrying case. More importantly, it has Velcro fasteners on the upper rear inside corners to attach a background
The Digital age
I must add that I hate how almost every manufacturer has found a way to add the buzzword “digital” to their product name, trying to cash in on the current digital craze. When it says it’s a “digital” tripod or a “digital” tent does that mean it can’t be used with film? Of course not! But, even though Photek has followed this road in naming their tent, it doesn’t mean that you should overlook the Digital Lighthouse if you shoot film. I dislike the exploitive and manipulative efforts of the marketeers (sic) who are trying to jump aboard the digital bandwagon. Whether you record on film or flash card isn’t important, it’s the photographs that are! However…. I will purchase the first digital chicken that is introduced sight unseen!
The light is much bigger than the tent but the rule is tiny tents for tiny subjects! What’s in the ice cream cone tent? A coin!
The Photek Digital Lighthouse has zippered slots, an opening panel secured by Velcro, and a black velour background that can be attached to Velcro tabs inside the bank when you want a black background.
Using a single light source to photograph this model locomotive shows how easy it is to create beautiful lighting with a tent.
Hint #1:
You can put more than just the subject inside the tent! This photo has a piece of track and a painted sky background added to enhance the train. Remember, the primary reason for a tent is beautiful lighting not just to put it on a plain background.
Hint #2:
Don’t try tenting a real locomotive unless you have acres of material available and a lot of time on your hands!
Do it yourself? Building a tent can be a real pain…
Pro-still-life photographers often build their own tents, creating them in all different shapes and sizes. In its simplest form, a tent can have only one side. In this incarnation, an illustration board, whose size is determined by the subject size, is hung in front of the camera and a hole is cut in the board through which the lens “sees” the subject. Add a bank light above the frontal wall (the illustration board with the hole in it) and the tent now has two sides.
If the surfaces of the subject are highly reflective, the sidewalls of the white illustration board can be added and hung from the bank. In this example, considering the background, the surface the subject rests upon, the sidewalls, the front wall with the hole in it, and the bank light above it all, the subject is totally surrounded and all reflections off it are controlled.
The Topless Tent
Sometimes, depending on the subject and the camera position, the tent might be a topless box with walls made from sheets of translucent acrylic. One friend, who shoots precious gems, makes tiny tents, the size, and shape of an upside-down ice cream cone with the pointy end cut off (topless!) for the lens to peer through. His little bitty tents are made from materials like Lee filter’s #220 White Frost or Rosco’s Tough Rolux (both available from Adorama) and a bit of Scotch Magic Tape.
The All-Encompassing Tent
I have even seen a mentor, who had to shoot a small product with a fisheye lens, and create a spherical tent and background out of two 24-inch diameter half domes of translucent acrylic! A hole was cut in one-half dome for the fisheye lens to stick through and the subject was hot glued to a rod that out behind it (with the subject blocking the lens’ view of it) until it passed through a hole in the other half dome. I find these solutions elegant because they allow pro photographers to specifically tailor the tent to the subject.
